You picked up a multimeter. Now you are staring at a dial full of symbols and three ports that all look the same.
Do not worry. Every electrician, mechanic, and DIY enthusiast felt exactly the same on their first day.
A multimeter is one of the most useful tools you can own. With it, you can test a dead battery in 30 seconds, find a broken wire, check a wall outlet, or diagnose a car problem — all with one device.
This guide teaches you everything from scratch. No electrical background needed.
What Is a Multimeter?
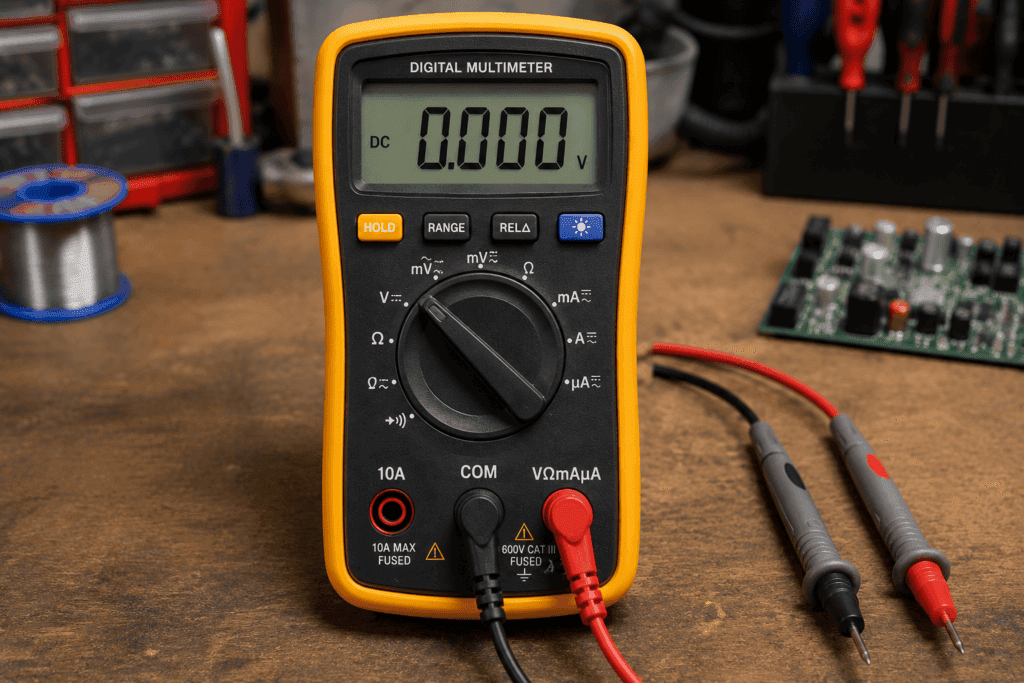
A multimeter is a handheld electronic testing tool that measures voltage, current, and resistance in a single device. Most modern digital multimeters also test continuity, capacitance, diodes, and temperature.
The name says it all. Multi means many. Meter means measurement tool. Instead of carrying three separate instruments, you carry one.
Electricians, car mechanics, engineers, and students use multimeters every day. But they are just as useful for everyday homeowners who want to test a battery, check a fuse, or find out why a lamp stopped working.
💡 Tip: Want to learn more about what a multimeter is before using one? Read our What Is a Multimeter guide first.
Digital vs Analog Multimeter: Which Should You Use?
| Feature | Digital Multimeter | Analog Multimeter |
|---|---|---|
| Display | Number on LCD screen | Moving needle on scale |
| Accuracy | High and easy to read | Lower — needs practice |
| Auto-ranging | Available on most models | Rarely available |
| Best for | Beginners and professionals | Advanced users |
| Price | $10 to $300 | $15 to $100 |
For beginners, a digital multimeter is the right choice. The display is clear, readings are precise, and most models include auto-ranging — the meter picks the correct setting for you automatically.
Parts of a Multimeter Explained
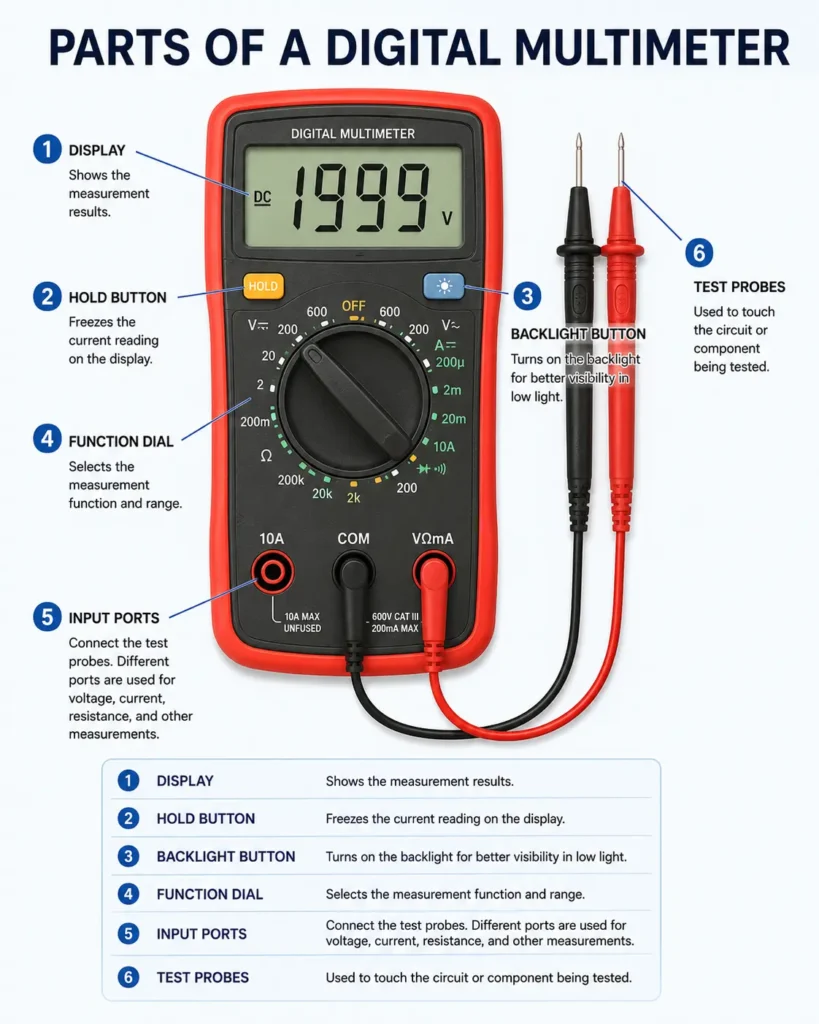
Before you take any measurement, you need to understand what each part does. Using the wrong port or wrong dial setting are the two most common beginner mistakes. This section prevents both.
The Display
The display shows your measurement as a number. Most digital multimeters show 3 to 4 digits. For example, measuring a 9V battery might show 9.12 on the screen.
If you see OL or just the number 1 on the display, it means the selected range is too low for what you are measuring. Switch to a higher range and try again.
The Dial (Rotary Switch)
The large dial in the center selects the type of measurement you want. You turn it to choose voltage, resistance, current, continuity, or other modes.
Each position on the dial has a symbol. See the symbols section below for a complete guide to every setting.
The Ports: COM, VΩmA, and 10A
Most multimeters have three ports. Using the wrong port is the fastest way to damage your multimeter or blow its internal fuse.
| Port | Label | Probe Color | When to Use |
|---|---|---|---|
| Common | COM | Black | Always — for every single measurement |
| Voltage and Resistance | VΩmA | Red | All standard measurements |
| High Current | 10A or 20A | Red | Only when measuring large currents |
⚠️ Warning: Never plug the red probe into the 10A port for voltage or resistance measurements. This is one of the most common ways beginners damage their multimeter permanently.
The Probes
Your multimeter comes with two probes — one red and one black. The black probe always goes into the COM port. The red probe goes into VΩmA for most tests, and into the 10A port only when measuring large currents.
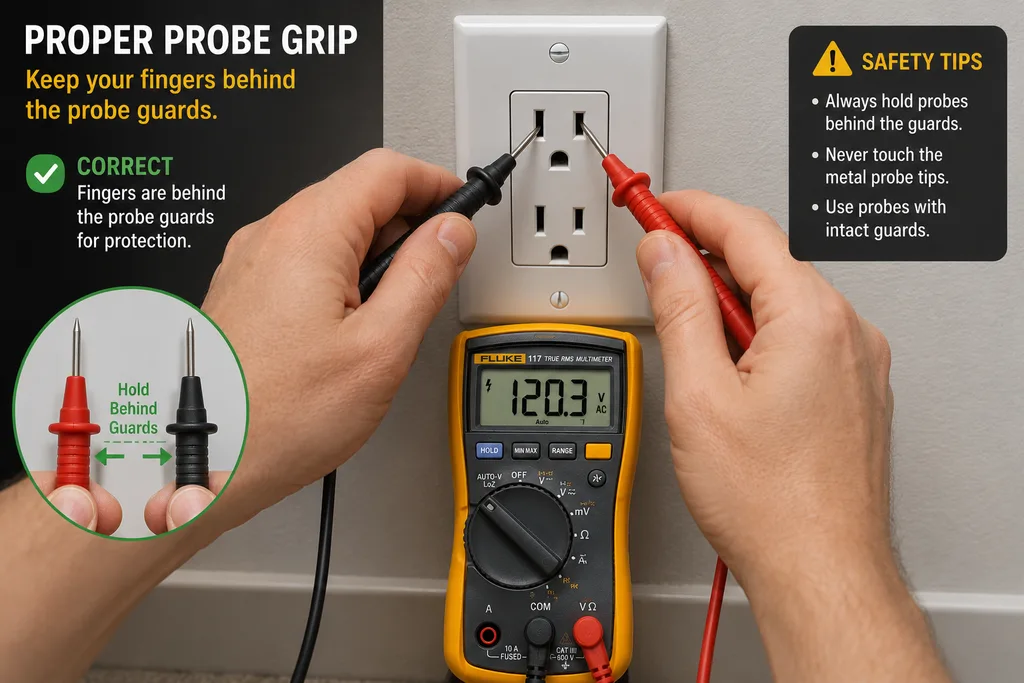
Hold the probes by the insulated handle. Never touch the metal probe tips during a live test.
Multimeter Symbols: Complete Guide
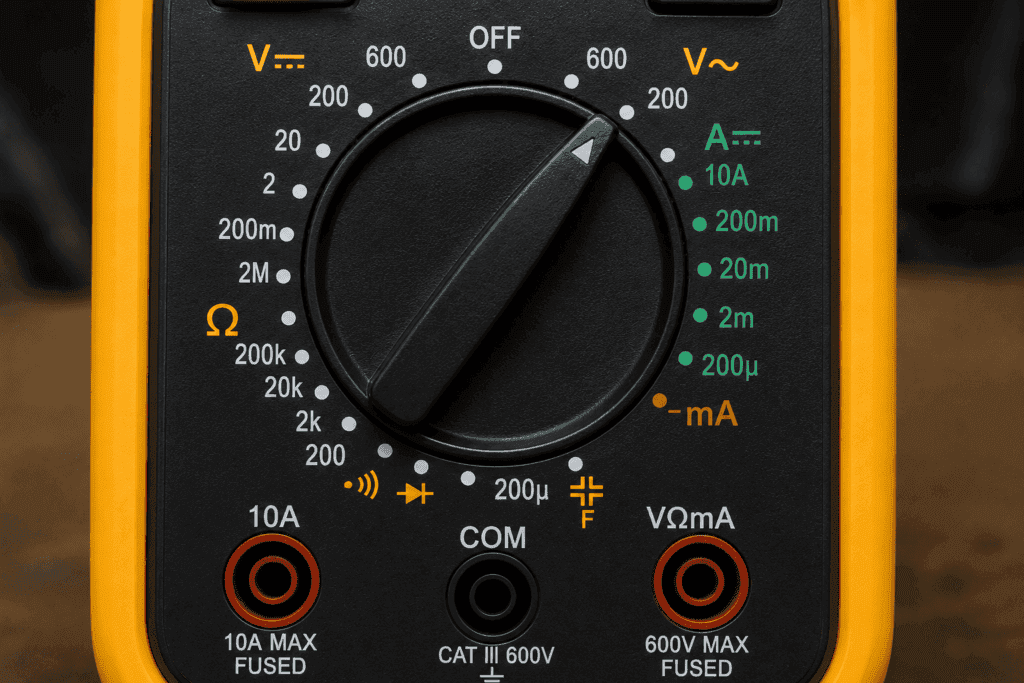
The symbols on a multimeter dial look confusing at first. But once you learn what each one means, choosing the right setting becomes second nature.
| Symbol | Name | What It Measures |
|---|---|---|
| V~ | AC Voltage | Wall outlets, mains power, appliances |
| V— | DC Voltage | Batteries, car circuits, electronics |
| Ω | Resistance | Opposition to current flow in ohms |
| A— | DC Current | DC amperage in series with the circuit |
| A~ | AC Current | AC amperage |
| ))) or → | Continuity / Diode | |
| – | ( | Capacitance |
| hFE | Transistor test | Tests transistor gain |
| °C / °F | Temperature | Measures temperature with a thermocouple probe |
💡 Tip: For a full breakdown of every symbol check out our Multimeter Symbols Guide.
AC Voltage Symbol (V~)
The tilde (~) stands for alternating current. Use this setting to measure wall outlets, extension cords, and any mains-powered device.
DC Voltage Symbol (V—)
The straight line (—) stands for direct current. Use this for all battery tests, car electrical checks, and low-voltage electronics.
Resistance Symbol (Ω)
The Omega symbol is the Greek letter for ohm — the unit of resistance. Use this to test resistors, cables, and components. Always turn off the circuit before measuring resistance.
Continuity Symbol
This symbol looks like a sound wave or a diode arrow. When you select this mode and touch the probes to a complete circuit, the multimeter beeps. Silence means the circuit is broken.
How to Measure Voltage with a Multimeter
Voltage measurement is the most common use of a multimeter. You can check a battery, test a wall outlet, or measure voltage in a car circuit.
Step 1: Set the Dial to Voltage Mode
Turn the dial to the correct voltage type:
DC Voltage (V—): Use for batteries, car circuits, and electronics. AC Voltage (V~): Use for wall outlets and mains-powered appliances.
If your multimeter is not auto-ranging, choose a range higher than the voltage you expect. For a 9V battery, select the 20V DC range. For a wall outlet, select 750V AC.
Step 2: Insert the Probes Correctly
Black probe into the COM port. Red probe into the VΩmA port. Never use the 10A port for voltage measurements.
Step 3: Touch the Probes to the Circuit
For DC voltage (battery): Touch the red probe to the positive (+) terminal and the black probe to the negative (-) terminal.
For AC voltage (wall outlet): Insert one probe into each slot of the outlet. Polarity does not matter for AC measurements.
⚠️ Safety warning: Keep your fingers behind the probe guards at all times when testing live AC voltage. Never touch the metal probe tips.
Step 4: Read the Display
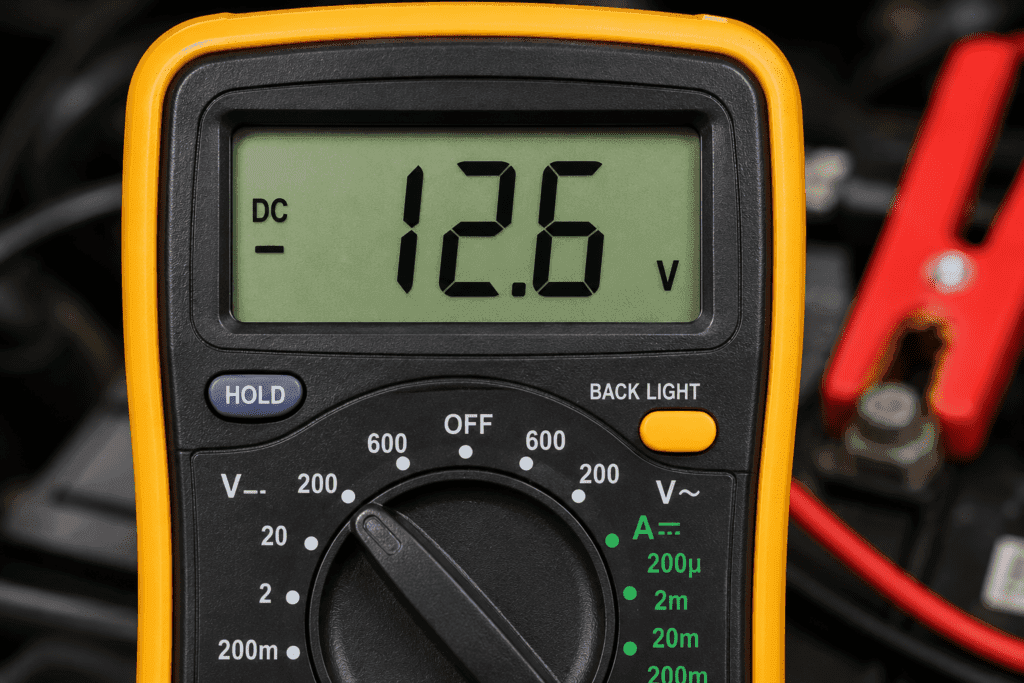
The number on the display is your voltage reading. If you see a negative sign (-), you have the probes reversed. Swap them and try again.
Voltage Reading Reference Chart
| Component | Expected Reading | Low Reading Means |
|---|---|---|
| AA battery (new) | 1.5V DC | Below 1.2V — weak or dead |
| 9V battery (new) | 9.0 to 9.5V DC | Below 7V — replace it |
| Car battery (resting) | 12.6V DC | Below 12.2V — needs charging |
| Wall outlet (US) | 110 to 125V AC | Below 110V — supply issue |
| Wall outlet (Pakistan/UK) | 220 to 240V AC | Below 200V — supply issue |
How to Measure Resistance with a Multimeter
Resistance measurement tells you how much a component opposes the flow of electricity. Use this to test resistors, cables, heating elements, and motor windings.
Step 1: Turn Off Power to the Circuit
This is the most important step. Never measure resistance on a live circuit. The voltage in the circuit interferes with the reading and can damage your multimeter.
Disconnect the component completely if possible. Remove the battery or switch off the power supply.
Step 2: Set the Dial to Ohms (Ω)
Turn the dial to the Ω symbol. If your multimeter is not auto-ranging, start with the lowest range that exceeds the expected resistance.
Step 3: Place the Probes and Read the Result
Touch one probe to each end of the component. The display shows the resistance in ohms. Polarity does not matter for resistance measurements.
A 220Ω resistor should display a value close to 220 — for example 217 or 223. Small variations are completely normal.
What Does OL Mean on the Resistance Setting?
OL means the resistance is higher than the selected range can display. This means either you selected a range that is too low, the component has an open circuit and is broken inside, or the component genuinely has very high resistance.
💡 Tip: Learn more in our dedicated guide — What Does OL Mean on a Multimeter.
How to Measure Current (Amps) with a Multimeter
Measuring current is the trickiest multimeter skill for beginners. Unlike voltage and resistance where you touch the probes across a component, current measurement requires you to route electricity through the meter itself.
⚠️ Important: Before you do anything, check your port. Using the wrong port is the fastest way to blow the internal fuse of your multimeter.
For currents up to 200mA, use the mA port if your multimeter has one. For currents up to 10A, use the 10A port. Never measure high current through the VΩmA port.
Step 1: Move the Red Probe to the 10A Port
Unplug the red probe from VΩmA. Plug it firmly into the 10A port. Leave the black probe in COM.
Step 2: Set the Dial to Amps
Turn the dial to DC Amps (A—) for battery-powered circuits or AC Amps (A~) for mains-powered circuits.
Step 3: Break the Circuit and Measure in Series
Turn off the circuit. Disconnect one wire to create a gap. Connect the multimeter across the gap — red probe toward the positive supply, black probe toward the load. Turn the circuit back on and read the current on the display.
💡 Tip: For measuring car battery draw or appliance current without breaking the circuit, use a clamp meter. It measures current around a wire without any disconnection needed. See our guide on How to Measure Amps with a Multimeter for the full process including a parasitic draw test.
How to Check Continuity with a Multimeter
Continuity testing is the fastest and most satisfying test a multimeter can perform. You hear a beep when a circuit is complete. Silence tells you something is broken.
What Is Continuity?
Continuity means there is an unbroken electrical path between two points. If a wire is continuous, current can travel through it. If not, something is broken, burned, or disconnected.
Use continuity mode to test if a fuse is blown, find a break in a wire, check if a switch opens and closes properly, and verify connections on a circuit board.
Step 1: Set the Dial to Continuity
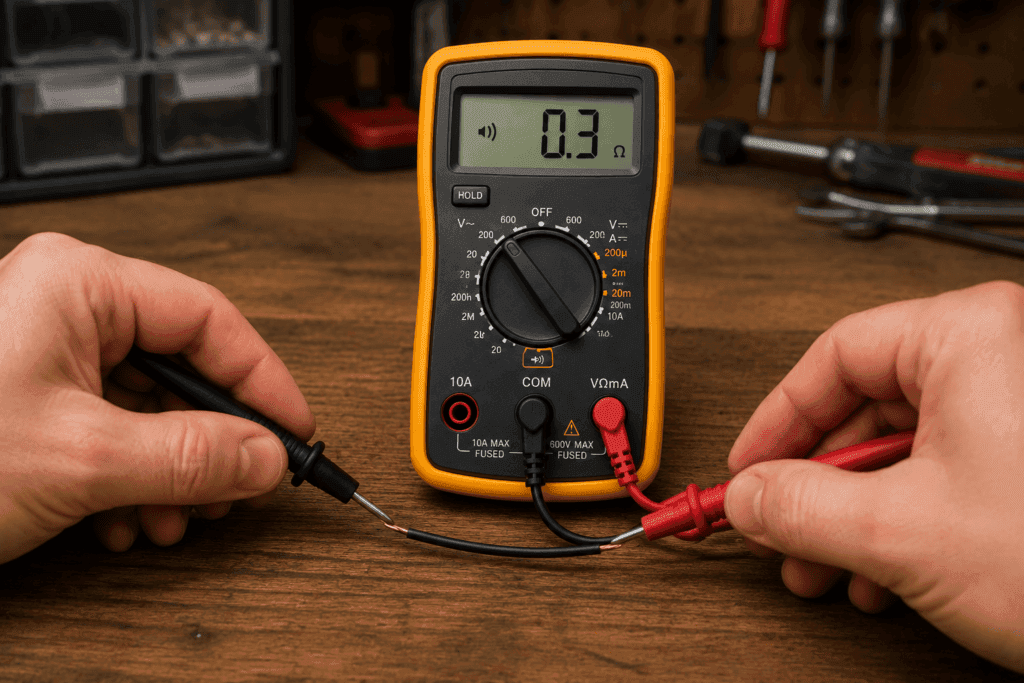
Turn the dial to the continuity symbol — a sound wave ())) or diode arrow (→|). On many multimeters, continuity and diode testing share the same position.
Step 2: Touch the Probes Together (Self-Test)
Before testing anything, touch the red and black probe tips together. Your multimeter should beep immediately. This confirms the beeper works and the setting is correct.
Step 3: Test Your Circuit or Wire
Touch one probe to each end of the wire, fuse, or component you want to test.
| Result | What It Means |
|---|---|
| Beep | Complete circuit — electricity can flow |
| No beep | Open circuit — path is broken |
| Beep only sometimes | Intermittent fault — loose connection |
💡 Tip: Read our full guide How to Check Continuity with a Multimeter for more step by step examples.
How to Test a Car Battery with a Multimeter
Testing a car battery is one of the most popular real world uses for a multimeter. It takes less than two minutes and can save you from a dead car on a cold morning.
What Voltage Should a Healthy Car Battery Read?
A fully charged 12V car battery at rest with the engine off should read:
| Reading | Battery Status |
|---|---|
| 12.6V or above | Fully charged healthy |
| 12.4V to 12.6V | 75 to 100% charged |
| 12.2V to 12.4V | 50 to 75% charge soon |
| Below 12.2V | Low charge may not start |
| Below 11.8V | Dead or severely damaged |
Step by Step Car Battery Test
- Turn off the car and all electronics. Wait 15 minutes for the surface charge to settle.
- Set your multimeter to DC Voltage (V—) on the 20V range or use auto-range.
- Touch the red probe to the positive (+) terminal and black probe to the negative (-) terminal.
- Read the display and compare to the chart above.
If the reading is below 12.4V, charge the battery fully and test again. If it still reads below 12.4V after a full charge, the battery may need replacing.
💡 Tip: For a complete car battery guide including load testing and alternator checks, read our How to Test a Car Battery with a Multimeter guide.
Safety Rules for Using a Multimeter
Using a multimeter is safe when you follow basic precautions. Ignoring these rules is how accidents happen.
Always use the correct port. Black probe in COM. Red probe in VΩmA for most tests. Red probe in 10A only for large current measurements.
Never measure resistance on a live circuit. Always turn off power before testing resistance or continuity.
Use the right CAT-rated multimeter. For household outlets, use a CAT III-rated multimeter. For industrial applications, use CAT IV.
Hold the probes by the insulated handle. Never touch the metal probe tips during a live measurement.
Start at a high range. If unsure of the expected value, start at the highest range and work down to avoid damaging the meter.
Check the probes before testing. Inspect leads for cracks, fraying, or exposed metal. Damaged probes are a shock hazard.
FAQ
What is the continuity symbol on a multimeter?
The continuity symbol looks like a small sound wave (similar to Wi-Fi signal bars) or a diode arrow pointing to a line (→|). On most multimeters, it shares a dial position with the diode test. When you select it and touch the probes together the meter beeps to confirm it is working correctly.
What does OL mean on a multimeter?
OL stands for overload. It means the value being measured exceeds the range currently selected. It is not an error. Switch to a higher range and try again. On some multimeters, OL appears as the number 1 alone on the far left of the display.
Can I use a multimeter to test a live wire?
You can measure voltage on a live wire safely — that is exactly what the voltage setting is designed for. However, never measure resistance or continuity on a live circuit. The voltage interferes with the reading and may damage the meter. Always turn off and isolate the circuit before testing resistance.
Which port do I use for measuring amps?
For currents below 200mA use the mA port if your multimeter has one. For currents up to 10A move the red probe to the 10A port. Never measure amps through the standard VΩmA port; this instantly blows the internal fuse.
How do I know which setting to choose on my multimeter?
First identify what you are measuring: voltage, resistance, or current. Then choose DC or AC depending on your circuit. Finally, select a range higher than the value you expect. If you are unsure, start at the highest range and work down. If your meter has auto-range, it does all of this automatically.
Is it safe to use a multimeter on a car battery?
Yes. Testing a car battery with a multimeter is one of the safest measurements you can make. Set the multimeter to DC voltage, touch the red probe to the positive terminal, and the black probe to the negative terminal. A healthy battery reads 12.6V or above. There is no shock risk at 12V DC.
Conclusion
Using a multimeter is a skill anyone can learn in one afternoon.
Start with voltage testing; it is the simplest measurement and the most useful for everyday tasks. Once you are comfortable with that, move on to continuity testing, resistance measurement, and eventually current testing.
The most important rules to remember are: always use the correct port, never measure resistance on a live circuit, and always start on a high range setting if you are unsure of the expected value.
With practice, reaching for a multimeter becomes second nature. It becomes your first step whenever something electrical stops working.