
You’ve already replaced the battery, but it keeps dying anyway. If that sounds familiar, this is exactly the article you need. Learning how to test an alternator with a multimeter takes under five minutes and tells you whether your alternator is the real problem before you spend another penny.
A bad alternator is the most common reason a new battery keeps dying. The battery isn’t the issue; it never was. The alternator’s job is to recharge the battery while the engine runs. When it fails, it stops doing that. Your new battery drains just like the old one. The cycle repeats.
The good news? You don’t need a mechanic to diagnose this. A basic multimeter and this guide are all it takes to know for certain whether your alternator is not charging the battery — or whether the problem lies somewhere else entirely.
Symptoms of a Bad Alternator: How to Tell Before You Test
Before you grab the multimeter, your car has probably already been trying to tell you something is wrong. Here are the five most common bad alternator symptoms — and what each one actually means.
Quick reference signs your alternator is failing:
- 🔴 Battery warning light on the dashboard
- 💡 Dim or flickering headlights
- 🔋 Battery keeps going dead overnight
- 🔊 Whining or grinding noise from the engine bay
- ⚡ Electrical accessories behaving strangely
Battery Warning Light on Dashboard
The battery warning light doesn’t always indicate a faulty battery; it monitors the entire charging system. If it flickers on while you’re driving, that’s your first sign that the alternator isn’t delivering the voltage it should.
Dim or Flickering Headlights
Your headlights run directly off the alternator while the engine is on. If they dim at idle and brighten when you rev or flicker randomly at speed, the alternator is struggling to maintain consistent output. This is one of the clearest signs of how to tell if an alternator is bad without any tools at all.
Battery Keeps Going Dead
If you’ve already replaced the battery and it’s still dying — especially overnight or after short trips — the battery was never the problem. That’s a classic alternator not charging battery pattern. The alternator drained it. Again.
Whining or Grinding Noise from the Engine Bay
A failing alternator bearing produces a distinctive whine or grind that gets louder with engine speed. If the noise changes pitch when you turn on electrical loads — headlights, AC, rear demister the alternator is working harder than it can handle.
Electrical Accessories Behaving Strangely
Power windows are moving more slowly than usual. Seat heaters are cutting out. The radio resets itself. When the alternator output drops, the car starts rationing power to non-essential systems first. Strange electrical behaviour across multiple accessories at once is a strong sign that the charging system is failing.
💡 Notice any of these? The multimeter test below will confirm it in under five minutes — no guesswork, no mechanic needed.
What You Need to Test an Alternator
Good news — you don’t need specialist equipment. Here’s everything required to run a full car charging system test right in your driveway:
- ✅ Digital multimeter — with a DC voltage (V⎓) setting. Any basic model works
- ✅ Red and black probes — included with almost every multimeter
- ✅ A helper (optional but useful) — someone to rev the engine while you hold the probes steady
- ✅ Safety glasses — always recommended around a running engine
- ✅ Your car — engine off to start, then running for the main test
That’s genuinely everything. No ramps, no garage, no specialist tools. If you can check an alternator with a multimeter, you can do it exactly where the car is sitting right now.
🔧 Need a multimeter for automotive work? Best Multimeter for Cars →
How to Test an Alternator with a Multimeter — Step by Step
Here’s exactly how to test an alternator with a multimeter in six steps. Follow the order, especially Step 1, which most guides skip, and why most DIY alternator tests give unreliable results.
Step 1: Test the Battery First (Baseline Reading)
Before you test anything, check the battery voltage with the engine off. A healthy battery should read 12.6V or above at rest.
This step matters more than people realise. A battery below 12.4V doesn’t have enough charge to give your alternator a fair test — a weak battery can mask a perfectly good alternator and send you chasing the wrong problem. If the battery reads low, charge it fully first, then start the multimeter alternator test.
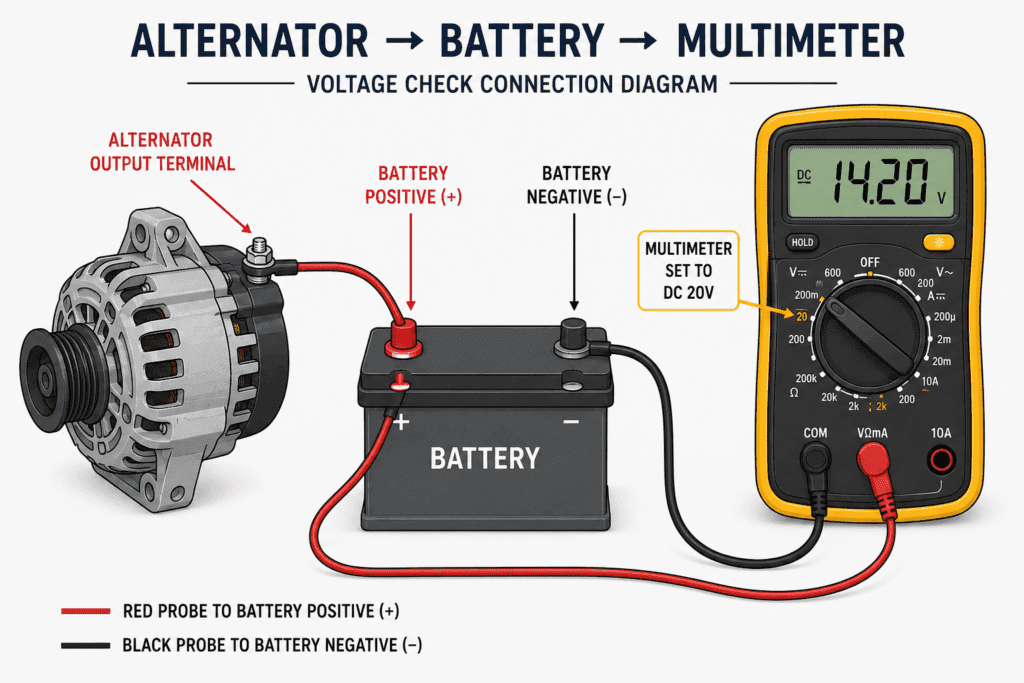
Step 2: Set Your Multimeter to DC Voltage (20V Range)
Turn the multimeter dial to DC Voltage (V⎓) and select the 20V range.
Your alternator outputs DC voltage — never AC. The 20V range is precise enough to show the difference between a healthy 14.2V reading and a weak 12.8V one. That difference is everything when diagnosing a charging fault.
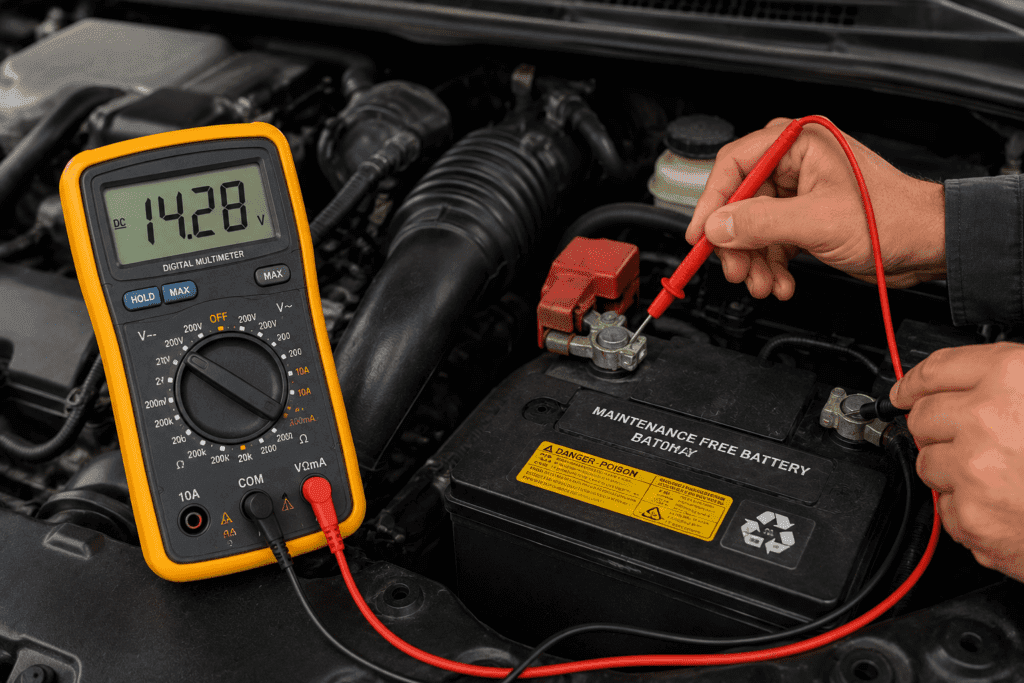
Step 3: Connect Probes to the Battery Terminals
With the engine still off, connect your probes firmly to the battery terminals:
- 🔴 Red probe → Positive (+) terminal
- ⚫ Black probe → Negative (−) terminal
Keep both probes in contact throughout the entire alternator output test. You’ll be watching the number change in real time as you move through the next steps.
Step 4: Start the Engine
Start the engine and let it idle. Don’t rev it yet, just let it settle at normal idle speed for 30 seconds.
Watch the multimeter display as the engine starts. You should see the voltage climb immediately above the resting battery voltage. That climb is the alternator kicking in and taking over the electrical load from the battery.
Step 5: Read the Voltage with the Engine Running
With the engine idling, read the voltage on the display. Here’s what the numbers mean:
- The 13.7V – 14.7V alternator is charging correctly. This is the healthy range
- The 13.0V – 13.6V alternator is undercharging. The battery will drain slowly over time
- Below 13.0V, the alternator is failing or not charging at all
- Same as resting battery voltage — alternator has stopped charging entirely
A reading that stays identical to the battery’s resting voltage with the engine running is the clearest sign of a dead alternator you’ll ever see on a multimeter.
Step 6: Rev the Engine and Check Voltage Again
Have your helper rev the engine to around 2,000 RPM while you watch the display. On a healthy alternator, voltage should rise slightly — staying comfortably within the 13.7V – 14.7V range under increased load.
If the voltage drops when the engine revs — or stays flat below 13V — the alternator is not responding to increased electrical demand. That’s a failing alternator, confirmed. To check your alternator with a multimeter properly, this rev test is the one that catches problems a simple idle reading can miss.
Testing the Alternator at Idle vs. Revving the Engine
A basic voltage check at idle tells you part of the story. The rev test tells you the rest — and it’s the part most DIY guides completely miss.
Why the Rev Test Matters
At idle, a failing alternator can sometimes scrape together just enough output to look acceptable on a multimeter. It’s only when engine RPM increases and the electrical demand rises with it that the weakness shows up.
The alternator output test at idle alone misses this entirely. The rev test doesn’t. That’s why it’s the one that actually matters for a definitive diagnosis.
What a Healthy Alternator Does When You Rev
Rev the engine from idle to around 2,000 RPM and watch the display.
A healthy alternator responds immediately — alternator voltage when revving climbs and holds comfortably between 13.7V and 14.7V. The voltage rises with RPM because the alternator spins faster and produces more output. That’s exactly what it’s designed to do.
Here’s the comparison at a glance:
| Condition | Healthy Alternator | Failing Alternator |
|---|---|---|
| Engine at idle | 13.7V – 14.7V | Below 13.0V or the same as the battery |
| Revved to 2,000 RPM | Holds 13.7V – 14.7V | Drops, stays flat, or falls further |
| Heavy load (lights + AC on) | Slight dip, recovers quickly | Drops and stays low |
What a Failing Alternator Does When You Rev
A failing alternator does one of three things when you rev the engine — none of them good:
- Voltage stays flat, no response to increased RPM. The alternator has lost the ability to scale output
- Voltage drops further when the increased electrical load overwhelms what little output remains
- Voltage reads the same as resting battery voltage. The alternator has stopped charging entirely, and the battery is now powering everything on its own
Any of these results during a test alternator with multimeter rev check means one thing: the alternator needs replacing. There’s no adjustment, no quick fix, no charging it back to health. When the alternator voltage at idle and under load both read low, it’s done.
What Voltage Should an Alternator Read? (Normal Range)
A healthy alternator should read between 13.7V and 14.7V with the engine running. Anything outside that range, too low or too high, means the charging system needs attention.
Alternator Voltage Range: What Is Normal?
Here’s the complete alternator voltage range reference. Check your reading against the table, and you’ll know exactly where you stand:
| Engine State | Voltage Reading | What It Means |
|---|---|---|
| Engine off (battery only) | 12.6V or above | Battery is fully charged — baseline confirmed ✅ |
| Engine idling | 13.5V – 14.5V | Alternator charging correctly ✅ |
| Revved to 2,000 RPM | 13.8V – 14.8V | Strong healthy output ✅ |
| Below 13.5V while running | 12.6V – 13.4V | Alternator undercharging ⚠️ |
| Above 15V while running | 15V+ | Alternator overcharging ⚠️ |
| Same as resting battery | Below 12.6V running | Alternator has likely failed ❌ |
What If the Voltage Is Too Low?
A reading below 13.5V with the engine running means the alternator isn’t producing enough output to properly recharge the battery. The battery is covering the shortfall — and slowly draining itself doing it.
Left unchecked, this kills batteries repeatedly. If your alternator voltage reading never climbs above 13V at idle or under load, the alternator is undercharging and needs testing further — or replacing.
Common causes of low alternator output:
- Worn or slipping alternator belt
- A failing voltage regulator inside the alternator
- Corroded or loose wiring at the alternator output terminal
- Alternator nearing the end of life, internal windings failing
What If the Voltage Is Too High?
A reading above 15V with the engine running is just as serious as a low reading — and most guides completely ignore it.
This is called overcharging — the alternator is pushing more voltage into the battery than it can safely absorb. Over time, overcharging boils the battery acid, warps the internal plates, and destroys a perfectly good battery from the inside out.
If your alternator output test shows consistent readings above 15V, the voltage regulator has failed and is no longer limiting the output correctly. The alternator needs replacing before it takes the battery with it.
⚠️ Bottom line: Too low means the battery slowly starves. Too high means the battery gets cooked. The healthy window 13.7V to 14.7V is the only place you want to be.
Is It the Battery or the Alternator? How to Tell the Difference
This is the question that costs people the most money when they get it wrong. Replacing a battery when the alternator is the problem means you’ll be back doing it again in three months. Here’s how to get it right the first time.
| Signs It’s the Battery | Signs It’s the Alternator |
|---|---|
| The car struggles to start after sitting overnight | The car starts fine, but dies while driving |
| The battery is 3–5+ years old | New battery keeps going flat |
| Jump start works and car runs fine | Jump start works but car dies again quickly |
| No warning lights on dashboard | Battery warning light on while driving |
| Problem worse in cold weather | Flickering lights or strange electrics |
| Multimeter reads below 12.2V at rest | Multimeter reads below 13.5V with engine running |
Signs It Is the Battery
The battery is the problem if the car struggles to start after sitting — especially overnight or in cold weather — but runs perfectly fine once it’s going. A battery fault is about stored energy. It can’t hold enough charge to start the car, but once started, the alternator takes over and everything works normally.
A resting voltage below 12.2V after charging, or a battery over four years old that keeps losing charge, confirms it. Replace the battery — the alternator is fine.
Signs It Is the Alternator
The alternator is the problem when the car starts fine but dies while you’re driving — or when a brand new battery drains flat within days of fitting. This is the alternator not charging battery pattern.
A multimeter reading below 13.5V with the engine running confirms the alternator isn’t doing its job. Flickering headlights, warning lights on the dashboard, and strange electrical behaviour while driving are all bad alternator symptoms that point in the same direction. The battery is innocent — the charging system is the fault.
What If Both Are Failing?
It happens — and more often than people expect. A failing alternator left untreated will eventually destroy the battery through repeated deep discharge or overcharging. By the time the driver notices, both are damaged.
If your resting battery voltage is low and your alternator output is below 13.5V with the engine running, test both independently. Charge the battery fully first, retest it, then run the full how to test alternator with multimeter process from Section 4. In most cases, replacing the alternator first — then retesting the battery — tells you whether the battery recovered or needs replacing too.
💡 Simple rule: If it won’t start — suspect the battery first. If it starts but dies — suspect the alternator first. If both tests fail — replace the alternator first, then decide on the battery.
Frequently Asked Questions About Testing an Alternator
What voltage should an alternator put out?
A healthy alternator should read between 13.7V and 14.7V with the engine running at idle. Revved to 2,000 RPM, that alternator voltage reading should hold steady or climb slightly — never drop. Anything below 13.5V running means the alternator is undercharging. Above 15V means it’s overcharging. Both are problems that need fixing.
Can I test an alternator without removing it?
Yes — and that’s exactly how it should be done. The entire test alternator with multimeter process happens with the alternator fully installed, engine running, and probes connected to the battery terminals. No removal, no disassembly, no garage required. The battery terminals give you a direct window into the alternator’s output in real time.
What if my alternator reads 12.6V with the engine running?
That’s a failed alternator reading. 12.6V with the engine running means the alternator has stopped charging entirely — the voltage you’re seeing is just the battery’s own resting charge. The alternator is producing nothing. The battery is now powering the entire car on its own and will drain completely, often within 30–60 minutes of driving.
Can a bad alternator destroy a new battery?
Yes — and this is exactly why testing matters. A failing alternator that undercharges repeatedly puts a new battery through constant deep discharge cycles, dramatically shortening its lifespan. An overcharging alternator above 15V boils the battery acid and warps the internal plates. Either way, a bad alternator will destroy a brand new battery — usually within weeks.
How accurate is a multimeter alternator test?
Accurate enough to diagnose most faults with confidence. A how to test alternator with multimeter voltage check catches the two most common failures — undercharging and complete charging loss — reliably every time. It won’t diagnose intermittent faults that only appear under specific conditions, but for everyday diagnosis, it’s the fastest and most accessible tool available without workshop equipment.
What does it cost to replace an alternator?
Alternator replacement typically costs $300–$700 at a mechanic, parts, plus labour. The part alone runs $100–$400, depending on the vehicle. If you’re a confident DIYer, alternator replacement is a straightforward job on most cars — an afternoon, basic tools, and a factory workshop manual is all you need. If you’re not comfortable working around a running engine and electrical systems, a trusted mechanic is the right call.
Next Steps After Testing Your Alternator
You now have everything you need to diagnose a charging system fault with nothing more than a basic multimeter. Here’s the three-point summary before you go:
- ⏱️ Test the battery first — a resting voltage below 12.4V means the battery needs charging before the alternator test gives a reliable result
- 🔢 Normal alternator output is 13.5V – 14.7V at idle — that’s the healthy window. Below it means undercharging, above 15V means overcharging
- ⚡ Voltage should rise when you rev — a healthy alternator responds to increased RPM. A flat or dropping reading under load confirms the fault
Where you go next depends on what your test showed.
If your alternator tested fine but the car still won’t start, the battery is the real problem. Run the full battery test and get a definitive answer.
If your alternator is confirmed bad, you’ll want a reliable multimeter for ongoing automotive diagnostics before and after the repair. Don’t guess with a cheap meter when you’re dealing with charging faults.