
Your car will not start. The engine groans, clicks, or goes completely silent. Your first instinct is the battery.
But before you spend money on a replacement, take two minutes to test it yourself. All you need is a multimeter, a cheap and reliable tool that gives you the exact answer.
This guide walks you through everything: the right multimeter settings, exactly how to connect the probes, what the numbers on the display mean, and whether you need to charge, replace, or look elsewhere entirely. If you have never used a multimeter before, do not worry. This is one of the simplest tests in all of automotive diagnosis.
Quick answer: Set your multimeter to DC Voltage (20V range), connect red to the positive terminal and black to the negative, and read the display. A reading of 12.6V or above means your battery is healthy. Below 12.2V, it needs attention.
💡 Tip: Not sure which multimeter to use for the job? Check out our guide to the best multimeters for car testing, or read our beginner-friendly How to Use a Multimeter primer first.
What Voltage Should a Car Battery Read?
A standard 12V lead-acid car battery in good health reads between 12.6V and 12.8V when the engine is off and the battery has been resting for at least 15 minutes. Anything below 12.0V is considered discharged, and a reading under 11.8V usually points to a dead or failing cell.
Car Battery Voltage Chart: What the Numbers Mean
Use this table to interpret any voltage reading you get from your multimeter car battery test.

| Voltage Reading | Battery State | Charge Level | Action to Take |
|---|---|---|---|
| 12.7V to 12.9V | Fully charged | 100% | No action needed |
| 12.5V to 12.6V | Good | 75 to 100% | No action needed |
| 12.3V to 12.4V | Fair | 50 to 75% | Charge soon |
| 12.0V to 12.2V | Low | 25 to 50% | Charge immediately |
| 11.8V to 11.9V | Very low | Under 25% | Charge and load test |
| Below 11.8V | Dead or failed | 0% | Replace battery |
These figures apply to a standard 12V lead-acid or AGM battery at room temperature (around 20°C / 68°F). Cold weather can reduce voltage slightly. A battery reading 12.4V at freezing temperatures may still be healthy.
What You Need to Test a Car Battery
This is one of the most minimal tests in all of car maintenance. You need exactly these things:
- Digital multimeter with a DC voltage setting
- Red probe (positive)
- Black probe (negative)
- Your car, engine off
Your multimeter should have a DC voltage range that goes up to at least 20V. Almost every multimeter on the market, even budget models under $20, covers this range. If you are using an auto-ranging multimeter, it is even simpler. Just select DC Voltage and it does the rest.
How to Test a Car Battery with a Multimeter: Step by Step
Follow these five steps in order. The most common mistake people make is skipping Step 1. It is more important than it looks.
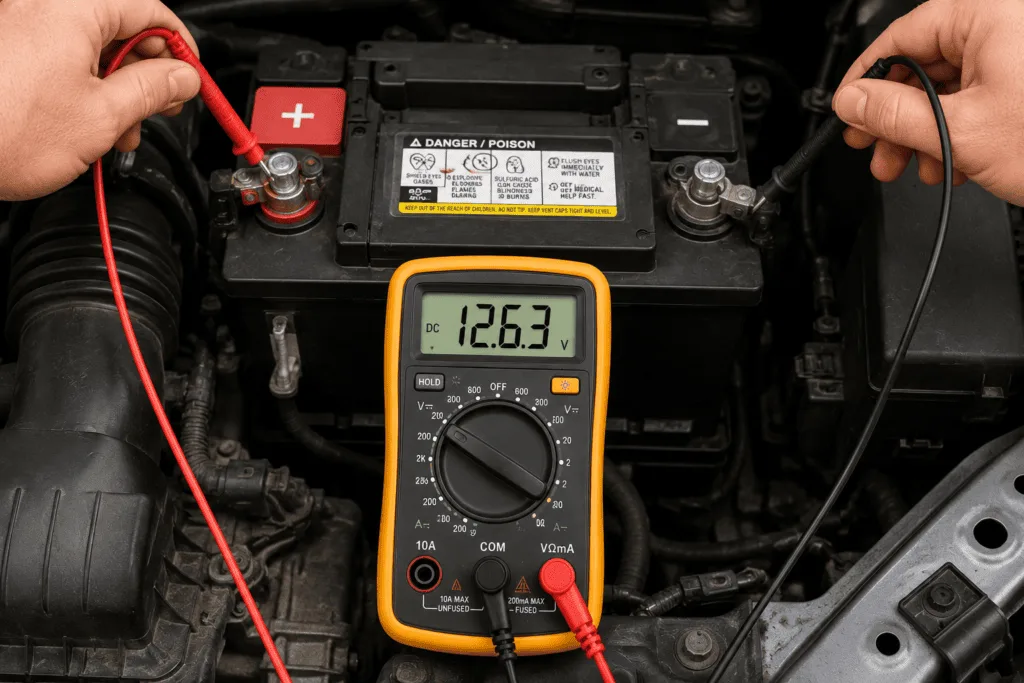
Step 1: Turn Off the Car and Wait 15 Minutes
Turn the engine off and let the vehicle sit completely idle. No headlights, no radio, nothing drawing power. Wait at least 15 minutes before you test.
This step matters because a recently driven battery carries a surface charge that can read 0.2V to 0.5V higher than the true resting voltage, giving you a falsely optimistic result. Most guides skip this step. That is exactly why people get confused when their “12.7V battery” will not start a week later.
Step 2: Set Your Multimeter to DC Voltage (20V Range)
Rotate the dial to the DC voltage setting, usually marked as V⎓ or DCV. Select the 20V range, or the nearest range above 12V. If your multimeter is auto-ranging, simply select DC Voltage and it sets the range automatically.
Never use the AC voltage setting on a car battery. Car batteries are direct current only, and AC mode gives you a zero or garbage reading.
Step 3: Connect the Probes to the Battery Terminals
Plug the black probe into the COM port on your multimeter. Plug the red probe into the VΩ port (sometimes labeled V or VΩmA).
Open your car hood and locate the battery. Touch the red probe to the positive terminal (+) and the black probe to the negative terminal (-). Hold them firmly in contact. A loose probe gives an unstable reading.
If you get a negative number, you have reversed the probes. Swap them and read again.
Step 4: Read the Voltage on the Display
The number on your multimeter display is your battery’s resting voltage. Compare it to the car battery voltage chart above.
A reading of 12.6V or above means the battery is healthy and fully charged. A reading between 12.0V and 12.4V means the battery is partially discharged and should be charged before further diagnosis. Below 12.0V means the battery is deeply discharged or failing.
Step 5: Test Under Load (Optional but Recommended)
For a more accurate picture of battery health, ask a helper to crank the engine while you hold the probes in place and watch the voltage.
During cranking the voltage will dip. This is normal. A healthy battery should not drop below 9.6V during starting. If it falls below 9.6V or struggles to recover above 12.4V after the engine starts, the battery is failing under load even if its resting voltage looked acceptable.
💡 Pro tip: Write down the voltage you measured and the date. Battery health declines gradually. Checking every few months lets you spot a deteriorating battery before it leaves you stranded.
What Does Your Car Battery Reading Mean?
Got your number? Here is exactly what it means and what to do next.
12.6V or Above: Battery Is Healthy
Your battery is in excellent condition. If the car still will not start with a healthy battery voltage reading, the problem lies elsewhere. Most likely the alternator, starter motor, or a short circuit in your electrical system. See our guide on how to test an alternator with a multimeter to investigate further.
12.2V to 12.5V: Battery Needs Charging
Your battery is not dead, it is discharged. This is normal if the car has been sitting unused for a few weeks, or if you accidentally left a light on. Charge it fully with a smart battery charger and retest. If it holds the charge and reads above 12.6V after a full charge, the battery itself is fine. If it drops again within a few days of normal driving, your alternator may not be charging it properly.
Below 12.2V: Battery Is Weak or Dead
A car battery voltage this low indicates a significantly discharged or failing battery. Try charging it for 8 to 12 hours with a proper charger, then test again under load (Step 5). If it still cannot hold voltage, the battery has likely reached end of life and should be replaced. Most car batteries last 3 to 5 years under normal driving conditions.
What If the Battery Reads 0V?
A zero reading does not just mean discharged. It usually means a completely failed cell or a severed internal connection. In this case charging will not help. The battery needs to be replaced immediately. This is different from a battery that reads 11.5V, which may still recover with a full charge. Zero volts means the battery is structurally dead.
Should You Charge or Replace Your Car Battery?
This is the question that matters most after your multimeter car battery test. The honest answer depends on three factors: the voltage reading, the battery’s age, and how it performs under load.
When to Charge the Battery
Charging makes sense when the battery reads between 12.0V and 12.5V, the battery is less than three years old, and it holds its charge normally after being recharged.
A smart charger, also called a trickle charger or battery maintainer, is the safest way to charge. It monitors voltage and stops automatically to prevent overcharging. Allow 8 to 12 hours for a full charge, then retest with your multimeter.
When to Replace the Battery
Replace your battery when it reads below 11.8V and will not recover after charging, it drops below 9.6V during a load test, it is more than four years old and you are already having issues, or it fails to hold a charge for more than a few days. A battery showing these signs will fail completely, often at the worst possible moment.
How to Tell If Your Alternator Is the Real Problem
Here is a scenario that tricks many car owners. The battery tests fine at rest (12.6V), gets replaced, and the new battery dies within a week.
The culprit is a faulty alternator that is not recharging the battery while the car is running. To rule this out, start the engine and check the voltage at the battery terminals. With the engine running, a healthy alternator should push the voltage to between 13.7V and 14.7V. If it stays at 12.6V or drops, the alternator is failing to charge.
💡 Tip: Battery tests fine but the car still will not start? Learn how to test your alternator in under 5 minutes.
How to Test Other Batteries with a Multimeter
The same multimeter you used for your car battery can test virtually any battery type. The process is identical: DC voltage, red to positive, black to negative. Only the expected voltage values differ.
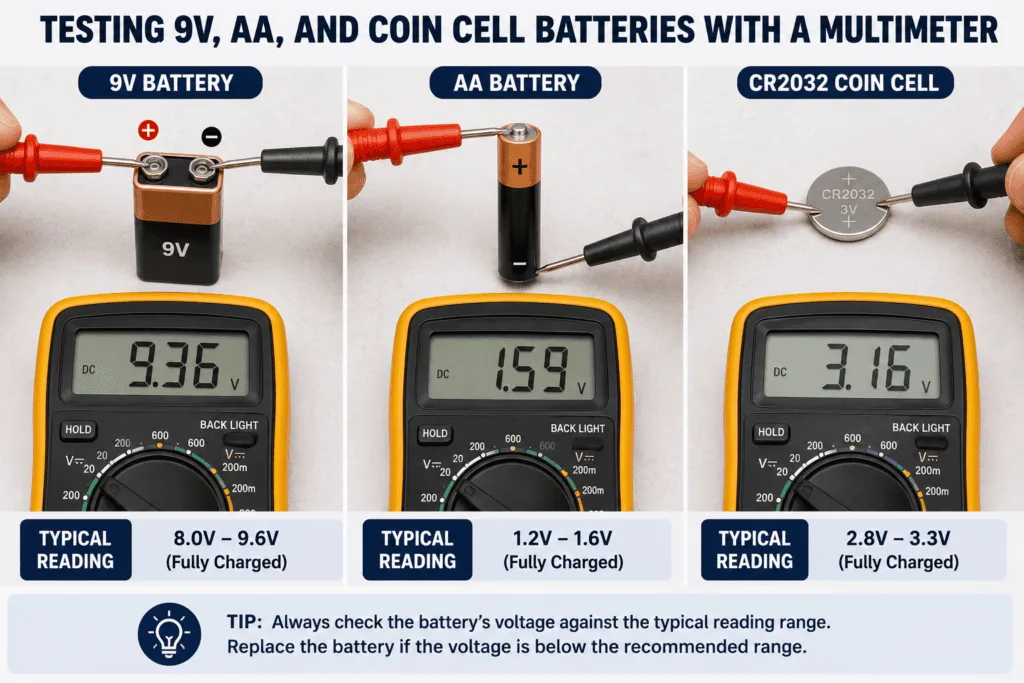
How to Test a 9V Battery with a Multimeter
Set your multimeter to DC voltage (20V range or auto). Touch red to the small circular positive terminal and black to the larger hexagonal negative terminal. A fresh 9V battery reads around 9.5V to 9.6V. Consider it healthy at anything above 8.5V, and replace it when it drops below 7V. At that level, many devices stop working reliably or behave erratically.
How to Test AA or AAA Batteries
Switch your multimeter to the 2V DC range or auto-range. Touch the red probe to the positive end (the small raised nub) and black to the flat negative end. A new AA or AAA battery reads approximately 1.5V to 1.6V. It is considered good above 1.3V and weak below 1.2V. Rechargeable NiMH batteries of the same size typically read 1.2V to 1.3V when fully charged, which is normal.
How to Test a CR2032 (Coin Cell) Battery
Use the 2V DC range. Hold the red probe against the positive face (the smooth side marked +) and black against the negative face (the ridged side). A fresh CR2032 reads 3.2V to 3.3V. Replace it when it falls below 2.8V. Many devices like car key fobs and glucose meters cut out around this threshold, well before the battery is truly empty.
💡 Tip: For a full breakdown of what every symbol on your multimeter means, visit our Multimeter Symbols Guide.
FAQ
What should a fully charged 12V battery read on a multimeter?
A fully charged 12V car battery should read between 12.6V and 12.8V at rest with the engine off. This reading indicates the battery is at 100% state of charge. Anything below 12.4V means the battery is less than 75% charged and should be topped up before testing under load.
Can I test a car battery without removing it?
Yes, and you should. There is no need to remove a car battery for a basic voltage test. Simply open the hood, locate the battery, and touch the multimeter probes directly to the terminals while the battery is still installed in the vehicle. Removing the battery is only necessary for a more advanced load test at an auto parts store.
What if my battery reads 12.6V but the car still won’t start?
A healthy voltage reading with a no-start condition points away from the battery. The most common culprits are a failing alternator (not charging during driving), a bad starter motor, corroded battery cable connections, or a blown fuse in the starting circuit. Start by testing the alternator output voltage with the engine running. It should read between 13.7V and 14.7V.
How do I test a car battery under load?
Hold your multimeter probes on the battery terminals and ask someone to crank the engine. Watch the voltage during starting. A good battery should stay above 9.6V while cranking. If it dips below 9.6V or takes a long time to recover after the engine starts, the battery is failing under load even if its resting voltage appeared normal.
Is 11.9V too low for a car battery?
Yes, 11.9V is very low for a resting car battery. It indicates the battery is less than 25% charged and may be deeply sulfated. Try a slow charge (8 to 12 hours on a smart charger) and retest. If it will not hold a charge above 12.4V after a full charge, or if the battery is more than three years old, it is time to replace it.
Can a multimeter tell me if my alternator is bad?
Yes. With the engine running a healthy alternator should push battery terminal voltage to between 13.7V and 14.7V. If the voltage stays around 12.6V or drops while driving, the alternator is not charging the battery. This is one of the most important diagnostic steps after a battery test, and it is covered in full in our alternator testing guide.
Conclusion
Testing a car battery with a multimeter comes down to three things. Wait before you test, since surface charge will fool you. Use DC voltage on the 20V range. And know your numbers: 12.6V and above is healthy, below 12.2V needs attention, and anything under 11.8V is a replacement candidate.
This two-minute test can save you from an unnecessary battery purchase or confirm that a new battery really is what you need. Either way, you are making an informed decision with real data, not guessing.