You plug in your phone charger, and nothing happens. The outlet looks fine on the outside, but something is wrong inside.
Before you call an electrician, grab a multimeter. A basic digital multimeter can tell you in seconds whether your outlet has power, whether it is properly grounded, and whether the wiring is safe.
This guide shows you exactly how to check voltage with a multimeter at any outlet in your home. You will also learn how to test a fuse, how to test a 120V outlet, how to test a 240V outlet, and how to read every result you get.
Everything is written in simple language. No electrical engineering background needed.
Safety First: What You Must Know Before Testing an Outlet
Outlet testing involves live electricity. One wrong move can cause a serious electric shock. Read this section carefully before you touch anything.
Safety Rules You Cannot Skip
Follow these rules every time you test an electrical outlet:
- Use one hand to hold both probes. This prevents electric current from passing through your chest if you get a shock.
- Never let the probe tips touch each other while inserted in the outlet. This creates a dangerous short circuit.
- Keep your other hand away from the outlet, the wall, and any metal surfaces.
- Work in a dry environment. Never test outlets near water or in damp conditions.
- Remove metal jewelry. Rings, watches, and bracelets conduct electricity.
- Do not touch bare wires or metal parts at any point during the test.
⚠️ Warning: If you see burn marks, smell burning plastic, or notice the outlet is warm to the touch, do not test it yourself. Call a licensed electrician immediately.
What Type of Multimeter Do You Need for Outlet Testing?
Any basic digital multimeter with an AC voltage setting can test a standard 120V outlet.
However, for outlet testing, you should use a multimeter with a CAT III safety rating or higher.
Why You Need a CAT III Rated Multimeter
CAT ratings tell you how much electrical stress a multimeter can safely handle. Household outlets are part of the fixed wiring installation category — this falls under CAT III.
Using a CAT I or CAT II multimeter on a household outlet is a safety risk. If there is a voltage spike, a lower-rated multimeter can fail dangerously.
Look for CAT III 300V or CAT III 600V on the label of your multimeter before testing any outlet.
💡 Tip: Not sure which multimeter to buy? Check out our guide on How to Use a Multimeter for beginner-friendly recommendations.
Parts of an Electrical Outlet: Know Before You Test
Before you insert any probes, you need to understand the three slots on a standard North American wall outlet.
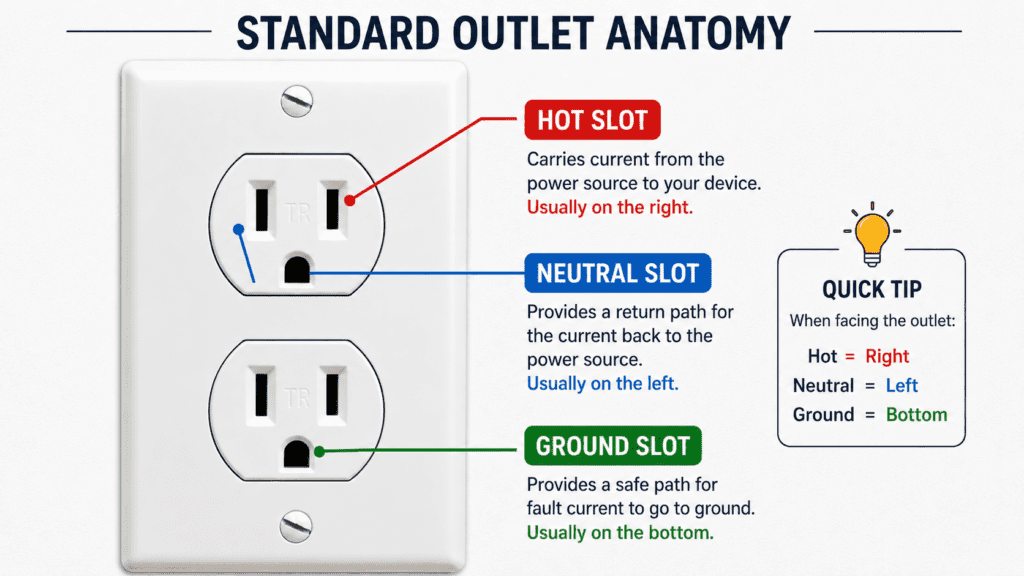
| Slot | Position | Wire Color | Purpose |
|---|---|---|---|
| Hot slot | Smaller right slot | Black | Carries live current to the outlet |
| Neutral slot | Larger left slot | White | Returns current back to the panel |
| Ground slot | Rounded bottom hole | Green or bare | Safety path for fault current |
AC vs DC: Why You Must Use AC Voltage Mode
Household outlets supply AC voltage alternating current. This means the current changes direction 60 times per second.
Batteries supply DC voltage direct current. This flows in one direction only.
You must set your multimeter to AC voltage mode when testing outlets. Using DC voltage mode on an AC outlet gives you a zero or incorrect reading. Look for the symbol V~ or VAC on your multimeter dial.
What You Need
Tools Required
- A digital multimeter with a CAT III rating and an AC voltage setting
- Red test lead (positive)
- Black test lead (negative)
- Rubber insulated gloves (recommended)
- Safety glasses (recommended)
How to Set Up Your Multimeter for Outlet Testing
- Plug the black lead into the COM port
- Plug the red lead into the VΩ port (sometimes labeled VΩmA)
- Turn the dial to AC voltage mode — look for V~ or VAC
- If your multimeter is not auto-ranging, select 200V as your range
- Touch the two probes together to confirm the multimeter is working
How to Check Voltage at an Outlet with a Multimeter
Follow these 6 steps for a complete and safe outlet test.
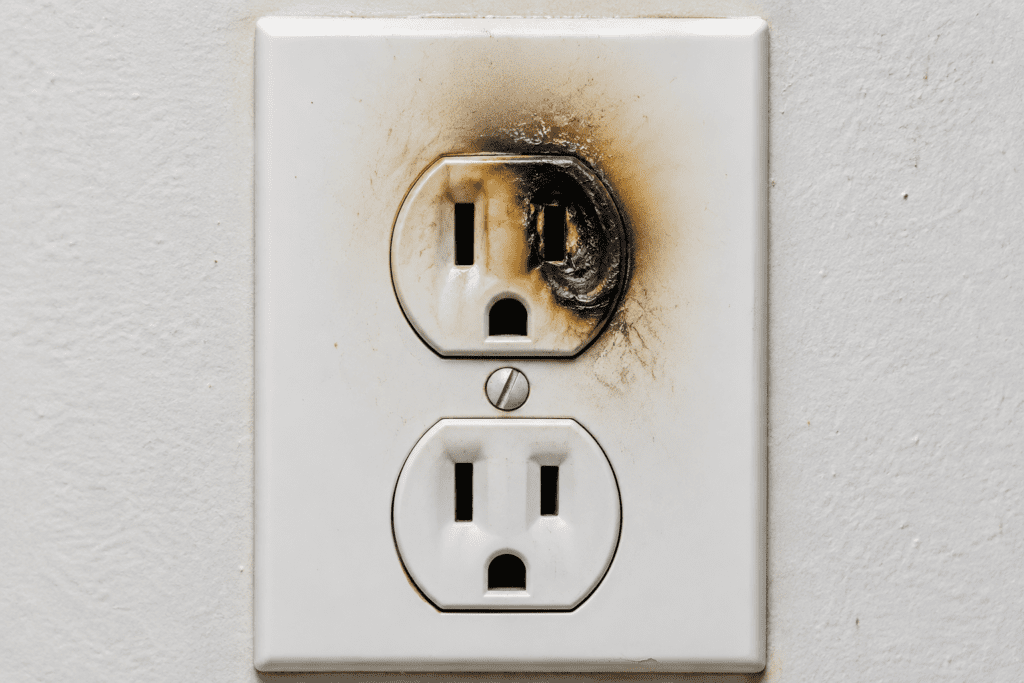
Step 1: Inspect the Outlet Visually
Look at the outlet before touching anything.
Check for burn marks, discoloration, melted plastic, or a burning smell. If you see any of these signs, stop. The outlet has a serious fault and needs professional repair.
If the outlet looks physically normal, proceed to Step 2.
Step 2: Set Your Multimeter to AC Voltage
Turn the dial to the V~ or VAC setting on your multimeter.
Select the 200V range if your multimeter is manual ranging. If it is auto-ranging, it will select the correct range automatically.
Never use the DC voltage setting on an outlet. Outlets supply alternating current — DC mode gives you no reading.
Step 3: Insert the Probes Correctly
Hold both probes in one hand. Insert the black probe into the neutral slot (the larger left slot). Insert the red probe into the hot slot (the smaller right slot).
Do not let the probe tips touch each other. Do not touch the metal parts of the probes with your fingers.
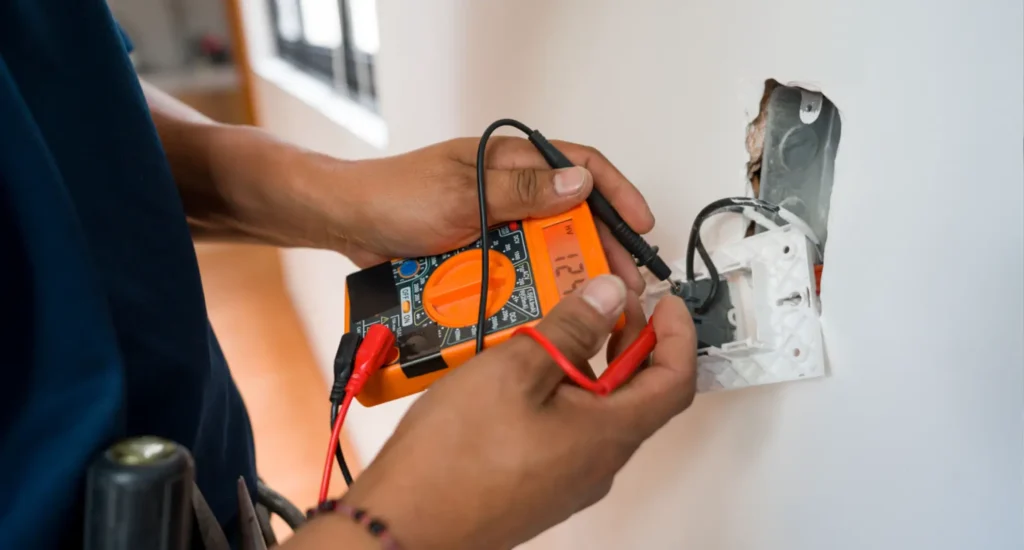
Step 4: Read the Voltage on the Display
Look at your multimeter display. A properly working 120V outlet should read between 110V and 125V.
Write down the reading. You will compare it to the voltage chart below.
Step 5: Test for Grounding
Keep the red probe in the hot slot. Move the black probe to the ground slot (the rounded bottom hole).
The reading should be close to the same voltage as before — between 110V and 125V. If the reading drops to zero, the outlet has a grounding problem.
Step 6: Test for Reversed Polarity
Now swap the probes. Place the red probe in the neutral slot (the larger left slot) and the black probe in the hot slot (the smaller right slot).
If you get a voltage reading on this test, the outlet has reversed polarity. This means the hot and neutral wires were installed the wrong way around. Reversed polarity can damage sensitive electronics and create a safety hazard. Call an electrician to fix it.
How to Test a 120V Outlet with a Multimeter
A 120V outlet is the standard wall outlet found in most rooms in a North American home. It powers everyday devices like lamps, phone chargers, televisions, and computers.
What Voltage Should a 120V Outlet Read?
A healthy 120V outlet reads between 110V and 125V on your multimeter.
Step-by-Step 120V Outlet Test
- Set your multimeter to AC voltage (V~) on the 200V range
- Insert the black probe into the neutral slot (larger left slot)
- Insert the red probe into the hot slot (smaller right slot)
- Read the voltage on the display
- Compare to the chart below
120V Outlet Voltage Reading Chart
| Voltage Reading | What It Means | What to Do |
|---|---|---|
| 110V to 125V | Normal — outlet is working correctly | No action needed |
| 100V to 109V | Low voltage — possible wiring issue | Check the circuit breaker. Call an electrician if it persists |
| 126V to 135V | High voltage — potential danger | Call electrician immediately |
| 0V | No power — dead outlet | Check the breaker. Test the GFCI reset button |
| OL | Overload reading | Check multimeter range setting |
How to Test a 240V Outlet with a Multimeter
A 240V outlet is a high-voltage outlet used for large appliances. You will find them powering electric dryers, ovens, air conditioners, and electric vehicle chargers.
What Is a 240V Outlet Used For?
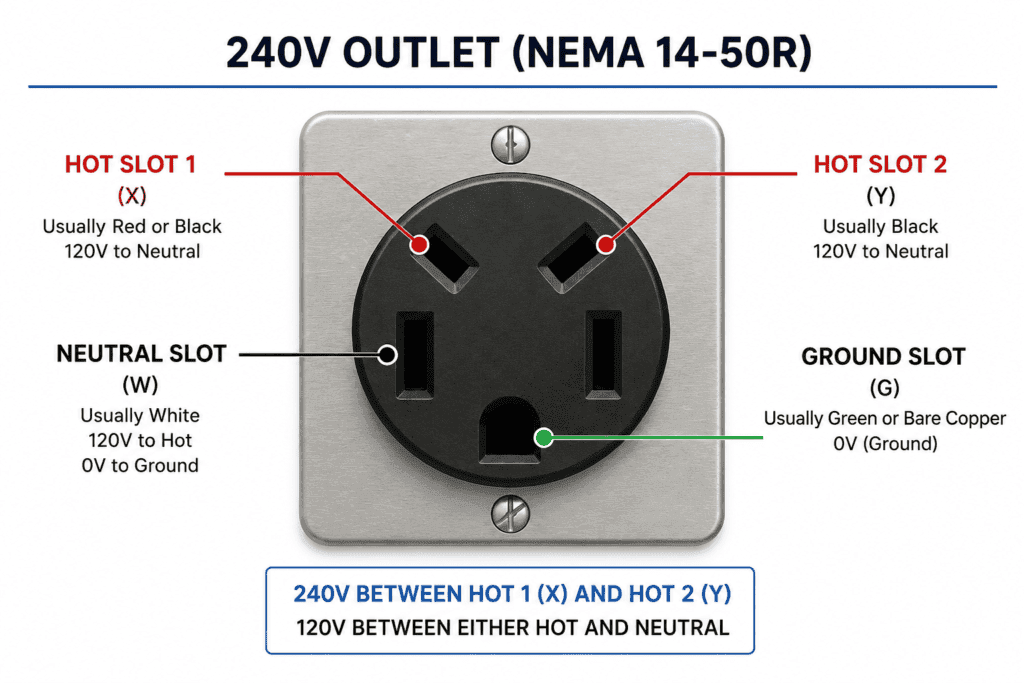
240V outlets supply double the voltage of a standard outlet. They have a different shape with four slots and are connected to a double-pole circuit breaker in your electrical panel.
What Voltage Should a 240V Outlet Read?
A healthy 240V outlet reads between 220V and 250V across the two hot terminals.
Step-by-Step 240V Outlet Test
- Set your multimeter to AC voltage (V~) on the 600V range
- Insert the red probe into hot slot 1 (left hot terminal)
- Insert the black probe into hot slot 2 (right hot terminal)
- Read the voltage — it should be between 220V and 250V
- To test each hot wire to neutral: move one probe to the neutral slot — each hot to neutral should read approximately 120V
240V Outlet Voltage Reading Chart
| Voltage Reading | What It Means | What to Do |
|---|---|---|
| 220V to 250V | Normal — outlet is working correctly | No action needed |
| Below 200V | Low voltage — wiring issue | Call electrician |
| Above 260V | High voltage — dangerous | Call an electrician immediately |
| 0V | No power | Check the double-pole breaker in the panel |
⚠️ Important: Always use a multimeter rated CAT III 600V or higher when testing 240V outlets. A lower-rated multimeter is not safe for this test.
How to Test for a Properly Grounded Outlet
Why Grounding Matters
Grounding is a critical safety feature in any electrical outlet. When a fault occurs — such as a short circuit or a damaged appliance — the ground wire provides a safe path for excess electrical current to flow back to the earth. Without proper grounding, that excess current has nowhere to go except through you.
Ungrounded outlets increase the risk of electric shock, electrical fire, and damage to sensitive electronics.
Step-by-Step Grounding Test
- Set the multimeter to AC voltage (V~)
- Insert the red probe into the hot slot (smaller right slot)
- Insert the black probe into the ground slot (rounded bottom hole)
- Read the voltage
What If the Ground Test Fails?
| Reading | What It Means |
|---|---|
| 110V to 125V | Outlet is properly grounded |
| 0V or very low | Outlet has no ground or ground wire is broken |
| Reading differs significantly from voltage test | Grounding problem — call an electrician |
A missing or broken ground is a serious electrical hazard. Do not continue using an ungrounded outlet until a licensed electrician inspects and repairs the wiring.
How to Test a Fuse with a Multimeter
A blown fuse is one of the most common causes of a dead outlet. Testing a fuse takes less than one minute.
What Is a Fuse and Why Does It Blow?
A fuse is a small safety device inside your electrical panel or fuse box. It protects a circuit from too much current. When too much current flows through the circuit, the fuse wire inside melts and breaks the circuit. This is called a blown fuse.
A blown fuse looks intact on the outside. You cannot tell if a fuse is blown just by looking at it. A multimeter gives you the definitive answer.
Step-by-Step Fuse Test
- Turn off power to the circuit and remove the fuse from the fuse box
- Set your multimeter to continuity mode (the sound wave symbol)
- Touch one probe to each metal end of the fuse
- Listen for the beep
How to Read Fuse Test Results
| Result | What It Means |
|---|---|
| Multimeter beeps | Fuse is good — current can flow through it |
| No beep — display shows OL | Fuse has blown — replace it immediately |
💡 Tip: Always replace a blown fuse with one of the same amperage rating. Never use a higher amp fuse as a replacement. This removes the circuit protection and creates a fire hazard.
How to Read Voltage Values on a Multimeter
Understanding what your voltage readings mean helps you make the right decision every time.
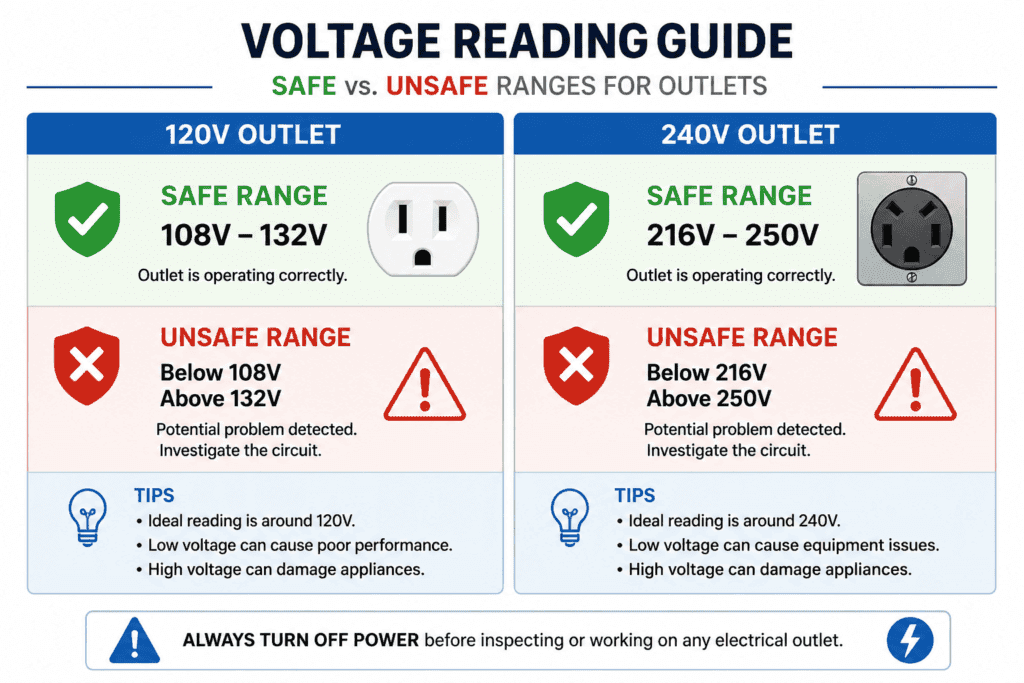
Normal Voltage Range for Outlets
| Outlet Type | Normal Range | Action |
|---|---|---|
| Standard 120V outlet | 110V to 125V | No action needed |
| 240V outlet | 220V to 250V | No action needed |
| Grounding test | Same as main reading | No action needed |
| Polarity test (reversed) | Any reading | Call electrician |
What Low Voltage Means
A reading below 110V on a 120V outlet indicates low voltage. Common causes include a loose wire connection, an overloaded circuit, or a problem at the electrical panel.
Low voltage can cause appliances to run poorly, motors to overheat, and electronics to malfunction.
What High Voltage Means
A reading above 125V on a 120V outlet is considered high voltage. This can damage sensitive electronics and appliances. High voltage is usually caused by a problem at the utility transformer or incorrect wiring. Call an electrician immediately.
What Zero Voltage Means
A reading of 0V means the outlet is not receiving power. Check these things first:
- Is the circuit breaker tripped in your electrical panel?
- Is there a GFCI outlet nearby that has tripped? Press the reset button on the GFCI outlet.
- Is the outlet controlled by a wall switch? Make sure the switch is in the ON position.
If none of these fixes work, the outlet wiring may be broken or disconnected inside the wall.
What OL Means When Testing an Outlet
OL means overload. The voltage is beyond your multimeter’s selected range. Switch to a higher range setting and test again.
Troubleshooting Common Outlet Problems
Outlet Has No Power
Check the circuit breaker first. If the breaker has tripped, reset it. If it trips again immediately, there is a short circuit in the wiring, and you need an electrician.
Check nearby GFCI outlets. A tripped GFCI cuts power to all outlets connected to it. Press the reset button on the GFCI outlet.
Outlet Is Warm to the Touch
A warm outlet means too much current is flowing through it, or there is a loose connection creating heat. Stop using the outlet immediately and call an electrician.
Devices Spark When Plugged In
Small sparks are sometimes normal when you plug in a device quickly. But large sparks, repeated sparks, or sparks with a burning smell mean the outlet has a serious fault. Stop using it and call an electrician.
Outlet Reads Correct Voltage but Still Does Not Work
If the outlet reads 110V to 125V but the device still does not work, the problem is with the device — not the outlet. Test the device in another outlet to confirm.
When to Call a Professional Electrician
Testing an outlet with a multimeter is safe for basic checks. But some problems require professional repair.
Call a licensed electrician when:
- The outlet reads 0V and resetting the breaker does not fix it
- You find reversed polarity during the polarity test
- The grounding test shows no ground connection
- The outlet is warm, sparking, or has burn marks
- You smell burning plastic near the outlet
- The breaker trips repeatedly after you reset it
- You are unsure about any reading or result
Never attempt to rewire an outlet yourself unless you are a qualified electrician. Incorrect wiring can cause house fires, serious injury, or death.
FAQ
What should an outlet read on a multimeter?
A standard 120V outlet should read between 110V and 125V on your multimeter. Set your multimeter to AC voltage mode before testing. A reading below 110V means low voltage. A reading of 0V means the outlet has no power. A 240V outlet should read between 220V and 250V.
How do I know if my outlet is properly grounded?
Keep the red probe in the hot slot and move the black probe to the ground slot (the rounded bottom hole). If you get a reading between 110V and 125V, the outlet is properly grounded. A reading of 0V means the ground wire is missing or broken. An ungrounded outlet is a safety hazard.
What does OL mean when testing an outlet?
OL means overload. The voltage reading is beyond the range your multimeter is set to measure. Switch to a higher range setting and test again. On a 120V outlet, use the 200V range. On a 240V outlet, use the 600V range.
Can I test a 240V outlet with a basic multimeter?
Yes, but only if your multimeter is rated for CAT III 600V or higher. Do not use a basic CAT I or CAT II multimeter on a 240V outlet. The higher voltage can cause the multimeter to fail dangerously if there is a voltage spike. Always check the safety rating on your multimeter before testing.
What is the difference between a 120V and a 240V outlet?
A 120V outlet is a standard two-slot outlet used for everyday devices like lamps, chargers, and televisions. A 240V outlet has four slots and supplies double the voltage. It powers large appliances like electric dryers, ovens, air conditioners, and EV chargers. They use different circuit breakers and cannot be swapped with each other.
How do I test a fuse with a multimeter?
Remove the fuse from the fuse box. Set your multimeter to continuity mode (the sound wave symbol). Touch one probe to each metal end of the fuse. A beep means the fuse is good. No beep and an OL reading means the fuse has blown and needs replacing.
Conclusion
Testing an outlet with a multimeter is one of the most useful electrical skills you can have.
With just a few simple steps, you can check voltage, test grounding, check for reversed polarity, and test blown fuses. All from the same affordable tool.
Remember to always set your multimeter to AC voltage mode for outlets, use a CAT III-rated multimeter, and work with one hand to stay safe.
A normal 120V outlet reads between 110V and 125V. A normal 240V outlet reads between 220V and 250V. Anything outside these ranges needs professional attention.
Now that you know how to check voltage with a multimeter at an outlet, the next step is learning how to test continuity and wiring. Check out our Continuity Testing Guide for the next level of electrical troubleshooting.