A power supply won’t turn on. A motor hums but won’t start. A circuit board that worked fine yesterday now does nothing. Nine times out of ten, a bad capacitor is behind it, and testing one with a multimeter takes less than two minutes once you know the right method.
This guide covers five ways to test a capacitor with a multimeter, including the one most guides never mention: an ESR check, which catches failures a basic capacitance reading alone will miss entirely.
What Is a Capacitor and Why Testing It Matters
A capacitor stores electrical charge and releases it when a circuit needs it, similar to a tiny rechargeable battery, and it also smooths out voltage fluctuations in power supplies. When a capacitor fails, the whole device suffers, sometimes obviously (no power at all) and sometimes subtly (a device that runs but performs erratically).
Why Capacitance Alone Doesn’t Tell the Whole Story
This is the single biggest gap in most capacitor testing guides. A capacitor’s internal resistance to the ripple current flowing through it, called ESR, rises as the capacitor ages and dries out internally, long before its actual capacitance value drops out of spec. This means a capacitor can measure a perfectly normal microfarad value on your multimeter’s capacitance setting while still being functionally bad in the circuit, a failure mode a basic capacitance reading alone cannot catch.
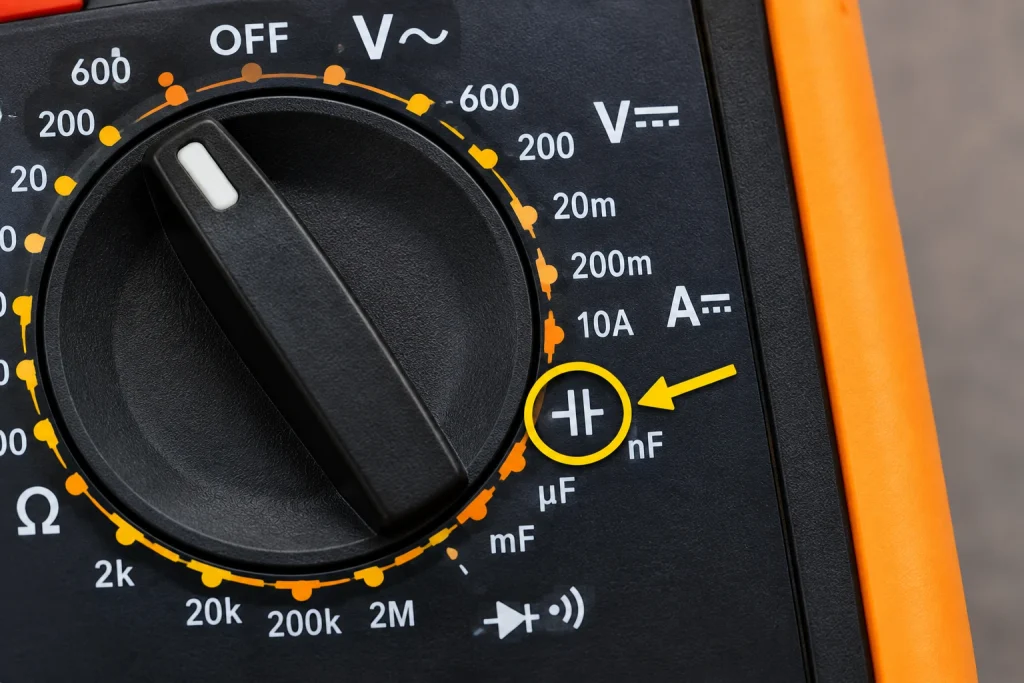
Capacitor Symbol on Multimeter: Finding the Right Settings
Capacitance Symbol
Look for –|(– or ⊣⊢ on your multimeter dial, two parallel lines representing the plates inside a capacitor. This is the capacitance symbol on multimeter models that include this function.
Microfarad Symbol on Multimeter
Your reading will display in µF (microfarads), nF (nanofarads), or occasionally pF (picofarads) for very small capacitors. The microfarad symbol on multimeter displays is simply the Greek letter mu followed by F, and it is the unit printed on the capacitor’s own casing as well, letting you compare your reading directly.
Not Every Multimeter Has a Capacitance Setting
If you cannot find this symbol on your dial, that is completely normal; not every multimeter includes it. Methods 2 through 5 below do not require a dedicated capacitance mode at all.
Safety First: Discharge the Capacitor Before Testing
A capacitor stores charge and can remain energized even after power is removed, sometimes for a surprisingly long time. Before touching any capacitor or taking a measurement:
- Turn all power to the circuit OFF
- Use your multimeter on the DC voltage setting to confirm the capacitor reads close to 0V
- If it still shows a charge, carefully discharge it by connecting a resistor (commonly 20,000 ohms, 5 watts) across the two leads, never a bare screwdriver, which creates sparks and can damage the capacitor
⚠️ Never short a capacitor’s leads directly to discharge it. This creates a sudden current spike that can damage the capacitor and, on larger capacitors, presents a genuine safety hazard.
Method 1: Capacitance Mode (Most Accurate for Value)
This method gives you a direct microfarad reading you can compare against the value printed on the capacitor.
- Discharge the capacitor and remove it from the circuit
- Note the rated value printed on the capacitor’s body
- Set your multimeter to the capacitance symbol
- Touch the probes to the two leads; polarity does not matter for capacitance mode on most meters
- Wait a few seconds for the reading to stabilize
- Compare the reading to the rated value
Capacitance Test Results Table
| Reading vs Rated Value | What It Means |
|---|---|
| Within 10-20% of rated value | Capacitor is good |
| More than 20% below rated value | Capacitor is weak, replace soon |
| Reads OL or 0 | Capacitor is dead, replace now |
Example: A capacitor rated 220µF reading 215µF is fine. One reading 150µF or showing OL has failed.
Method 2: Resistance Mode (Testing a Capacitor with an Ohmmeter)
If your multimeter lacks a capacitance setting, testing a capacitor with an ohmmeter still tells you whether it is charging normally.
- Discharge the capacitor and remove it from the circuit
- Set your multimeter to a high resistance range, at least 10kΩ
- Connect the probes, red to positive, black to negative on polarized capacitors
- Watch the reading
Resistance Mode Results
| Behavior | What It Means |
|---|---|
| Starts low, climbs steadily toward infinity | Good, the capacitor is charging normally |
| Stays at zero, no movement | Shorted, replace it |
| Jumps immediately to OL | Open circuit, replace it |
Method 3: Voltage Charge Test
This method gives a clear pass or fail answer using a battery instead of your meter’s built-in capacitance function.
- Fully discharge the capacitor first
- Confirm the capacitor’s voltage rating exceeds 9V
- Connect a 9V battery briefly (3 to 5 seconds), positive to positive, negative to negative
- Disconnect the battery
- Set your multimeter to DC voltage and touch the probes to the capacitor’s leads
- Read the voltage
| Reading | What It Means |
|---|---|
| Close to 9V, 8-9V | Capacitor holds charge, it is good |
| Drops quickly to 0V | Cannot hold charge, replace it |
⚠️ Only use this method on polarized (electrolytic) capacitors. Always match positive to positive, reversing polarity can damage or rupture the capacitor.
Method 4: Visual Inspection
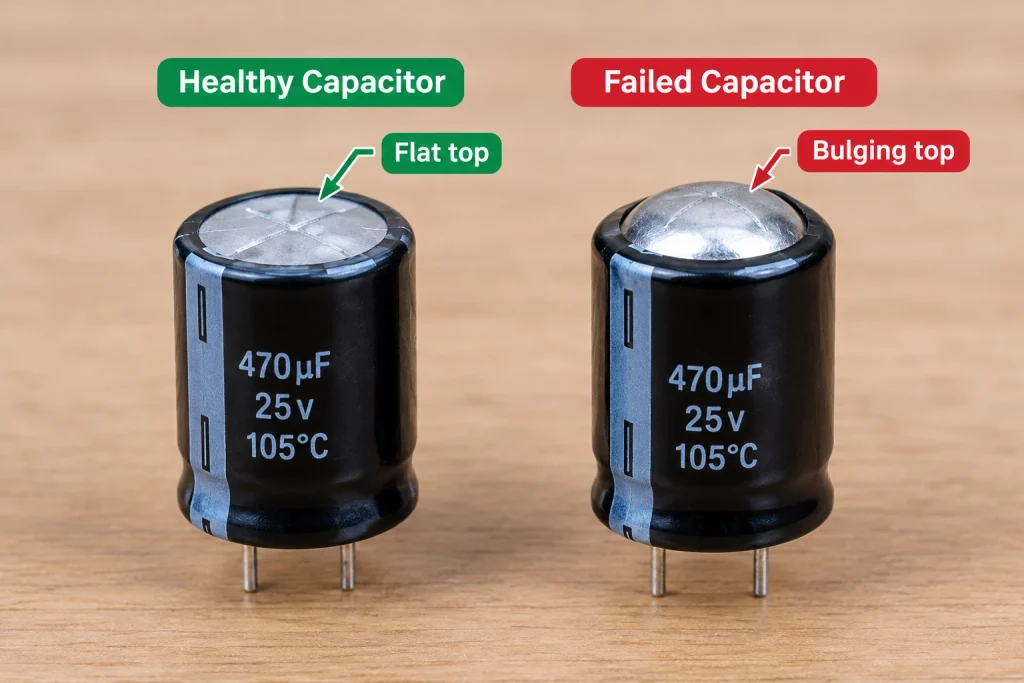
Sometimes you do not need a meter at all. A physically damaged capacitor has almost certainly failed.
| Sign | What It Means |
|---|---|
| Bulging or domed top | Failed, replace immediately |
| Leaking brown or white residue | Ruptured, replace immediately |
| Burn marks or discoloration | Overheated, replace immediately |
| Cracked casing | Physical damage, replace immediately |
Method 5: The ESR Test (What Most Guides Skip)
This is the method that catches the failures the other four miss.
Why a Standard Multimeter Cannot Fully Test ESR
A genuine ESR reading requires a dedicated ESR meter, since it needs to apply an AC test signal at a specific frequency and measure the resulting resistance, something a standard multimeter’s DC-based resistance and capacitance functions are not built to do accurately. This is the single most important limitation to understand when testing capacitors, especially in power supplies and motherboards.
When You Need a Dedicated ESR Meter Instead
If a capacitor passes both the capacitance test (Method 1) and the resistance test (Method 2) but the circuit it came from still misbehaves, particularly in a power supply, motherboard, or any high-ripple-current application, suspect ESR failure and test with a dedicated ESR meter before ruling the capacitor out. This is common enough in real-world repair work that professional technicians rarely rely on capacitance alone for power supply diagnosis.
💡 See our How to Test a Motherboard, ECU and PCB with a Multimeter guide, which covers this exact limitation in the context of motherboard capacitor failures.
Signs a Capacitor Has Failed ESR Even With Normal Capacitance
- The device it powers is unstable, overheats, or resets randomly despite the capacitor reading normal capacitance
- The circuit worked intermittently before failing completely
- The capacitor is in a high-ripple-current location: a power supply output stage, a motherboard VRM area, or near a switching regulator
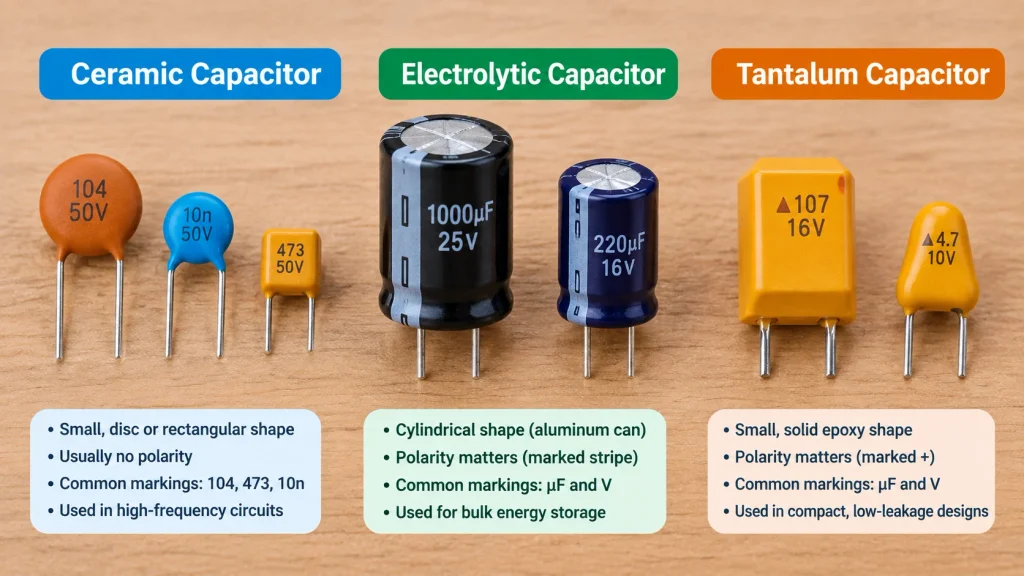
Capacitor Types: Why Testing Slightly Differs by Type
| Capacitor Type | Polarity | Testing Notes |
|---|---|---|
| Ceramic | Not polarized | Test with either probe on either lead, values are typically small (pF to nF range) |
| Electrolytic | Polarized | Match red probe to positive lead, most prone to bulging and drying out over time |
| Tantalum | Polarized | Can fail as a short circuit dramatically, sometimes with visible scorching, handle carefully |
| Film | Not polarized | Generally very reliable, testing follows the same steps as ceramic |
How to Check a Bad Capacitor with a Multimeter: Symptom-Based Troubleshooting
| Symptom | Likely Test to Run |
|---|---|
| Device won’t power on at all | Method 1 (capacitance) plus visual inspection |
| Motor hums but won’t start | Start capacitor test, method 1 or 3 |
| Power supply or motherboard unstable despite good capacitance reading | Method 5, suspect ESR failure |
| Visible bulging or leaking | Skip testing, replace immediately |
| HVAC compressor won’t start | Test the start and run capacitors, same principles as Method 1 |
💡 If you’re troubleshooting an HVAC system specifically, our Clamp Meter Guide covers the amperage side of compressor diagnostics that often accompanies a failing start capacitor.
FAQ
How do I test capacitance with a multimeter?
Set your multimeter’s dial to the capacitance symbol, discharge the capacitor first, remove it from the circuit, then touch a probe to each lead. Wait a few seconds for the reading to stabilize, then compare it to the rated value printed on the capacitor’s body. A reading within 10 to 20% of that value means the capacitor is good.
How do I test a capacitor with an ohmmeter if my multimeter has no capacitance mode?
Set your multimeter to a high resistance range, at least 10kΩ, and connect the probes to the discharged, disconnected capacitor. A good capacitor shows resistance starting low and climbing steadily toward infinity as it charges. A reading stuck at zero means it is shorted, and an immediate OL reading means it is open.
How do I check for a bad capacitor with a multimeter if it passes the capacitance test?
If a capacitor reads a normal capacitance value but the circuit it powers still misbehaves, suspect a failed ESR (Equivalent Series Resistance) rather than a capacitance failure. This is especially common in power supplies and motherboards, and requires a dedicated ESR meter to confirm, since a standard multimeter’s resistance and capacitance functions cannot measure true ESR.
What does the capacitance symbol look like on a multimeter?
The capacitance symbol looks like two short parallel lines, sometimes shown as –|(– or ⊣⊢, representing the two plates inside a capacitor. Not every multimeter includes this setting, budget models sometimes omit it entirely.
Can I test a capacitor without removing it from the circuit?
For the most accurate reading, remove the capacitor from the circuit entirely. Other components connected in parallel can interfere with capacitance and resistance readings, giving you a misleading result. If removal is impractical, disconnect at least one leg to isolate the capacitor as much as possible.
What is a normal capacitor reading on a multimeter?
A normal reading falls within roughly 10 to 20% of the value printed on the capacitor’s casing. A reading significantly below that range, an OL display, or a reading stuck at zero all indicate the capacitor has failed and needs replacing.
Conclusion
Testing a capacitor with a multimeter starts with capacitance mode for a direct value comparison, and resistance mode works just as well if your meter lacks that setting. Visual inspection and the voltage charge test round out a complete diagnostic toolkit for most everyday repairs.
The step most guides skip entirely is recognizing when a normal capacitance reading is not the end of the story. A capacitor can measure fine and still have failed ESR, especially in power supplies and motherboards, and knowing when to reach for a dedicated ESR meter separates a thorough diagnosis from a guess.
Ready to go further? Check out our How to Test a Motherboard, ECU and PCB with a Multimeter guide for power supply and motherboard-specific capacitor failures, and our How to Use a Multimeter guide if you’re just getting started.
1 thought on “How to Test a Capacitor with a Multimeter (5 Methods, Including ESR)”