You find an old meter in a toolbox. It has a needle, a dial full of curved scales, and no screen at all. You wonder if it still works, and whether it is any good.
Digital multimeters dominate today, but the analog voltmeter never really left. It still shows up in workshops, on dashboards, on solar battery banks, and in the hands of technicians who like watching a needle move.
This guide explains how an analog voltmeter works, how to read the scales without guessing, how the analog ohmmeter behaves, and when an analog meter is the better tool.
What Is an Analog Voltmeter?
An analog voltmeter measures voltage and shows the result with a moving needle that sweeps across a printed scale.
More voltage moves the needle further to the right. You read the value by checking where the needle stops on the scale.
Analog Volt Meter vs Analog Voltage Meter: Same Tool, Different Names
Analog volt meter, analog voltage meter, and analog voltmeter all describe the same instrument. The spelling varies, the tool does not.
Panel-mounted versions are often called an analog voltage gauge. They work on the same principle but stay fixed in one spot. You will find them later in this guide.
How the Moving Needle Works
Inside the meter sits a small coil of wire between the poles of a magnet. When current flows through the coil, it twists against a tiny spring. The needle is attached to the coil, so it moves with it.
A voltmeter adds a resistor in series with that coil, called a multiplier resistor. The voltage you measure pushes a small current through the resistor and coil. More voltage means more current. More current means more needle movement.
The range selector switch picks a different multiplier resistor for each range. That is how one meter reads 1 volt, 10 volts, or 250 volts.
What Is an Analog VOM (Volt-Ohm-Milliammeter)?
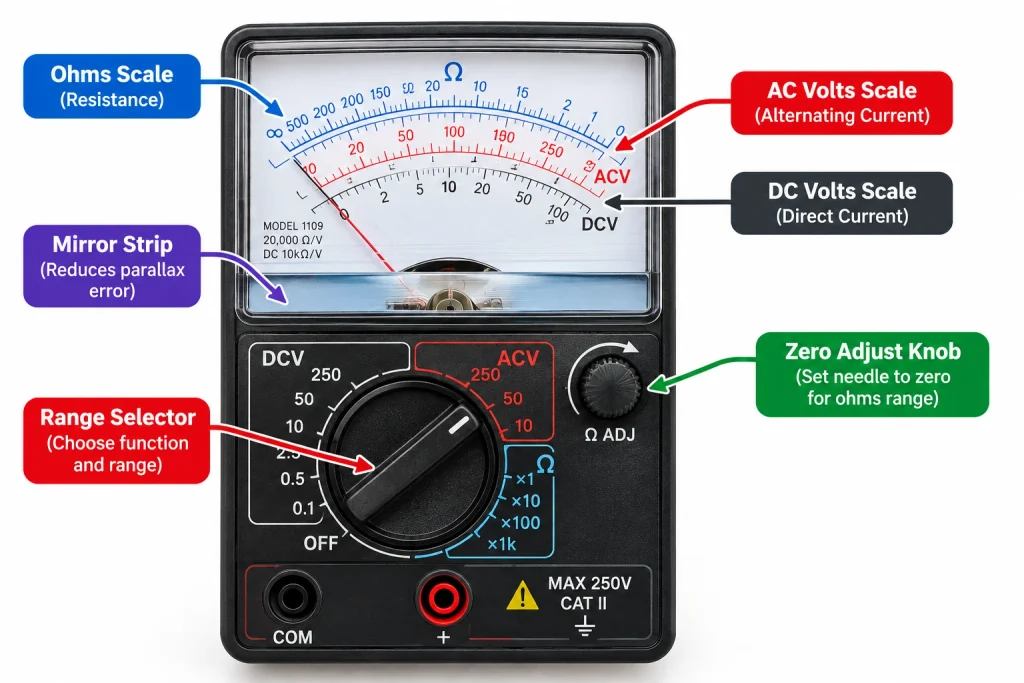
An analog VOM is a single meter movement that can be switched to measure several things. VOM stands for volt-ohm-milliammeter. It reads DC volts, AC volts, DC milliamps, and resistance in ohms.
When people say “analog multimeter,” they usually mean an analog VOM.
Analog DC Voltmeter vs Analog AC Voltmeter
How an Analog DC Voltmeter Works
The moving coil responds directly to direct current. An analog DC voltmeter needs no extra parts to read a battery or a DC power supply.
Polarity matters. Connect the red probe to the positive side and the black probe to the negative side. If you reverse them, the needle pushes backward against its stop. That can bend the needle.
How an Analog AC Voltmeter Works
The coil cannot follow current that reverses 50 or 60 times per second. It would just vibrate near zero.
An analog AC voltmeter solves this with a rectifier, a set of diodes that turns AC into pulsing DC. The meter then measures that pulsing DC and shows it on a scale calibrated to read the RMS value of a sine wave.
AC has no fixed polarity, so it does not matter which probe touches which side.
Why AC Readings Are Only Accurate for Sine Waves
The AC scale assumes the waveform is a smooth sine wave, like the power from a wall outlet. Square waves, dimmer output, and distorted waveforms will read wrong.
Most analog meters also print a separate low-voltage AC scale. Diodes behave differently at very small voltages, so that scale is spaced differently. Always use the AC scale that matches your range.
💡 For a full breakdown of AC and DC measurement, see our AC vs DC on a Multimeter guide.
Analog Electronic Multimeter vs Standard Analog VOM
Ohms Per Volt Sensitivity Explained
This is the most important spec on an analog meter, and most buyers never hear about it.
Sensitivity is measured in ohms per volt. It tells you how much current the meter steals from the circuit. The math is simple: sensitivity equals 1 divided by the full-scale current of the movement.
A movement that needs 50 microamps for full deflection gives 20,000 ohms per volt. A cheap movement that needs 1 milliamp gives only 1,000 ohms per volt.
To find the meter’s input resistance on any range, multiply the sensitivity by the range voltage. A 20,000 ohms-per-volt meter on the 10 volt range has an input resistance of 200,000 ohms.
Why Input Impedance and Loading Effect Matter
A standard analog VOM draws its power from the circuit you are measuring. In a low-resistance circuit, you will never notice. In a high-resistance circuit, the meter itself changes the answer. That is called the loading effect.
Here is a simple example. Two 100 kilohm resistors divide a 10 volt supply, so each should show 5 volts.
| Meter Connected Across One Resistor | Meter Input Resistance | Reading |
|---|---|---|
| None (the true value) | Not applicable | 5.0 V |
| Analog VOM, 20,000 ohms per volt on the 10 V range | 200 kilohms | About 4.0 V |
| Typical digital multimeter | 10 megohms | About 4.98 V |
The analog meter reads a full volt low because it pulls current out of the circuit. The circuit was never wrong. The meter was.
Vacuum Tube and FET-Based Analog Meters
An analog electronic multimeter fixes this problem. It adds an amplifier stage between the probes and the needle. Older versions used vacuum tubes and were called VTVMs. Later versions used field-effect transistors.
The amplifier gives the meter a high, constant input impedance, often 10 megohms or more, on every voltage range. The needle is still a moving needle, but the electronics do the hard work.
These meters need power from a battery or the mains. They are mostly found as vintage or used equipment today.
Analog Ohmmeter (Ohm Meter Analog): Reading a Backwards Scale
Reading resistance on an analog ohmmeter feels strange at first. The scale runs backward.
Why the Ohms Scale Runs Right to Left
An analog ohmmeter uses its own internal battery to push current through the resistor you are testing. Zero ohms lets the most current flow, so the needle swings all the way right. Higher resistance lets less current flow, so the needle sits further left.
That means zero ohms is on the right and infinity is on the left. The scale is also nonlinear. Values crowd together on the left side and spread out in the middle.
For best accuracy, choose a range where the needle lands near the middle of the ohms scale.
How to Zero the Analog Ohmmeter Before Each Reading
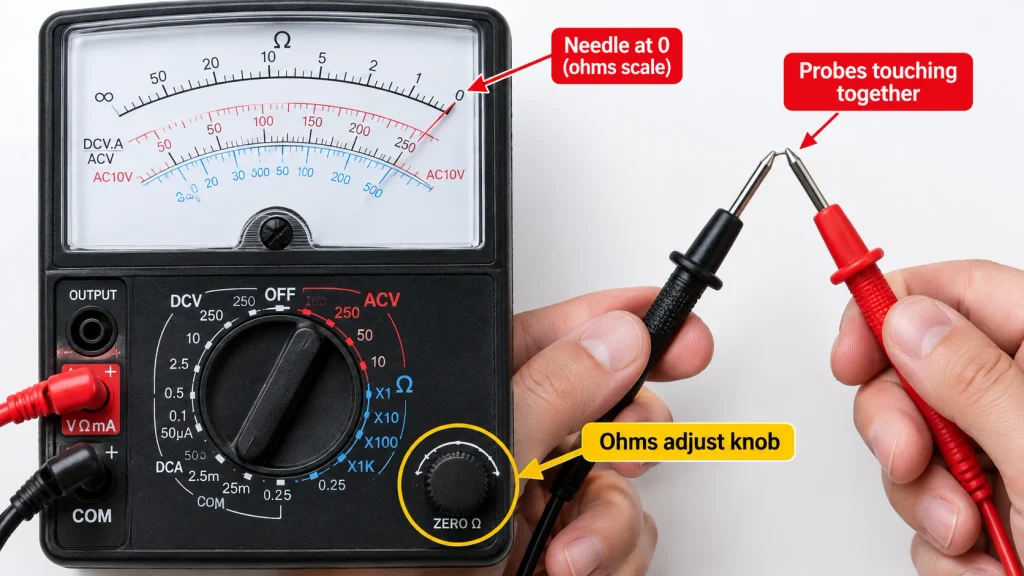
You must zero the ohmmeter every time you change range. Here is how:
- Set the selector to the ohms range you want
- Touch the two probe tips together
- Turn the ohms adjust knob until the needle sits exactly on 0 at the right side
- Separate the probes and measure your component
If you skip this step, every reading will be off.
Why the Internal Battery Matters
The ohms function is the only one that needs a battery. Voltage and current ranges on a standard analog VOM run without one.
If the battery weakens, you can no longer bring the needle to zero. That is your signal to replace it. Never store an analog meter for months with a battery inside, because a leaking battery can destroy the meter.
⚠️ Never use an ohms range on a live circuit. The meter applies its own voltage and expects a dead circuit. Outside voltage can damage the movement. To learn the same test on a digital meter, see our How to Measure Resistance with a Multimeter guide.
💡 A detail worth knowing: on many analog meters, the black lead is connected to the positive side of the internal battery when the meter is on an ohms range. That is the opposite of what you would expect. It matters when you check a diode or a transistor, so read your meter’s manual first.
How to Read an Analog Voltage Meter Correctly
Understanding the Multiple Scales
An analog dial can hold six or more scales. Typical ones include DC volts, AC volts, a low-voltage AC scale, ohms, and sometimes decibels. The scales share the same arc, so you must pick the right one.
Matching the Scale to the Range Selector
Match the scale to your range setting. Here is a simple example:
| Range Selector Setting | Scale Used | Needle Position | Reading |
|---|---|---|---|
| 10 V | 0 to 10 scale | 6.5 | 6.5 V |
| 100 V | 0 to 10 scale, multiply by 10 | 6.5 | 65 V |
| 250 V | 0 to 250 scale | 120 | 120 V |
When an analog volt reading looks strange, the most likely cause is the wrong scale.
Avoiding Parallax Error with the Mirror Scale
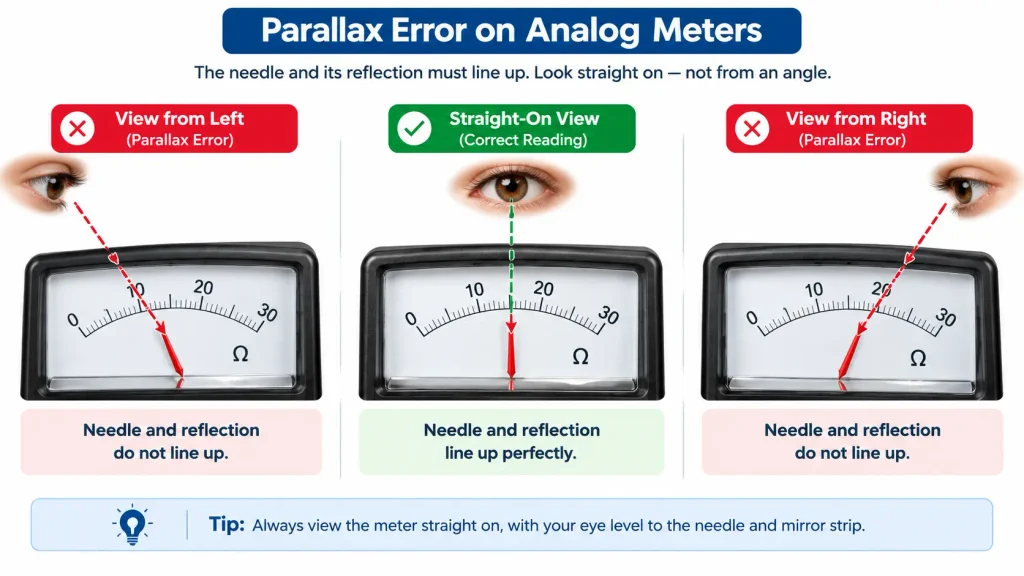
Many analog meters have a thin mirror strip along the scale. Its job is to remove parallax error. Parallax is the shift you see when you look at the needle from an angle.
Use one eye. Move your head until the needle covers its own reflection. Then read the value. That is the true reading.
Why Accuracy Depends on Where the Needle Sits
Analog meter accuracy is usually stated as a percentage of full scale, not of the reading. Many general-purpose analog meters are rated at roughly plus or minus 3 percent of full scale on DC ranges.
That has a big effect. On a 10 volt range, 3 percent is 0.3 volts of possible error anywhere on the scale. If the needle reads 1 volt, that error is 30 percent of the reading. If the needle reads 9 volts, it is about 3 percent.
The rule: pick a range that puts the needle in the upper half of the scale.
How to Measure Voltage with an Analog Voltmeter Step by Step
Step 1: Select AC or DC and the Right Range
Check the mechanical zero first. With the meter disconnected and in its normal position, the needle should rest exactly on zero. If it does not, turn the small screw on the meter face until it does.
Set the selector to DC volts or AC volts. If you do not know the voltage, start with the highest range.
Step 2: Connect the Probes in Parallel
Voltage is always measured across two points, not through the circuit. Touch the probes to the two points you want to compare.
For DC, red goes to positive and black goes to negative. For AC, either way works.
Step 3: Watch the Needle and Read the Scale
Watch the needle settle. If it slams to the right stop, disconnect at once and move to a higher range. If it moves backward, you have reversed a DC connection. Swap the probes.
Read the value on the scale that matches your range setting.
Step 4: Switch to a Lower Range for Better Accuracy
Once you know the approximate voltage, step the range down until the needle sits past the middle of the scale. This gives you a more accurate reading.
Analog Voltage Gauge: Panel Meters and Dashboard Gauges
How a Panel-Mount Analog Voltage Gauge Differs from a Handheld Meter
An analog voltage gauge is a fixed meter built into a panel, dashboard, or enclosure. It reads voltage all the time, at a glance.
Unlike a handheld analog voltmeter, it has no range switch, no ohms function, and no probes. The scale is fixed. Many automotive gauges cover a narrow window such as 8 to 16 volts, which is enough to show battery health.
Common Uses in Cars, Solar Systems, and Power Supplies
- Monitoring a car or boat battery while driving
- Watching a solar battery bank charge and discharge
- Showing output on a bench power supply
- Displaying battery voltage in a custom project or trailer
A gauge is great for spotting a trend, such as voltage dropping when a load turns on. It is not precise enough for a diagnosis. When the needle looks wrong, confirm it with a multimeter.
💡 See our How to Test a Car Battery with a Multimeter guide to check what your dashboard gauge is showing.
Analog Voltmeter vs Digital Multimeter: Which Should You Use?
Where Analog Still Wins
- Watching a changing value. A sweeping needle shows trends, peaks, and dips better than digits that flicker.
- Adjusting for a peak or null. Tuning a circuit is easier when you can watch the needle rise and fall.
- No battery for voltage and current. A standard analog VOM reads volts and milliamps with no power source.
- Ignoring phantom voltages. A low-impedance analog meter loads a wire, so weak induced voltages drop to near zero. That can help you tell a real voltage from a ghost one.
Where Digital Is Clearly Better
- Accuracy and resolution. Digits are easier to read and usually more precise.
- Input impedance. A typical digital multimeter has 10 megohms, so it barely disturbs a circuit.
- Extra functions. Digital meters add capacitance, frequency, temperature, and continuity beepers.
- Safety ratings. Modern digital meters carry CAT ratings. Many older analog meters do not.
- Forgiving of mistakes. Reversed polarity is harmless to a digital display.
Side by Side Comparison Table
| Feature | Analog Voltmeter or VOM | Digital Multimeter |
|---|---|---|
| Display | Moving needle on printed scales | Numeric LCD readout |
| Accuracy | Roughly 3 percent of full scale (varies) | Typically better and easier to read |
| Input resistance | 20,000 ohms per volt is common on good units | About 10 megohms typical |
| Needs a battery | Only for ohms (standard VOM) | Always |
| Best for | Trends, tuning, watching fluctuations | General measurement and diagnosis |
| Reverse polarity | Can bend the needle | Shows a minus sign |
| Extra functions | Few | Many |
| Typical safety rating | Often none on older units | CAT II or CAT III common |
⚠️ Safety note: Do not use a vintage analog meter on a breaker panel or on mains wiring unless it carries a valid modern safety rating. Older meters often lack the internal protection modern standards require. For panel work, use a CAT III rated meter. See our Multimeter Buying Guide for how to choose one.
💡 For a wider comparison of meter types, read our Voltmeter vs Multimeter guide and our What Is a Multimeter guide.
How to Choose an Analog Multimeter
New analog multimeters are less common than they once were, and many buyers look at used ones. Check these features either way.
Sensitivity Rating (Ohms Per Volt)
Look for at least 20,000 ohms per volt for electronics work. Higher is better. A meter rated at 1,000 or 2,000 ohms per volt will load most circuits badly and give false readings.
Mirror Scale and Needle Lock
A mirror strip helps you avoid parallax error. A needle lock or a rest position protects the movement while you carry the meter. A mechanical zero screw lets you correct the needle at rest.
A taut-band movement, which suspends the needle on a thin ribbon instead of pivots, tends to be more shock resistant and has less friction than a pivot-and-jewel movement.
Overload Protection and Fuses
A good analog meter has a fuse and protective diodes to guard the movement against mistakes. Ask whether the fuse is intact and easy to reach.
Checking a Used Meter
If you buy used, run these checks before you trust it:
- The needle moves smoothly and returns to zero
- The ohms adjust reaches zero on every range
- The battery compartment has no corrosion
- Readings match a known reference such as a fresh 1.5 volt battery and a precision resistor
Compare the meter against a digital multimeter you trust. Our How to Calibrate a Multimeter guide covers a simple home self-check.
Common Mistakes with Analog Voltmeters
Reading the Wrong Scale
The scales overlap on the same arc. Always match the scale to the range selector before you read the value.
Forgetting to Zero the Ohmmeter
Zero the ohmmeter each time you change range. A meter that was zeroed on the 1x range will read wrong on the 10x range.
Storing the Meter with a Weak or Leaking Battery
Remove the battery before long storage. A leaking cell can corrode the contacts and ruin the meter.
Connecting DC Probes with Reversed Polarity
Reversed DC polarity drives the needle backward against its stop. Repeated hits can bend it. Always confirm red is positive and black is negative.
Using an Ohms Range on a Live Circuit
The ohms function applies its own voltage. Outside voltage can burn out the movement. Turn the power off first.
Using the Meter in the Wrong Position
Many analog meters are calibrated to be used flat or upright, as marked on the dial. A meter used at the wrong angle can read slightly off.
FAQ
What is an analog voltmeter?
An analog voltmeter is a meter that measures voltage and shows it with a moving needle across a printed scale. A small current flows through a coil inside the meter, and the coil moves the needle. More voltage means more current and more needle movement.
What is the difference between an analog voltmeter and a digital multimeter?
An analog voltmeter shows the reading with a needle on a scale. A digital multimeter shows numbers on a screen. Digital meters are usually more accurate, load the circuit less, and add many functions. Analog meters are better at showing changing values and trends, and they need no battery for voltage readings.
Why does an analog ohmmeter read backwards?
The ohms scale runs right to left because the meter measures resistance by the current it allows to flow. Zero ohms lets the most current through, which swings the needle to the right. Higher resistance lets less current flow, so the needle sits further left. Infinity is on the left.
Can an analog voltmeter measure AC and DC?
Yes, if it is a multi-range analog VOM. The DC ranges use the moving coil directly. The AC ranges use a rectifier to turn AC into pulsing DC before it reaches the coil. A dedicated analog DC voltmeter or a panel gauge may measure only one type, so check the label.
What does ohms per volt mean on an analog meter?
Ohms per volt is the sensitivity rating. It tells you how much current the meter draws from a circuit. It equals 1 divided by the full-scale current of the movement. Multiply it by the range voltage to get the input resistance. A higher number means the meter disturbs the circuit less.
Are analog multimeters still worth buying?
For most people, a digital multimeter is the better everyday tool. An analog meter is worth having if you need to watch a value change in real time, tune a circuit for a peak, or read voltage and current without a battery. If you use one, choose a good sensitivity rating and use it with correct safety habits.
Conclusion
An analog voltmeter tells you the voltage through the movement of a needle. It measures DC directly, uses a rectifier to read AC, and shares a dial with an analog ohmmeter that runs backward and needs zeroing before every measurement.
Its weaknesses are real. Low input resistance can change the reading in a high-resistance circuit. The accuracy depends on where the needle sits. Older meters may lack modern safety ratings. Its strength is just as real: an analog meter shows trends and changes better than a flickering digital display.
Read the correct scale, remove parallax error with the mirror, zero the ohmmeter each time, and pick a range that puts the needle in the upper half of the scale. For most everyday testing, keep a digital multimeter within reach as well.
1 thought on “Analog Voltmeter Guide: How It Works, How to Read It, and When to Use One”