You flip the switch, and nothing happens. You swap the bulb, and still nothing. Now you are wondering: is it the switch, the light fixture, or the wiring?
A multimeter answers that in about 10 minutes. Checking a light switch is one of the easiest electrical tests in a home, and it can save you a new switch you do not need or a call-out you do not need.
Quick answer: To test a light switch with a multimeter, turn off the breaker, prove the switch is dead, and pull it out of the box. Set the meter to continuity and touch one probe to each brass terminal. A good single-pole switch beeps and reads close to 0Ω when ON, and shows OL when OFF. Any other result means the switch is bad.
💡 What OL means: OL stands for overload. In continuity mode, it means the resistance is too high to measure, so the switch is open. Some older meters show a “1” at the left edge of the screen instead, which means the same thing.
Before You Start: Safety and Tools
A US light switch carries 120V, enough to kill. The tests below are safe only when you follow every step in order.
What You Need
- Digital multimeter with continuity (or ohms) and AC voltage settings, rated CAT III for home wiring
- Non-contact voltage tester for a quick first check
- Screwdrivers: flathead for the cover plate, Phillips for the mounting screws
- Flashlight
- Phone camera to photograph the wiring before you disconnect anything
How to Prove the Switch Is Dead
Turning off the breaker is not enough. You have to prove the circuit is dead with the live-dead-live method:
- Live: Test your meter or voltage tester on a known working outlet. It should read about 120V.
- Dead: Turn off the breaker, then test every wire in the switch box. It should read 0V.
- Live: Test the known working outlet again. This proves your tester did not fail during step 2.
A switch box can hold wires from more than one circuit. Check every wire, not just the ones on the switch.
⚠️ Safety warning: If you see scorch marks, melted insulation, or smell burning in the box, stop. Leave the breaker off and call a licensed electrician.
For help choosing a tester, see my guide to the best voltage tester.
Method 1: Continuity Test (Power Off)
Using a multimeter to test a light switch this way is the most reliable method. The power stays off the whole time, and the result is a clear yes or no.
Step 1: Remove the Switch from the Box
With the circuit proven dead, remove the cover plate and the two mounting screws. Pull the switch gently out of the box. Take a photo of the wiring before you touch anything.
Step 2: Disconnect at Least One Wire
Loosen one terminal screw and remove its wire. Cap the bare end with a wire nut.
This step matters. If the switch stays wired in, the meter can read a path through the light fixture and other devices on the circuit. That gives you a false reading.
Step 3: Set Up the Meter
Plug the black lead into COM and the red lead into VΩ. Turn the dial to the continuity symbol, the one that looks like a sound wave. Touch the probe tips together. The meter should beep and read close to 0Ω.
Not sure which symbol to pick? My Multimeter Symbols Guide shows every one.
Step 4: Touch the Probes to the Terminals
A single-pole switch has two brass terminal screws, plus a green ground screw. Touch one probe to each brass screw. Ignore the green screw for now.
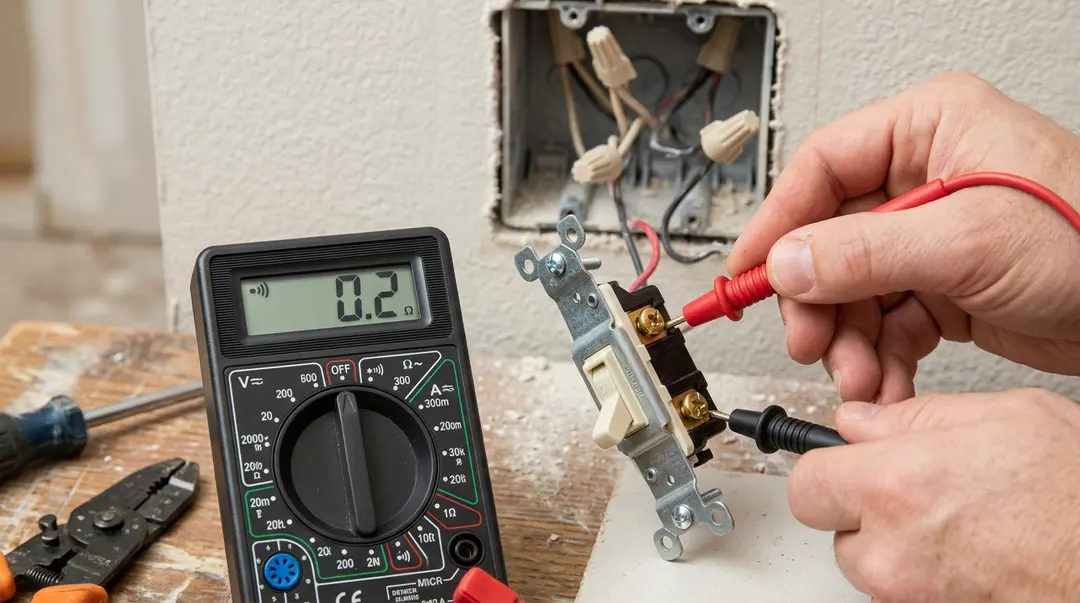
Flip it off and the meter should show OL. Anything else means the
switch needs replacing.
Step 5: Flip the Switch and Read the Meter
Flip the switch ON and OFF a few times while the probes stay in place. Watch the screen and listen for the beep.
Continuity Test Results
| Switch position | Reading | What it means | What to do |
|---|---|---|---|
| ON | Beep, 0Ω to 1Ω | Contacts close properly | Good |
| OFF | OL, no beep | Contacts open properly | Good |
| ON | OL, no beep | Contacts do not close | Replace the switch |
| OFF | Beep, near 0Ω | Contacts are stuck closed | Replace the switch |
| ON | Several ohms, or the reading jumps when you wiggle the toggle | Worn or burned contacts | Replace the switch |
As a final check, touch one probe to the green ground screw and the other to each brass terminal. Both should read OL. A low reading means the switch is leaking to its frame, and it must be replaced.
Real World Example: When the Switch Passes
Say the switch reads 0.3Ω when ON and OL when OFF. The switch is good, so the fault is somewhere else. Look next at the bulb socket, the fixture wiring, and any loose or burned connection in the box. For checking those wires, see my guide on How to Test Continuity with a Multimeter.
Method 2: Voltage Test (Without Removing the Switch)
This method is faster because nothing is disconnected. But the power is ON, so it is live work.
⚠️ Safety warning: Use a CAT III meter, hold the probes only behind the finger guards, and keep your other hand away from the box. If you are not comfortable working near live 120V wiring, use Method 1 instead.
Remove the cover plate and the mounting screws, then ease the switch forward so you can reach the terminal screws. Do not let the terminals touch the box. Set the meter to AC volts (V~).
Step 1: Check That Power Reaches the Switch
Touch the black probe to the bare copper ground wire or a grounded metal box. Touch the red probe to each brass terminal in turn, with the switch OFF.
- One terminal reads 114V to 126V: power is reaching the switch. This is the line terminal.
- Neither terminal reads voltage: the problem is upstream. Check the breaker and the wiring that feeds the box.
If the box has no ground wire, skip this step and use Method 1.
Step 2: Test Across the Switch
Now put one probe on each brass terminal and flip the switch. Leave a working bulb in the light fixture for this test.
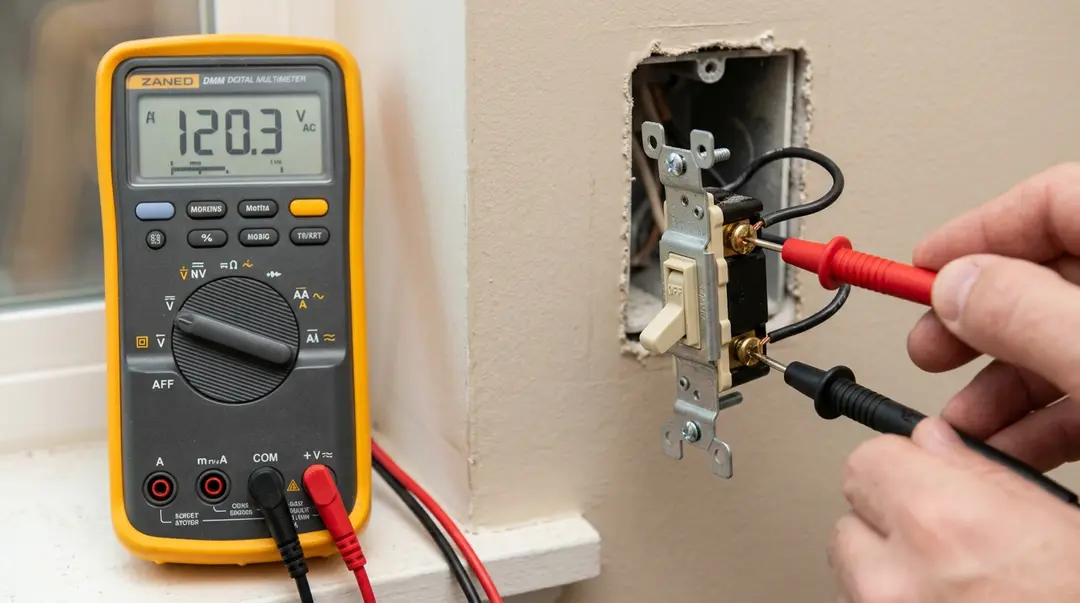
120V across its terminals. Flip it on, and the reading should drop to
near 0V.
| Switch position | Reading across the terminals | What it means |
|---|---|---|
| OFF | About 120V | Good. The switch is open, and the meter reads voltage through the bulb. |
| ON | Close to 0V | Good. The switch is closed. |
| ON | About 120V | Bad. The switch does not close. Replace it. |
| ON | A few volts, light dim or flickering | Bad. Burned contacts are dropping voltage. Replace the switch. |
| OFF | 0V | No power, or a dead bulb or fixture is breaking the path. Recheck Step 1 and the bulb. |
Why does a good switch read voltage when it is OFF? With the switch open, the meter connects to the hot wire on one side and, through the bulb, to neutral on the other. When the switch closes, both terminals sit at the same voltage, so the reading drops to near zero.
Watch Out for Ghost Voltage
A digital multimeter has a very high input resistance, usually 10MΩ. On a dead or disconnected wire that runs next to live wires, it can pick up a misleading reading, sometimes tens of volts. This is called ghost voltage.
If a reading does not make sense, switch your meter to LoZ mode if it has one. LoZ puts a small load on the circuit. A ghost reading collapses to near 0V, while real voltage stays.
For more on AC readings, see my guide on how to measure AC voltage.
How to Test a 3-Way Switch with a Multimeter
A 3-way switch lets you control one light from two places, such as the top and bottom of a staircase. It has three terminals plus ground:
- Common: usually the darker or black screw, sometimes marked COM on the switch body
- Two travelers: usually the lighter brass screws
Inside, the switch connects the common terminal to one traveler or the other. It never connects both at once.
With the power proven dead, photograph the wiring, mark the wire on the common terminal with tape, and disconnect the wires. Set the meter to continuity.
| Probes on | Position 1 | Position 2 |
|---|---|---|
| Common and traveler A | Beep, near 0Ω | OL |
| Common and traveler B | OL | Beep, near 0Ω |
| Traveler A and traveler B | OL | OL |
A good 3-way switch gives exactly this pattern. If common connects to neither traveler in one position, or to both, replace the switch.
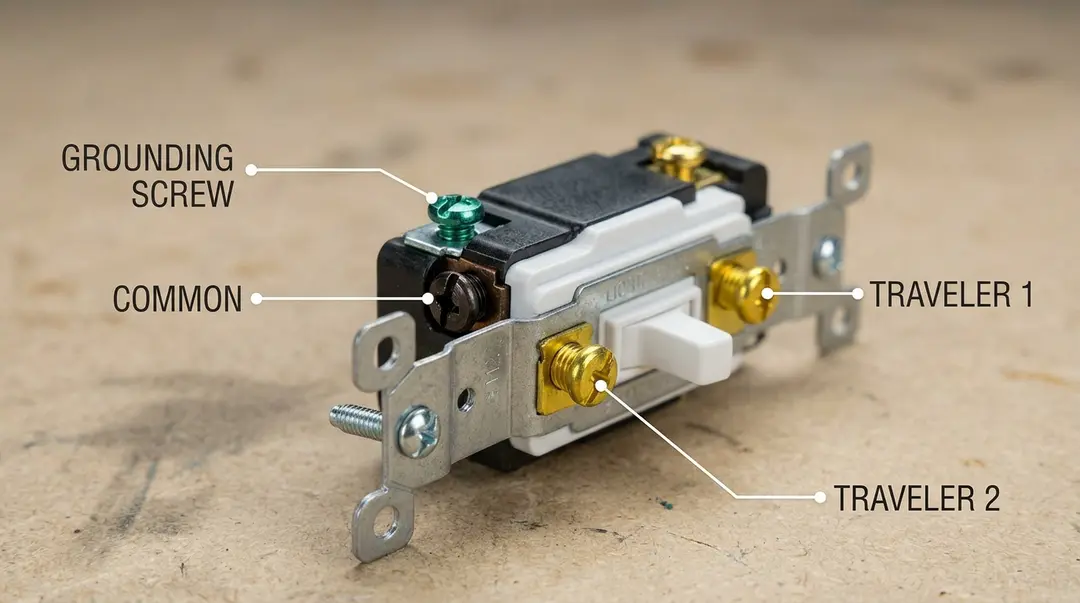
screw. In each toggle position, it should show continuity to one
traveler, switching sides when you flip it.
What About 4-Way Switches?
A 4-way switch sits between two 3-way switches when one light is controlled from three or more places. It has four terminals in two pairs. In one position, it connects the pairs straight across. In the other, it crosses them over.
To test it, use the maker’s diagram on the switch or its box to identify the pairs. In each position, each input terminal should connect to exactly one output terminal, and the connection should swap when you flip the switch.
Dimmer, Smart, and Other Power Switches
Not every switch can be tested with continuity.
Dimmer switches: Most modern dimmers are electronic, so a continuity test gives unreliable results. Instead, use Method 2, Step 1 to confirm power reaches the dimmer. If it does and the light stays off, the dimmer is the likely fault. If an LED bulb flickers or buzzes on a dimmer, check that the bulb is dimmable and listed as compatible before blaming the switch.
Smart switches: These contain electronics and often a relay that only works with power applied. Unpowered, many read OL in every position, so a continuity test proves nothing. Check that power reaches the switch, then follow the maker’s reset and troubleshooting steps.
Other power switches: To check a power switch with a multimeter on an appliance, power strip, or tool, unplug the device first. Then test it like a single-pole switch: continuity across its terminals, closed when ON and open when OFF. Two details to watch:
- Double-pole switches have two pairs of terminals. Test each pair separately.
- Lighted rocker switches have a small lamp inside. The lamp can show a resistance reading even when the switch is OFF, so disconnect the lamp terminal before you test.
Which Method Should I Use?
| Your situation | Best method |
|---|---|
| You want a definite answer on whether the switch is bad | Method 1: continuity test |
| You want a quick check without disconnecting wires, and you are comfortable with live work | Method 2: voltage test |
| The box has no ground wire | Method 1 |
| It is a 3-way or 4-way switch | Method 1, using the position pattern |
| It is a dimmer or smart switch | Method 2, Step 1, then swap with a known-good switch |
Do You Need a Light Switch Tester?
No special light switch tester is needed. A multimeter does both tests. Here is how the other common testers compare:
| Tool | What it tells you | Can it test a switch? |
|---|---|---|
| Multimeter | Continuity, resistance, and voltage | Yes. Both methods. |
| Continuity tester (battery and buzzer) | Whether a path is closed | Yes, for Method 1 only, with the power off |
| Non-contact voltage tester | Whether a wire is live | Only as a safety check. It cannot tell whether the contacts work. |
| Plug-in outlet tester (three lights) | Outlet wiring faults | No. It plugs into an outlet, not a switch. |
If you already own a multimeter, add a non-contact voltage tester for quick safety checks, and you have everything you need. For outlet problems, see my guide on how to test an outlet.
Common Mistakes When Testing a Light Switch
Trusting the breaker label. Breaker labels can be wrong. Always prove the switch is dead with the live-dead-live method.
Testing continuity with the power on. Continuity mode is for dead circuits only. Live voltage can damage the meter and gives false readings.
Leaving the switch wired in for a continuity test. The meter reads a path through the fixture and other devices. Disconnect at least one wire.
Misreading OL or “1”. Both mean the circuit is open. On a switch in the ON position, that means the switch is bad, not good.
Blaming the switch for a dead bulb. A dead bulb makes the voltage test read 0V across a switch that is OFF. Try a known-good bulb first.
Mixing up the 3-way common wire. Mark the common wire with tape before you disconnect it. Swapping it with a traveler makes the light work only in some switch positions.
FAQ
How do you test a light switch with a multimeter?
Turn off the breaker, prove the switch is dead, and disconnect at least one wire. Set the meter to continuity and touch a probe to each brass terminal. A good switch beeps and reads close to 0Ω when ON, and reads OL when OFF.
What should a good light switch read on a multimeter?
In continuity mode, a good single-pole switch reads 0Ω to 1Ω with a beep when ON, and OL with no beep when OFF. In a live voltage test across the terminals, it reads about 120V when OFF and close to 0V when ON.
Can you test a light switch without removing it?
Yes. With the power on, set the meter to AC volts and measure across the two brass terminals. About 120V with the switch OFF and close to 0V with it ON means the switch works. This is live work, so use a CAT III meter and keep your hands behind the probe guards.
How do I know if my light switch is bad?
Common signs are a light that will not turn on with a good bulb, flickering when you touch the toggle, or a switch that feels warm or makes a buzzing or crackling sound. A warm or noisy switch is a fire risk, so turn off the breaker and test it. A multimeter test confirms the fault.
How do you test a 3-way switch with a multimeter?
With the power off and the wires disconnected, put one probe on the common terminal, usually the dark screw. In one position, it should connect to one traveler; in the other position, to the other traveler. The two travelers should never connect to each other.
What is the best light switch tester?
A multimeter is the best light switch tester, because it handles both the continuity test and the voltage test. Pair it with a non-contact voltage tester for quick safety checks. A plug-in outlet tester cannot test a switch.
Conclusion
Testing a light switch with a multimeter takes about 10 minutes and tells you whether to replace the switch or look elsewhere.
- Prove it dead first. Turn off the breaker and use the live-dead-live method on every wire in the box.
- Use continuity for a sure answer. A good switch reads close to 0Ω when ON and OL when OFF.
- Use voltage for a quick check. A good switch reads about 120V across its terminals when OFF and close to 0V when ON, as long as the bulb is good.
If the switch passes both tests, the fault is in the fixture, the bulb socket, or the wiring. Ready to check those wires next? My guide on How to Test Wires with a Multimeter walks you through it.