Your wall outlet feels dead. Your RV shore power connection seems fine, but something is off. Your dryer outlet needs testing before you plug in a new appliance.
All of these situations call for the same skill: measuring AC voltage and AC current safely and correctly with a multimeter. This is one of the most useful things you can learn to do with the tool, and also one where a single wrong move, like inserting a probe into the wrong port, carries real risk.
This guide covers everything from basic AC voltage measurement to full outlet troubleshooting, 240V circuits, AC current measurement, and what every abnormal reading actually means.
What Is an AC Multimeter Setting?
The AC setting on a multimeter measures alternating current, the type of electricity that constantly reverses direction and powers your wall outlets, appliances, and household wiring.
AC vs DC: Quick Refresher
AC (alternating current) changes direction repeatedly, 60 times per second in the US and 50 times per second in most other countries. DC (direct current) flows in one steady direction, the kind of power that comes from batteries.
Your wall outlets, extension cords, and mains-powered appliances all run on AC. Your car battery, phone charger output, and most electronics run on DC.
What Does the AC Voltage Symbol Look Like?
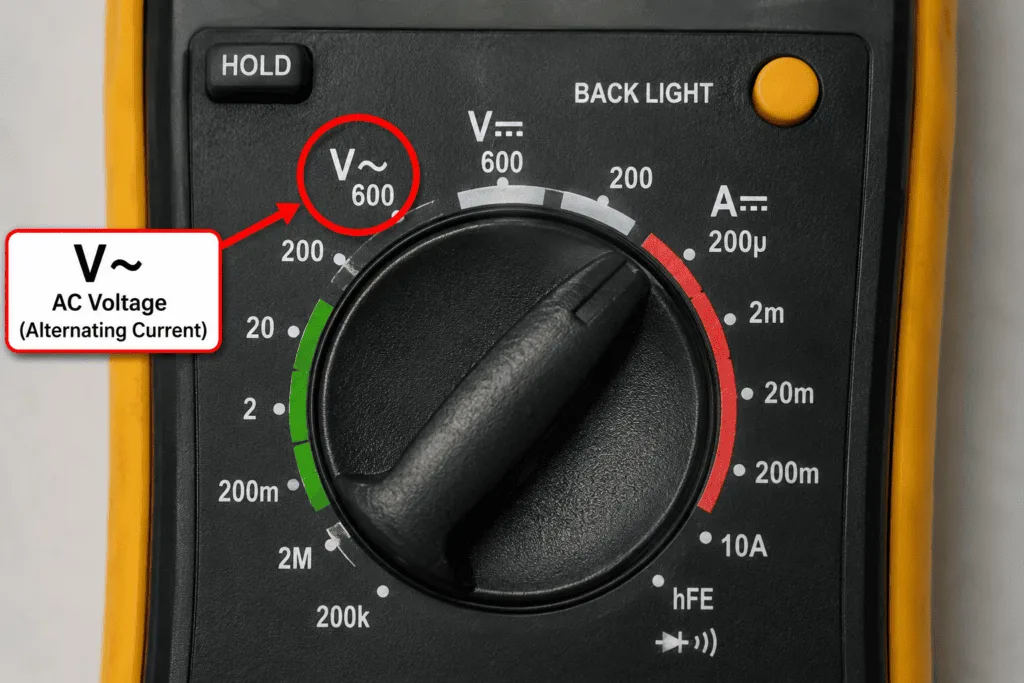
Look for V~ or VAC on your multimeter dial. The tilde (~) represents the wavy, alternating nature of the current.
What Does the AC Current Symbol Look Like?
Look for A~ or ACA on your multimeter dial. It uses the same tilde symbol as AC voltage, paired with the letter A instead of V. Not every basic multimeter includes an AC current setting, since it is used less often than AC voltage in everyday testing.
Safety First: AC Voltage and Current Testing Rules
AC voltage from a wall outlet can injure or kill. Follow these rules every time.
The One-Hand Rule
Hold both test leads in a single hand whenever possible, keeping your other hand away from the outlet, the wall, and any metal surface. This prevents a complete electrical path from forming across your chest if something goes wrong.
Never Touch the Probe Tips
Hold the probes only by their insulated handles. Never let your fingers slide down to the metal tips while testing a live circuit, and never let the two probe tips touch each other while connected.
Avoid Wet or Damp Conditions
Never test live circuits while standing on wet ground, in a damp basement, or with wet hands. Water dramatically increases the risk and severity of an electric shock.
What CAT Rating Do You Need for AC Testing?
Use a multimeter rated CAT II at minimum for testing wall outlets and plug-in appliances. Use CAT III if you are testing at a breaker panel, distribution board, or fixed building wiring. Never use a CAT I rated meter on household mains voltage.
⚠️ Important: Never insert either test lead into the A or mA current port while intending to measure voltage. This creates a direct short circuit through the meter and can cause a dangerous arc flash. Always confirm the red lead is in the VΩ port, not the current port, before testing voltage.
What You Need Before You Start
Tools Required
- A digital multimeter rated CAT II or higher
- Red and black test leads
- Insulated rubber gloves (recommended for extra protection)
How to Set Up Your Multimeter for AC Voltage
- Plug the black lead into the COM port
- Plug the red lead into the VΩ port
- Turn the dial to the AC voltage symbol (V~)
- If your multimeter is not auto-ranging, select a range above the expected voltage, typically 200V or 600V for household testing
- Some multimeters combine AC and DC voltage on the same dial position, in which case press the function button until AC appears on the display
How to Measure AC Voltage with a Multimeter: Step by Step
Step 1: Set the Dial to AC Voltage
Turn the dial to V~. Confirm the display shows the AC symbol before proceeding.
Step 2: Insert the Test Leads Correctly
Black lead into COM, red lead into VΩ. Double check this before touching anything, since inserting leads into the wrong jack is one of the most common and most dangerous multimeter mistakes.
Step 3: Connect to the Circuit (Parallel Connection)
Voltage is always measured in parallel, meaning you touch the probes across two points without breaking the circuit. For an outlet, this means inserting one probe tip into each slot.

Step 4: Read the Display
The number shown is your AC voltage reading. Compare it to the voltage standards table below.
Why AC Voltage Has No Polarity
Unlike DC, AC voltage has no fixed positive or negative side, since the current constantly reverses direction. This means it does not matter which probe goes in which slot when measuring straightforward AC voltage. You will never see a negative sign on the display during an AC measurement, even if the leads are swapped.
AC Voltage Measurement Standards: What Is a Normal Reading?
Standard Voltage Tolerance Table by Supply Type
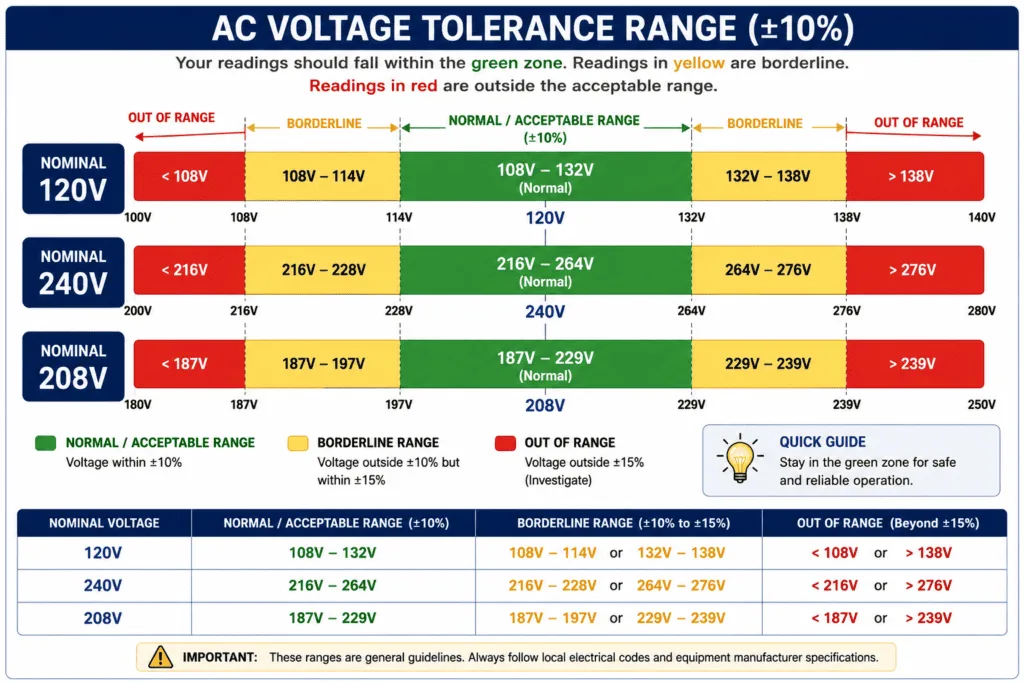
Electrical utilities and building codes allow a normal operating range around each nominal voltage rather than an exact fixed number. Use this table as a general reference.
| Nominal Supply | Typical Normal Range | Investigate If Outside |
|---|---|---|
| 120V (standard US outlet) | Approximately 114V to 126V | Below 110V or above 127V |
| 120/240V split phase (US home service) | Each leg approximately 114V to 126V, combined near 228V to 252V | Significant deviation from these bands |
| 208V (three phase, commercial) | Approximately 197V to 218V | Below 191V or above 220V |
| 240V (dryer, range, AC unit) | Approximately 228V to 252V | Below 220V or above 254V |
Why Voltage Trends Low More Often Than High
In most real-world electrical systems, voltage drop is far more common than voltage spikes. Long wire runs, heavy loads elsewhere on the same circuit, and aging connections all tend to pull voltage down rather than push it up. A reading that trends slightly low but stays within the acceptable band is usually normal. A reading significantly above the expected range is a less common but more serious warning sign, since it can indicate dangerous miswiring.
How to Test a Wall Outlet for AC Voltage (Complete Troubleshooting Workflow)
Outlet Anatomy: Hot, Neutral, and Ground
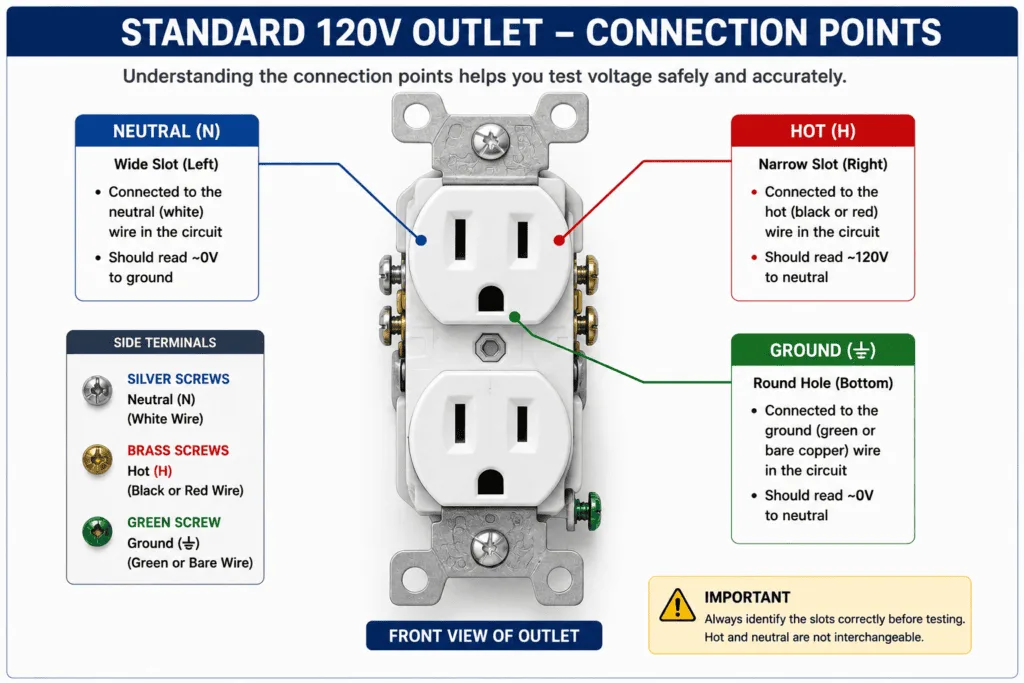
A standard North American outlet has three connection points. The shorter vertical slot is Hot. The taller vertical slot is Neutral. The rounded or U-shaped hole is Ground.
Test 1: Hot to Neutral
Insert one probe into the hot slot and one into the neutral slot. This is your baseline voltage reading and should fall within the normal range from the table above.
Test 2: Hot to Ground
Move one probe to the ground hole, keeping the other in the hot slot. This reading should be very close to your Hot to Neutral reading. A significant difference indicates a problem.
Test 3: Neutral to Ground
Move your probes to test between neutral and ground. This should read very close to 0V, with up to a few volts considered acceptable on a loaded circuit due to normal voltage drop.
Outlet Test Results Table
| Test | Normal Reading | Abnormal Reading | Likely Cause |
|---|---|---|---|
| Hot to Neutral | Within normal voltage range | 0V | Tripped breaker or GFCI needs reset |
| Hot to Neutral | Within normal voltage range | 200V or higher on a 120V circuit | Dangerous miswiring, do not use, call an electrician |
| Hot to Ground | Should match Hot to Neutral closely | 0V or a strange partial reading | Floating or disconnected ground wire |
| Neutral to Ground | Close to 0V | 120V or close to the full supply voltage | Reversed polarity, hot and neutral swapped |
⚠️ Any of the abnormal results above mean the outlet is unsafe to use until it has been properly inspected and repaired. Do not plug sensitive electronics into an outlet showing reversed polarity, a floating ground, or dangerously high voltage.
How to Test a 240V Circuit (Dryer, Range, AC Unit)
What Is Different About 240V Testing
A 240V circuit in a typical North American home uses two hot legs, each carrying roughly 120V relative to neutral, but 180 degrees out of phase with each other. Measured hot leg to hot leg, this produces roughly 240V. This is why large appliances like electric dryers, ranges, and central AC units use 240V outlets and dedicated circuits.
Step by Step 240V Circuit Test
- Set your multimeter to AC voltage on the 600V range
- Identify the two hot terminals on the 240V outlet or appliance connector
- Insert one probe into each hot terminal and read the voltage, which should fall in the 240V nominal range
- To check each leg individually, test from each hot terminal to the neutral or ground terminal separately, each should read approximately half of the combined reading
240V Test Results Table
| Test | Normal Reading | Abnormal Reading |
|---|---|---|
| Hot Leg 1 to Hot Leg 2 | Approximately 228V to 252V | Significantly below or above this range |
| Hot Leg 1 to Neutral | Approximately 114V to 126V | Significantly different from Hot Leg 2 reading |
| Hot Leg 2 to Neutral | Approximately 114V to 126V | Significantly different from Hot Leg 1 reading |
If one leg reads normally and the other reads at or near 0V, one leg has lost power, often from a single tripped breaker on a double-pole breaker pair. This is a common cause of a dryer or range appearing partially functional.
15A vs 20A Outlets: How to Tell Them Apart
Slot Shape Differences
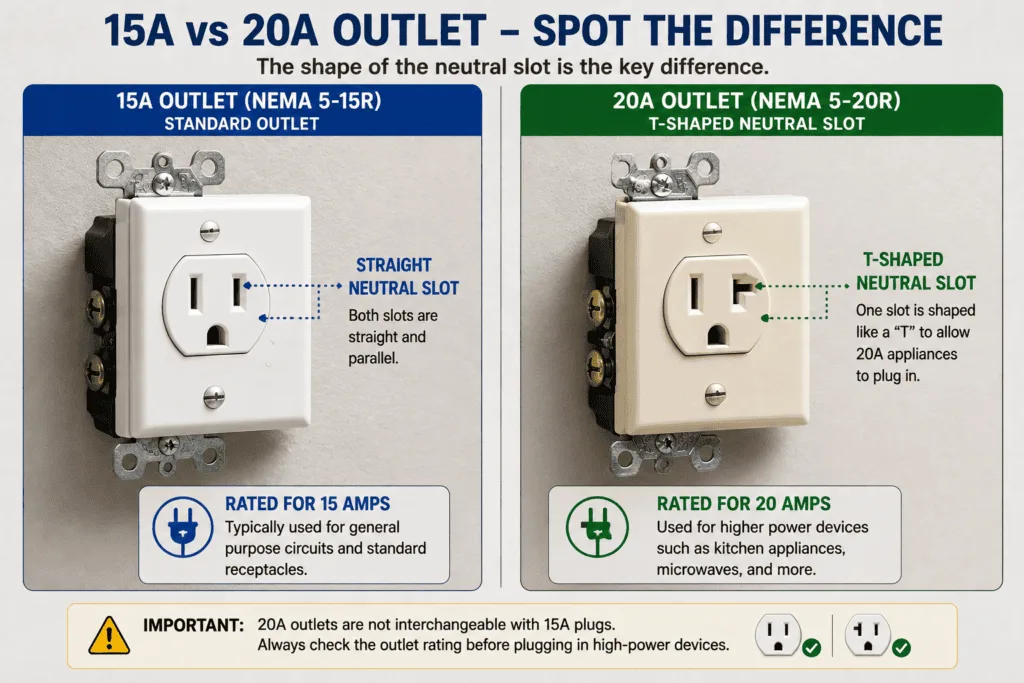
A standard 15A outlet has two straight vertical slots. A 20A rated outlet has one straight slot and one sideways T-shaped slot for the neutral connection, allowing it to accept both 15A and 20A rated plugs.
Why It Matters for Your Reading
The outlet type does not change the expected voltage reading, but it does change the maximum safe current the circuit can carry. A 15A outlet on a 15A breaker with correctly sized wiring supports up to 1,800W at 120V. A 20A outlet supports up to 2,400W. Even a 15A-shaped outlet wired to a 20A breaker with proper 12-gauge wiring can safely carry 20A, so always check the breaker panel labeling if you are unsure.
How to Measure AC Current with a Multimeter
Why AC Current Measurement Is Different from Voltage
Voltage is measured in parallel, without breaking the circuit. Current must be measured in series, meaning the multimeter becomes part of the circuit itself. For a live AC household circuit, this means physically breaking the circuit to insert the meter, something that should only be done by someone trained to do it safely, or avoided entirely in favor of the safer clamp meter method below.
Method 1: Multimeter in Series (When to Use It)
This method works well for low-voltage AC circuits in a controlled setting, such as testing a small transformer output on a workbench. It is not recommended for live household AC circuits unless you are a trained electrician following proper lockout procedures.
If you do use this method on an appropriate low-risk circuit:
- Move the red probe to the A or 10A port, never leave it in VΩ
- Set the dial to AC current (A~)
- Power down the circuit
- Break the circuit at one point and connect the meter in series across the gap
- Restore power and read the current
Method 2: Clamp Meter (Recommended for AC Current)
A clamp meter measures current by clamping around a single wire and reading the magnetic field it produces, with no need to break the circuit or touch bare conductors. This is the safer and more practical method for AC current measurement in nearly every household and light commercial situation.
Step by Step AC Current Test
- Set the clamp meter to AC current mode
- Open the jaws and clamp around one single conductor only, either the hot wire or the neutral wire, never both together
- Ensure the device or circuit is powered on and drawing current
- Read the current on the display
💡 Tip: Clamping around both wires of a cable at once cancels out the magnetic fields and gives a false reading near zero. Always isolate a single conductor for an accurate reading.
Advanced Multimeter Functions for AC Testing
HOLD Function
Press HOLD to freeze the current reading on the display. This is useful when the meter is in a position you cannot easily see while probing, letting you read the captured value afterward.
MIN/MAX Function
Press MIN/MAX to record the lowest and highest readings over a period of time. The meter beeps each time it captures a new extreme value. This is useful for catching brief voltage sags or spikes that a snapshot reading would miss.
REL (Relative) Function
Press REL to set the current reading as a zero reference point. Future readings display as the difference above or below that reference, useful for comparing voltage drop across a component relative to a baseline.
RANGE Function
On a multimeter with both auto and manual ranging, press RANGE to lock the meter to a specific fixed range instead of letting it auto-select. Experienced users sometimes prefer this for faster, more predictable readings when they already know the approximate expected value.
Common Mistakes When Measuring AC Voltage and Current
Inserting Leads Into the Wrong Jack
Placing the red lead into the A or mA current port while attempting to measure voltage creates a direct short circuit through the meter and risks a dangerous arc flash. Always confirm the red lead is in the VΩ port before testing voltage.
Testing in Wet Conditions
Water dramatically increases shock risk and can also damage your multimeter. Never test live AC circuits in damp basements, wet outdoor conditions, or with wet hands.
Misreading a Reversed Polarity Fault
A Neutral to Ground reading close to the full supply voltage does not mean your meter is broken. It means the hot and neutral wires have been installed backward somewhere in the circuit, a genuine wiring fault that needs correction, not a testing error.
Confusing 240V Readings with a Wiring Fault
Seeing 240V on a dedicated appliance circuit is completely normal and expected, not a sign of a problem. Confusion here usually comes from assuming every household circuit should read close to 120V, when large appliance circuits are intentionally wired for double that voltage.
FAQ
What does AC mean on a multimeter?
AC stands for alternating current, the type of electricity used in wall outlets, extension cords, and most household appliances. On a multimeter dial, look for the symbol V~ for AC voltage or A~ for AC current. The tilde represents the wavy, constantly reversing nature of alternating current.
Is it safe to measure AC voltage with a multimeter?
Yes, when done correctly with proper safety precautions. Use a CAT II or higher rated multimeter, hold both probes in one hand, never touch the metal probe tips, and avoid testing in wet conditions. Millions of electricians and informed DIYers safely measure AC voltage with a multimeter every day by following these basic rules.
What is a normal AC voltage reading for a wall outlet?
A standard US wall outlet should read between approximately 114V and 126V under normal conditions, with 110V to 127V generally considered acceptable. Readings significantly outside this range, especially near 0V or above 200V on a standard 120V outlet, indicate a problem that needs investigation before the outlet is used.
How do I measure AC current with a multimeter?
For low-risk, low-voltage circuits, you can move the red probe to the current port and connect the multimeter in series after powering down the circuit. For household AC circuits, a clamp meter is strongly recommended instead, since it measures current safely by clamping around a single wire without needing to break the circuit or touch live conductors.
What does it mean if my outlet reads 0 volts?
A 0V reading usually means the circuit has no power reaching it. Check whether the circuit breaker has tripped and needs resetting, or whether the outlet is protected by a GFCI that has tripped and needs its reset button pressed. If neither fixes the issue, there may be a break in the wiring that requires a licensed electrician.
What is the difference between 15A and 20A outlets?
A 15A outlet has two straight vertical slots. A 20A outlet has one straight slot and one sideways T-shaped slot, allowing it to accept both 15A and 20A rated plugs. The voltage reading is the same for both, but the maximum safe current, and therefore the maximum wattage the circuit can handle, differs between the two.
Conclusion
Measuring AC voltage and AC current with a multimeter comes down to a few consistent rules. Voltage is measured in parallel, with the red lead in the VΩ port. Current is measured in series, or more safely with a clamp meter, with the red lead moved to the dedicated current port first.
A normal 120V outlet reads between roughly 114V and 126V. A 240V appliance circuit reads roughly double that. Any reading of 0V, a reading dramatically above the expected range, or a Neutral to Ground reading close to full voltage all signal a real problem that needs attention before the circuit is used.
Follow the one-hand rule, never touch the probe tips, and confirm your lead placement before every test. These few habits are what separate safe, confident multimeter use from a dangerous mistake.