Your multimeter reads 11.8V on a car battery you know is fully charged. A second multimeter reads 12.6V on the same battery.
One of them is wrong. And without calibration, you have no way of knowing which one to trust.
This guide explains what multimeter calibration is, when you need it, how to do a simple self-check at home, and when to send your meter to a professional calibration lab. It also covers how to fix the most common multimeter problems — a meter that reads incorrectly, will not turn on, or has a blown fuse.
What Is Multimeter Calibration and Why Does It Matter?
Multimeter calibration is the process of comparing your multimeter’s readings against a known accurate reference standard and adjusting the meter if its readings fall outside acceptable limits.
Over time, every multimeter drifts. The internal components age. Temperature and humidity affect the electronics. Physical drops or electrical overloads stress the circuitry. All of these factors gradually push your meter’s readings away from the true value.
A calibrated multimeter gives you readings you can trust. An uncalibrated meter may look like it is working but give you readings that are slightly or significantly wrong — leading to misdiagnosis, wasted time, and potentially dangerous mistakes.
What Happens When a Multimeter Is Not Calibrated?
An uncalibrated multimeter can produce three types of errors:
Offset errors: The reading is consistently higher or lower than the true value by a fixed amount. For example, always reading 0.3V too high.
Drift errors: The reading slowly moves away from the true value over time. The meter was accurate last year but has drifted since then.
Non-linear errors: The reading is accurate at some values but not others. The meter might read correctly at 5V but be 0.5V off at 12V.
Who Needs to Calibrate a Multimeter?
Professional users electricians, engineers, HVAC technicians, and automotive mechanics should calibrate annually. Inaccurate readings in professional work create liability and safety risks.
Home users and hobbyists: a basic self-check once a year is enough. If your meter passes the self-check described in this guide, you can continue using it with confidence.
Signs Your Multimeter Needs Calibration
Look for these signs before your scheduled calibration interval arrives.
Readings That Do Not Match Known Values
If you test a fresh AA battery and it reads 1.3V instead of 1.5V, and you know the battery is new, your multimeter may be drifting. Always compare readings against a known good reference like a fresh battery or a precision resistor.
Inconsistent Readings on the Same Circuit
If you test the same circuit three times and get three meaningfully different readings, the multimeter has an internal problem. A stable, healthy meter gives the same reading every time on the same circuit.
Multimeter Has Been Dropped or Damaged
Any significant physical impact can knock the internal components out of calibration. If you have dropped your multimeter, calibrate it before trusting any future readings.
Multimeter Is More Than One Year Old Without Calibration
Most manufacturers specify that accuracy guarantees are valid for one year after calibration. After one year without calibration, you cannot rely on the accuracy specifications printed in the manual.
How Often Should You Calibrate a Multimeter?
Calibration Interval Table
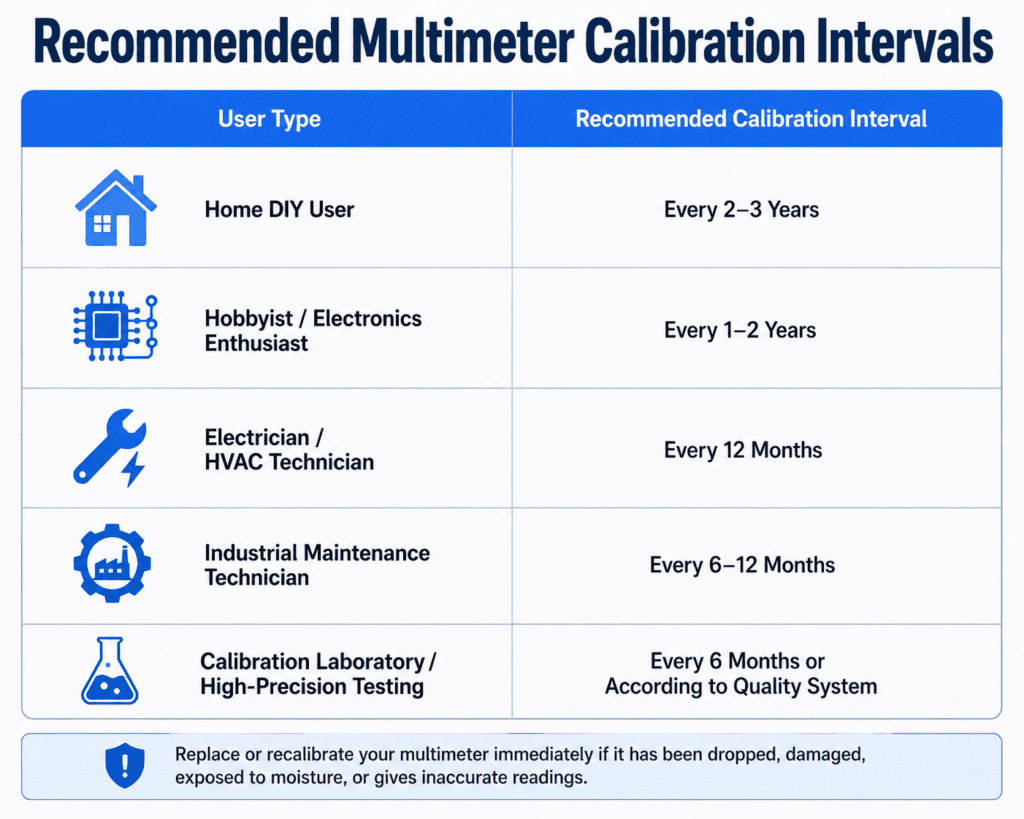
| User Type | Recommended Interval | Reason |
|---|---|---|
| Professional electrician or engineer | Every 6 to 12 months | High usage and safety requirements |
| HVAC or automotive technician | Every 12 months | Regular use on critical systems |
| Home DIY user | Every 12 months or when in doubt | Basic accuracy check sufficient |
| Hobbyist or student | Every 1 to 2 years | Low stakes measurements |
| After a drop or electrical overload | Immediately | Physical damage may have occurred |
| After exposure to extreme heat or moisture | Immediately | Environmental damage likely |
Factors That Affect How Often You Need to Calibrate
Usage frequency: The more you use your multimeter, the faster it drifts. A multimeter used daily needs more frequent calibration than one used monthly.
Environmental conditions: Heat, humidity, dust, and vibration all accelerate drift. A meter kept in a controlled environment lasts longer between calibrations.
Measurement precision required: For critical measurements like medical equipment or aerospace work, calibrate every 3 to 6 months. For basic home use, annual calibration is fine.
After mechanical or electrical shock: Always calibrate after a significant drop or after accidentally connecting the meter to a circuit beyond its rated voltage.
DIY Calibration: Simple Self-Check Method for Home Users
This self-check does not replace professional calibration, but it tells you whether your meter is trustworthy enough for home use. You need no special equipment, just a fresh battery and a precision resistor.
What You Need for a Basic Self-Check
- A brand new AA battery (1.5V rated)
- A precision resistor with a known value (1kΩ or 10kΩ — check the color codes or use a known-good resistor)
- A wall outlet for AC voltage check
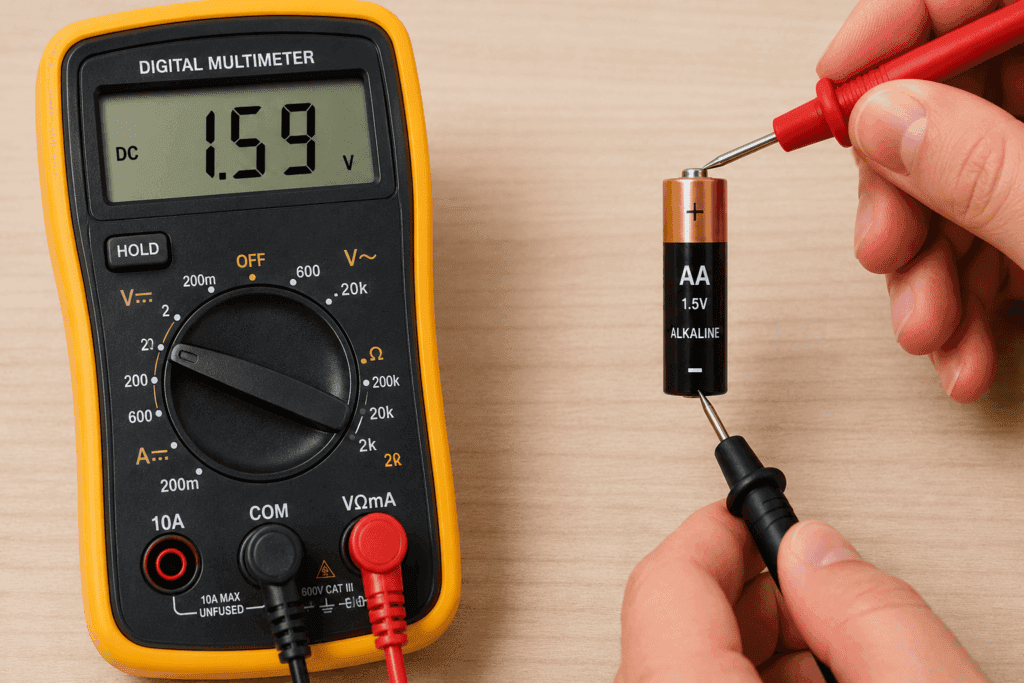
Step 1: Test a Known Battery Voltage
- Set your multimeter to DC voltage mode (V—)
- Select the 2V range or use auto-range
- Touch the red probe to the positive end of a brand new AA battery
- Touch the black probe to the negative end
- Read the display
A brand new unused AA battery should read between 1.50V and 1.65V. If your meter reads below 1.35V or above 1.7V, your meter may be out of calibration.
Step 2: Test a Known Resistor Value
- Set your multimeter to resistance mode (Ω)
- Select the appropriate range or use auto-range
- Touch the probes to each end of a precision resistor with a known value
- Read the display and compare to the resistor’s rated value
A good meter should read within 1 to 2% of the resistor’s rated value. For a 1 kΩ resistor, your meter should read between 980 Ω and 1020 Ω. A reading of 950Ω or 1100Ω suggests the meter has drifted.
Step 3: Test a Known AC Outlet Voltage
- Set your multimeter to AC voltage mode (V~)
- Select the 200V range or use auto-range
- Insert the probes into a wall outlet
- Read the voltage
In the US, a healthy outlet reads between 110V and 125V. In Pakistan and the UK, it ranges from 220V to 240V. If your reading is significantly outside this range, confirm with a second meter before assuming your meter is wrong — it could be a supply issue rather than a calibration issue.
How to Interpret Your Self-Check Results
| Test | Good Result | Possible Calibration Issue |
|---|---|---|
| AA battery test | 1.50V to 1.65V | Below 1.35V or above 1.7V |
| 1kΩ resistor test | 980Ω to 1020Ω | Below 950Ω or above 1050Ω |
| AC outlet test | Within expected range for your country | More than 10V outside expected range |
If your meter fails two or more of these checks, send it for professional calibration or consider replacing it.
How to Calibrate a Multimeter Professionally
Professional calibration requires a precision electrical calibrator, a piece of equipment that outputs known exact voltages, currents, and resistances. The most common calibrator for multimeter calibration is the Fluke 5522A, which costs several thousand dollars. This is why most users send their meters to a calibration lab rather than doing it themselves.
Step 1: Gather the Required Equipment
- A precision electrical calibrator rated at least 4 times more accurate than your multimeter (4:1 Test Uncertainty Ratio)
- Four test leads of equal length
- The multimeter manufacturer’s calibration procedure (from the user manual)
- A controlled environment, ideally 23°C plus or minus 2°C and low humidity
Step 2: Read the Manufacturer Instructions
Check the user manual for the specific calibration test points, acceptable tolerances, and any built-in adjustment procedures. Different multimeter models have different calibration requirements.
Step 3: Perform Pre-Calibration Checks
- Inspect for physical damage, corrosion, or broken terminals
- Confirm the battery is fresh and fully charged
- Allow the multimeter to stabilize at room temperature for at least 30 minutes
- Check that test leads are undamaged and making good contact
Step 4: Zero the Multimeter
- Set the multimeter to the measurement function you are calibrating
- Touch the test leads together
- Confirm the meter reads close to zero
- Use the zero adjustment function if your meter has one
Step 5: Test Each Function Against a Reference Standard
For each function, test multiple points across the full range:
DC Voltage: Apply known voltages (10mV, 1V, 10V, 100V) from the calibrator and record readings. AC Voltage: Apply known AC voltages at 50Hz or 60Hz and record readings. DC Current: Apply known currents and record readings; remember to use the correct current input port. AC Current: Apply known AC currents at test frequencies and record readings. Resistance: Apply known resistance values across the full range and record readings.
Step 6: Adjust If Necessary
If any reading falls outside the manufacturer’s specified tolerance, adjust the meter following the manufacturer’s procedure. Most handheld multimeters have trim pots or a built-in software calibration mode for fine adjustment. After adjustment, repeat the affected tests to confirm the readings are now within tolerance.
Step 7: Document the Calibration Results
Record the following information for the calibration certificate:
- Date and time of calibration
- Environmental conditions (temperature and humidity)
- Equipment used as the reference standard
- Test points tested and readings recorded
- As-found and as-left values for any adjustments made
- Technician name and signature
DIY Calibration vs Professional Calibration
DIY vs Professional Comparison Table
| Factor | DIY Self-Check | Professional Calibration |
|---|---|---|
| Equipment needed | Fresh battery, resistor | Precision calibrator ($3,000 to $30,000+) |
| Time required | 5 to 10 minutes | 30 minutes to 2 hours |
| Accuracy of check | Basic pass or fail only | Full specification verification |
| Calibration certificate | No | Yes — traceable to national standards |
| Cost | Free | $50 to $200 per meter |
| Suitable for | Home and hobby use | Professional and industrial use |
| Adjustment capability | None | Full adjustment to spec |
When to Send Your Multimeter to a Calibration Lab
Send your multimeter to a professional calibration lab when:
- Your work requires a calibration certificate for compliance or audit purposes
- Your meter fails the basic home self-check
- Your meter has been dropped or exposed to extreme conditions
- Your industry requires ISO 17025 accredited calibration (aerospace, medical, manufacturing)
- You need NIST-traceable calibration documentation
How Much Does Professional Multimeter Calibration Cost?
Professional calibration costs between $50 and $200 for most handheld digital multimeters. Premium multimeters with more functions cost more to calibrate. Expedited or on-site service costs more than standard turnaround.
For a basic budget multimeter costing $15 to $30, professional calibration may cost more than the meter is worth. In this case replacing the meter is more cost-effective than calibrating it.
How to Fix a Multimeter Not Working
Before assuming your multimeter needs calibration or replacement, check these common causes.
Check the Battery First
A low battery is the most common reason a multimeter gives erratic or low readings. Replace the battery with a fresh one before any other troubleshooting. Most digital multimeters use a 9V battery or AA batteries — check the back panel.
Check the Fuse
A blown internal fuse causes the multimeter to read OL on all settings or give no reading at all. See the fuse replacement section below for how to check and replace the fuse.
Check the Test Leads
Damaged test leads cause false readings, intermittent readings, or no readings. Inspect the leads for cuts, fraying, or broken tips. Test the leads by touching them together in continuity mode — you should hear a beep. No beep means the leads are faulty and need replacing.
Check the Dial and Settings
Confirm the dial is fully clicked into the correct position. A dial that is between two settings gives no reading or an incorrect reading. Turn the dial firmly until it clicks into place.
Multimeter Not Working Troubleshooting Table
| Symptom | Most Likely Cause | Fix |
|---|---|---|
| No display at all | Dead battery | Replace battery |
| Display on but no reading | Blown fuse | Replace fuse |
| OL on all settings | Blown fuse or wrong range | Replace fuse or select correct range |
| Erratic or jumping readings | Low battery or damaged leads | Replace battery or leads |
| Reads zero on everything | Wrong port or wrong setting | Move red probe to correct port |
| Reading is consistently wrong | Needs calibration | Perform self-check or professional calibration |
How to Fix a Multimeter Not Turning On
Dead Battery
This is the most common cause. Remove the back panel (usually held by one or two screws), locate the battery compartment, remove the old battery, and install a fresh one. Turn the multimeter on and test.
Blown Internal Fuse
A severely blown fuse can prevent the multimeter from turning on in some models. Follow the fuse replacement steps below.
Damaged Power Switch
If the battery is fresh and the fuse is intact but the meter still will not turn on the rotary switch or power switch may be damaged internally. This requires professional repair or meter replacement.
Step-by-Step Multimeter Not Turning On Fix
- Remove the back panel screws and open the battery compartment
- Replace the battery with a known fresh battery of the correct type
- Reinstall the panel and try turning the meter on
- If still no power locate and test the internal fuse (see next section)
- Replace the fuse if blown
- If the meter still does not turn on with a fresh battery and good fuse, the meter needs professional repair or replacement
How to Replace a Multimeter Fuse
What Is the Multimeter Fuse and What Does It Do?
The internal fuse in a multimeter protects the meter from damage when measuring current. If too much current flows through the meter, the fuse blows to protect the internal components. A blown fuse is very common when users accidentally measure amps with the probe in the VΩ port or when they exceed the meter’s maximum current rating.
Signs of a Blown Multimeter Fuse
- Meter works normally on voltage and resistance but reads OL on current measurement
- Meter reads OL on all settings
- Meter does not turn on (in severe cases)
- Visible burn mark on the fuse when inspected
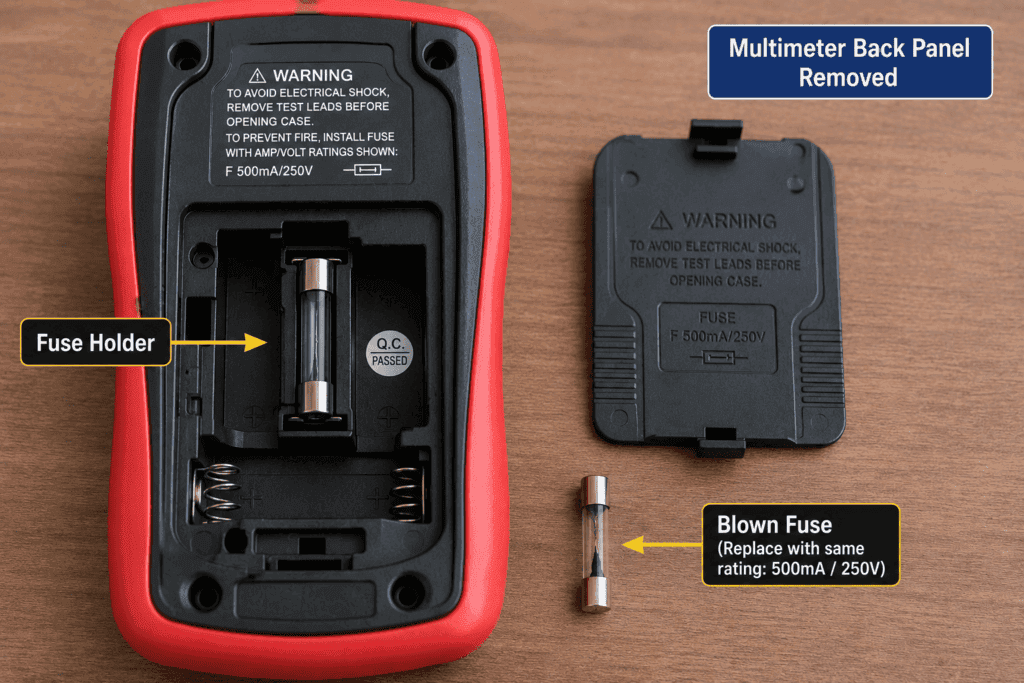
Step-by-Step Fuse Replacement Guide
- Turn off the multimeter and remove it from any circuit
- Remove the back panel screws (usually a small Phillips screwdriver)
- Open the back panel carefully
- Locate the fuse — it is usually a small glass or ceramic cylinder in a fuse holder
- Remove the blown fuse from the holder (pull it out or use a small screwdriver to lever it out)
- Inspect the fuse — a blown fuse has a broken wire or black scorch mark inside
- Install the correct replacement fuse (see below)
- Reassemble the back panel and test the meter
How to Choose the Right Replacement Fuse
The replacement fuse must match the original exactly in three specifications:
| Specification | Where to Find It | Why It Matters |
|---|---|---|
| Current rating (amps) | Printed on the old fuse or in the manual | A higher rated fuse removes the protection |
| Voltage rating | Printed on the old fuse | Must match or exceed the original |
| Physical size | Measure the old fuse length and diameter | Must fit the holder correctly |
⚠️ Warning: Never replace a blown fuse with a higher rated fuse or with a piece of wire. This removes the protection and can permanently damage your multimeter or cause a fire.
How to Reset a Multimeter
When Does a Multimeter Need Resetting?
Most basic digital multimeters do not have a reset function. However some advanced models — particularly those with data logging, min-max hold, or Bluetooth — have a reset function that restores factory default settings.
You may want to reset your multimeter when the display is showing unusual symbols, the backlight or hold function is stuck, or the meter is behaving unexpectedly after a software update.
Step-by-Step Multimeter Reset
- Check your multimeter’s user manual for the specific reset procedure — it varies by model
- Most resets involve holding a combination of buttons while turning the meter on
- Common reset method: hold the RANGE button while turning the dial from OFF to any measurement position
- Release the button once the display briefly flashes or shows all segments
- The meter is now reset to factory defaults
If your multimeter does not have a reset function and is behaving strangely, try removing the battery for 30 seconds and reinstalling it. This clears any stored settings in some models.
FAQ
How do I know if my multimeter needs calibrating?
Test your meter against known values — a fresh AA battery should read 1.5V to 1.65V and a 1kΩ resistor should read within 1 to 2% of its rated value. If your readings are significantly off or inconsistent, your meter needs calibration. Also calibrate after a drop, after exposure to extreme conditions, or if more than one year has passed since the last calibration.
Can I calibrate my multimeter at home?
You can perform a basic self-check at home using a fresh battery and a precision resistor. This tells you if your meter is approximately accurate. However, true professional calibration requires a precision electrical calibrator costing thousands of dollars. For home and hobbyist use, the self-check method is sufficient. For professional work, send the meter to an accredited calibration lab.
How much does multimeter calibration cost?
Professional calibration costs between $50 and $200 for most handheld digital multimeters. The exact cost depends on the number of functions being calibrated, the required accuracy level, and the turnaround time. For cheap budget multimeters costing under $30, it is usually more cost-effective to replace the meter than to pay for professional calibration.
Why is my multimeter reading incorrectly?
The most common causes are a low battery, damaged test leads, a blown internal fuse, or the wrong measurement mode selected. Replace the battery first. Then inspect the leads. Then check the fuse. If all of these are fine the meter may have drifted out of calibration and needs a professional check.
How do I replace a multimeter fuse?
Remove the back panel screws, open the battery compartment or fuse access panel, locate the fuse holder, and pull out the old fuse. Replace it with an identical fuse matching the original current rating, voltage rating, and physical size. Never use a higher rated fuse as a replacement. Reassemble the panel and test the meter.
Should I repair or replace my multimeter?
Replace it if the cost of repair or calibration exceeds the cost of a new meter. For budget meters under $30 replacement is almost always the better option. For mid-range meters ($30 to $100) a fuse replacement or battery change is worth doing. For professional-grade meters ($100 and above), repair and calibration is usually cost-effective and worth doing to maintain accuracy and compliance documentation.
Conclusion
Calibration is the difference between a multimeter you can trust and one that gives you false confidence.
For home users, the simple self-check in this guide is enough. Test a fresh battery, test a known resistor, and compare the readings to expected values. If your meter passes, you can use it with confidence.
For professional users, send your meter to an accredited calibration lab once a year. Get a calibration certificate. Keep records.
If your multimeter is not working, check the battery first, then the fuse, then the test leads. Most multimeter problems come down to one of these three things.