Your car battery keeps dying overnight. You charge it. It dies again. You replace it. It dies again. The problem is not the battery. Something in your car is draining it while the engine is off. This is called a parasitic draw.
A parasitic draw test with a multimeter is the fastest way to find the problem. And it is easier than most people think.
In this guide, you will learn how to measure amps with a multimeter, how to do a full parasitic draw test, how to read milliamps results, and when to use a clamp meter instead.
What Are Amps and Why Do They Matter?
Amps, or amperes, measure the flow of electrical current through a circuit. Think of electricity like water flowing through a pipe. Voltage is the water pressure. Amps are how much water actually flows through the pipe every second.
Understanding amperage helps you diagnose problems that voltage testing alone cannot catch. A circuit can show the correct voltage but still draw too much current — overloading wires, draining batteries, and burning out components.
Amps vs Volts vs Watts: What Is the Difference?
| Measurement | What It Describes | Common Unit |
|---|---|---|
| Amps (A) | The flow of electric current | Amperes (A) |
| Volts (V) | The electrical pressure driving the current | Volts (V) |
| Watts (W) | The total power consumed | Watts (W) |
The relationship between these three is simple:
Amps = Watts divided by Volts
Example: A 1200W hair dryer on a 120V outlet draws 10 amps of current.
What Are Milliamps on a Multimeter?
A milliamp (mA) is one thousandth of an amp. Most multimeters have two current settings:
- A setting: measures amps for large currents above 200mA
- mA setting: measures milliamps for small currents below 200mA
For a parasitic draw test, you will almost always use the mA setting because a normal key-off current draw is very small, usually under 100mA.
What Is a Safe Amperage Level for the Human Body?
| Current Level | Effect on the Human Body |
|---|---|
| 1mA | Barely noticeable tingling |
| 10mA | Strong tingling; safe limit for continuous contact |
| 20mA | Painful difficulty breathing |
| 50mA | Potentially life-threatening |
| 100mA and above | Cardiac arrest fatal |
⚠️ Warning: Always treat electrical current with respect. Even low voltages can push dangerous amounts of current through your body under the right conditions.
Amps vs Milliamps on a Multimeter
This is the section most beginners skip, and it is the most important one before you start measuring.
When to Use the A Setting
Use the A or 10A setting when measuring large currents. Examples include:
- Current drawn by a starter motor
- Current output of an alternator
- Current draw of high-power appliances
Set your multimeter to this setting when you expect the current to be above 200mA.
When to Use the mA Setting
Use the mA setting for small currents. Examples include:
- Parasitic draw testing on a car
- Testing small electronic circuits
- Measuring current draw of LED lights or sensors
Most parasitic draw readings fall between 20mA and 80mA. Always use the mA setting for this test.
What Happens If You Use the Wrong Setting?
If you use the mA setting when the current is actually several amps, you will blow the internal fuse of your multimeter instantly. This is the most common mistake beginners make when measuring amperage.
Always start on the highest setting (A or 10A) and work down to a lower setting if the reading is too small to see clearly.
What You Need Before You Start
Tools Required
- A digital multimeter with both A and mA current settings
- Red and black test leads
- Insulated gloves (recommended)
- A fully charged car battery (for parasitic draw test)
- Alligator clip leads (optional but very helpful for hands-free testing)
How to Check Your Multimeter Is Rated for Current Measurement
Look at the back of your multimeter or check the user manual. Confirm:
- It has a dedicated A port for current measurement
- The maximum current rating is listed (usually 10A)
- It has an internal fuse to protect against overload
💡 Tip: Not sure how to read the symbols on your multimeter? Check out our Multimeter Symbols Guide for a full breakdown of every dial setting.
How to Set Up Your Multimeter for Current Measurement
Setting up your multimeter for current measurement is different from voltage testing. The most important difference is probe placement.
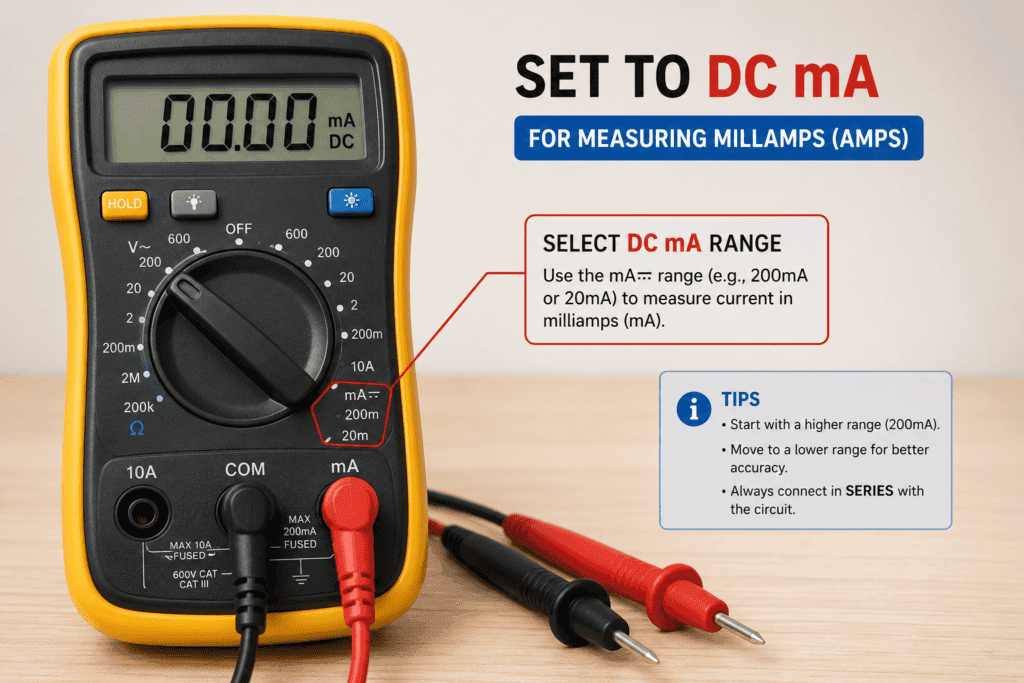
Step 1: Plug the Black Probe into the COM Port
The black probe always goes into the COM port. This is the common or ground reference port. It is the same port you use for voltage and resistance testing.
Step 2: Plug the Red Probe into the A Port
For current measurement, the red probe must go into the A port — not the VΩ port you use for voltage. This is the most important step. Using the wrong port will give you no reading or will blow your multimeter fuse.
If your multimeter has both an A port and a mA port, use the mA port for parasitic draw testing and the A port for large current measurements.
Step 3: Select AC or DC Current Mode
Turn the dial to the current setting. Look for:
- A with a straight line (⎓): DC for batteries and car circuits
- A with a wavy line (~): AC for household appliances
For a parasitic draw test on a car, always select DC current.
Step 4: Set the Range Higher Than Expected Current
If your multimeter is not auto-ranging, start at the highest setting (10A) first. You can always move to a lower range once you confirm the current is within a safe level.
If your multimeter is auto-ranging, it will select the correct range automatically.
How to Do a Parasitic Draw Test with a Multimeter
This is the main reason most people need to measure amps on a vehicle. A parasitic draw test tells you exactly how much current your car is drawing while the engine is off.
What Is a Parasitic Draw?
A parasitic draw is unwanted electrical current flowing out of a car battery while the vehicle is parked and switched off. Every modern car has some key-off current draw — clocks, alarm systems, and computer modules all use a small amount of power. But when this draw is too high, it drains the battery overnight.
What Is a Normal Parasitic Draw Reading?
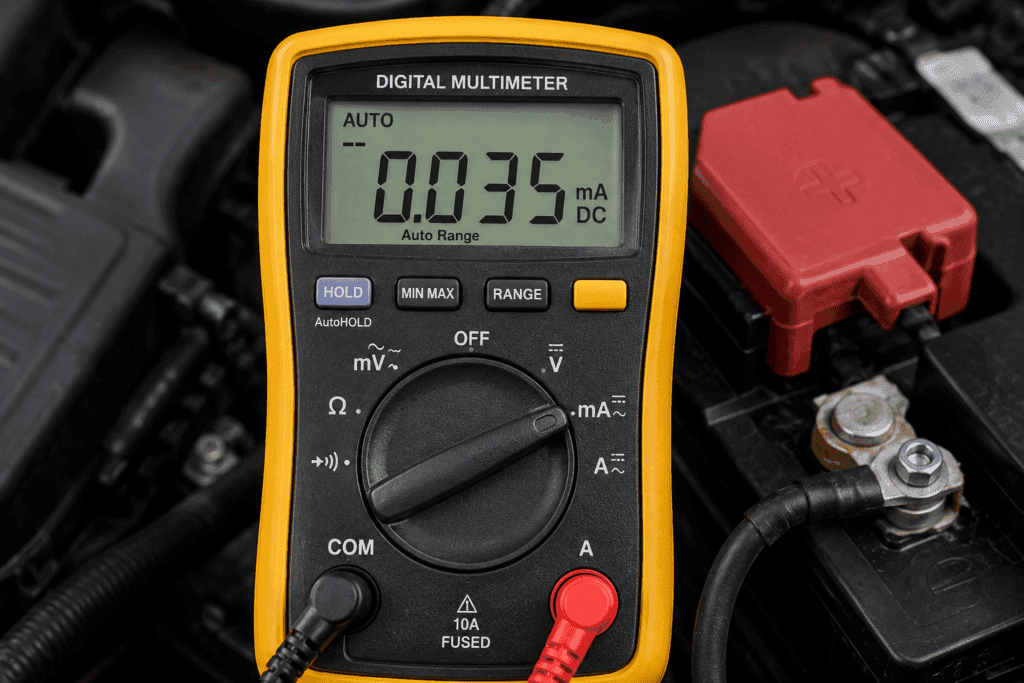
A normal parasitic draw on most vehicles is between 20mA and 80mA after the car’s computers have gone to sleep. This sleep period usually takes 10 to 30 minutes after the ignition is switched off.
What Is a Bad Parasitic Draw Reading?
Any reading above 100mA after the sleep period is considered a parasitic drain problem. Readings above 200mA will drain a healthy battery within a few days.
Step 1: Turn Off the Vehicle and All Accessories
Turn off the engine. Turn off all lights, radio, air conditioning, and accessories. Close all doors. Remove the key from the ignition.
Wait at least 10 to 30 minutes. This allows the vehicle’s computers and modules to enter sleep mode. Testing too soon gives a falsely high reading.
Step 2: Disconnect the Negative Battery Terminal
Open the hood and locate the battery. Use a wrench to loosen and remove the negative terminal (marked with a minus sign or black color). Do not disconnect the positive terminal.
⚠️ Warning: Do not let the negative terminal touch the battery post while your multimeter is connected. This creates a direct short circuit and can blow your multimeter fuse immediately.
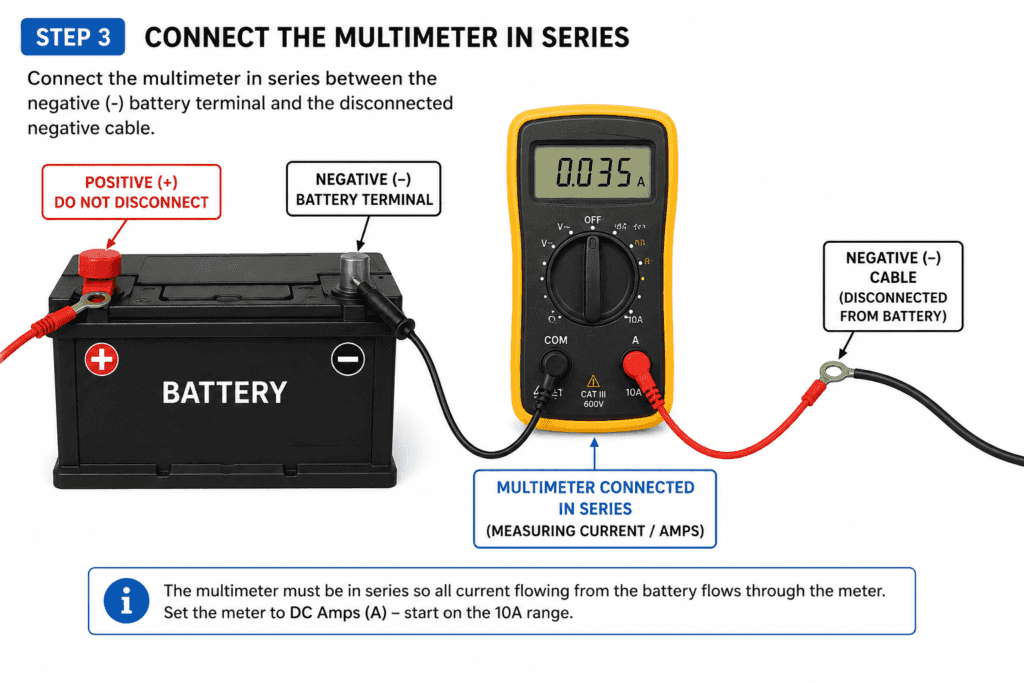
Step 3: Connect the Multimeter in Series
This is the key step. To measure current, your multimeter must be connected in series with the circuit — not in parallel like you do for voltage.
Connect the multimeter between the negative battery terminal and the battery post:
- Touch the red probe to the battery negative post (where the cable was connected)
- Touch the black probe to the negative battery cable (the cable you removed)
Now the current flows from the battery, through your multimeter, and into the vehicle’s electrical system. Your multimeter is now part of the circuit.
Step 4: Wait for the Reading to Stabilize
Watch the display. The reading will start high and drop as the vehicle’s computers go to sleep one by one. Wait at least 10 minutes for the reading to stabilize before recording your result.
Do not open any doors or touch anything in the car during this time. Opening a door wakes up the modules and resets the sleep timer.
Step 5: Read the Milliamps on the Display
Once the reading has stabilized, note the number on your display. This is your parasitic draw reading in milliamps.
Parasitic Draw Reading Results Table
| Reading | What It Means | What to Do |
|---|---|---|
| Under 50mA | Normal — no parasitic drain | No action needed |
| 50mA to 100mA | Borderline — monitor the battery | Watch for battery drain over time |
| 100mA to 200mA | Above normal — investigate further | Begin pulling fuses to isolate the circuit |
| Above 200mA | Excessive drain — battery will die | Find and fix the cause immediately |
| Above 1A (1000mA) | Severe drain | Check for shorted wiring or stuck relay |
💡 Tip: To find which circuit is causing the drain, pull fuses one at a time from the fuse box while watching the multimeter. When the reading drops significantly, you have found the problem circuit.
How to Read Milliamps Results on a Multimeter
What Does OL Mean When Measuring Amps?
OL means overload. The current is higher than the range your multimeter is set to measure.
If you see OL during a parasitic draw test, switch to the higher A setting immediately. Do not leave the multimeter on the mA setting with an overload reading — this can blow the internal fuse.
Milliamps Reading Chart
| Reading | What It Means |
|---|---|
| 0mA to 20mA | Very low draw — normal for simple vehicles |
| 20mA to 80mA | Normal range for most modern vehicles |
| 80mA to 100mA | Slightly elevated — monitor closely |
| 100mA to 500mA | Excessive drain — investigation needed |
| 500mA and above | Serious fault — find immediately |
| OL | Current exceeds range — switch to higher setting |
How to Measure AC Current with a Multimeter
AC measurement is less common for most DIY users. You would measure AC when checking the current draw of a household appliance or testing an AC motor.
What Is AC Current?
AC stands for alternating current. In an AC circuit, the current changes direction many times per second. Household outlets, motors, and most mains-powered appliances use AC current.
When Would You Measure AC Current?
- Checking if an appliance is drawing more current than rated
- Testing an electric motor for overload
- Diagnosing a high electricity bill from a specific device
Step by Step AC Current Measurement
- Important: Connect the multimeter in series with the circuit — break the circuit and insert the meter so current flows through it
- Set the dial to AC current (A~)
- Plug the black probe into COM and the red probe into the A port
- Connect the probes across the break in the circuit
- Power on the appliance and read the display
Safety Warning for AC Current Measurement
⚠️ Important: Measuring AC current from household mains (120V or 240V) is dangerous. Always use a CAT III rated multimeter and insulated probes. For high-current AC measurement, use a clamp meter instead — it is much safer because it does not require breaking the circuit.
How to Measure DC Current with a Multimeter
DC measurement is the most common test for automotive and battery-powered circuits.
What Is DC Current?
DC stands for direct current. In a DC circuit, current flows in one direction only. Car batteries, portable electronics, solar panels, and DC motors all use direct current.
Step-by-Step DC Current Measurement
- Turn off the power to the circuit completely
- Set the dial to DC (A⎓)
- Plug the black probe into COM and the red probe into the A port
- Break the circuit and connect the multimeter in series
- Turn on the power and read the display
- Leave the probes in place for 60 seconds to get a stable reading
DC Current Reading Results
| Reading | What It Means |
|---|---|
| Within expected range | Circuit is drawing normal current |
| Higher than expected | Component is drawing excess current |
| 0A | No current flowing; check connections |
| OL | Exceeds range switch to higher setting |
Using a Clamp Meter for Amps: Easier and Safer
What Is a Clamp Meter?
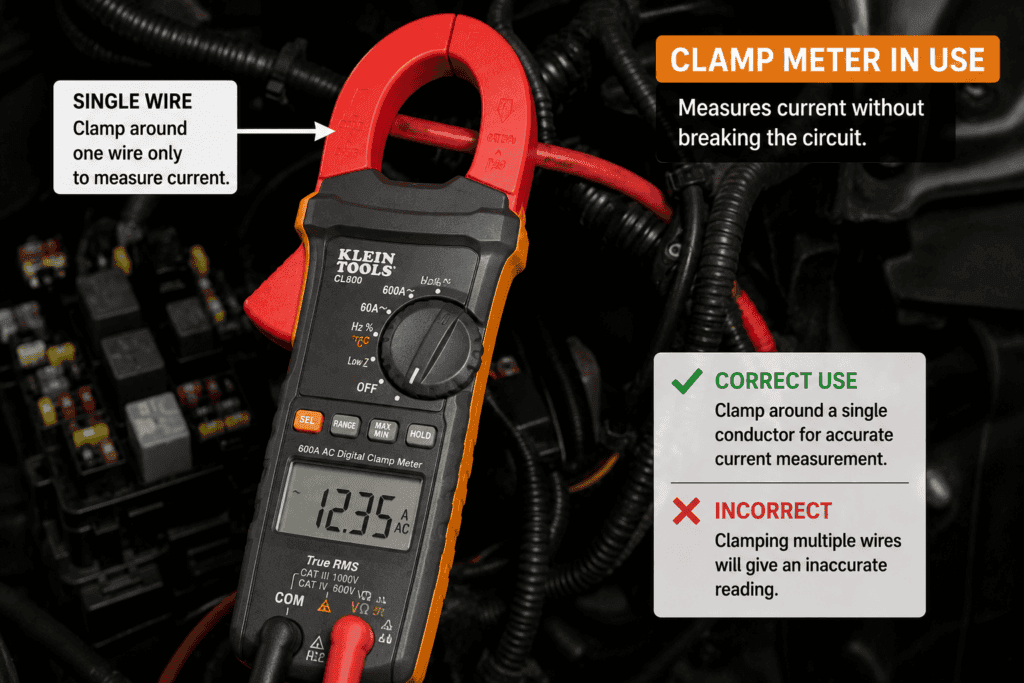
A clamp meter is a specialized tool that measures current without breaking the circuit. It works by clamping its jaws around a single wire. The jaws detect the magnetic field created by current flowing through the wire and calculate the amperage from that field.
You never need to disconnect anything. You never need to connect in series. You simply clamp around the wire and read the display.
Clamp Meter vs Multimeter: Which One Should You Use?
| Feature | Multimeter | Clamp Meter |
|---|---|---|
| Requires breaking circuit | Yes | No |
| Safe for high current | Risky above 10A | Yes — up to 1000A |
| Accuracy for small currents | Better (mA range) | Less accurate below 1A |
| Best for parasitic draw test | Yes | Not ideal for low mA readings |
| Best for large AC/DC | Not ideal | Yes |
| Cost | More affordable | Slightly more expensive |
| Ease of use | Requires series connection | Clamp around wire and read |
💡 Tip: For a parasitic draw test, use your multimeter — it is more accurate for small milliamp readings. For testing large currents in appliances or motors, use a clamp meter. It is safer and easier.
How to Measure Amps with a Clamp Meter
- Set the clamp meter to AC or DC mode
- Open the clamp jaws by pressing the trigger
- Clamp around a single wire only — never clamp around two wires at once
- Close the jaws firmly around the wire
- Read the current on the display
Real World Examples of Amperage Testing
Testing a Car for Parasitic Draw
Your car battery dies after two days of not driving. You connect your multimeter in series with the negative battery terminal. After 20 minutes, the reading stabilizes at 180mA. This is above the normal range. You begin pulling fuses one at a time. When you pull the fuse for the infotainment system, the current drops to 45 mA. The infotainment unit is not going to sleep properly and is draining the battery.
Checking If an Appliance Is Drawing Too Much Current
Your electricity bill is unusually high. You suspect your old refrigerator is the cause. You use a clamp meter to measure the current around the live wire going to the refrigerator. It reads 8A. The rated current on the label says 4A. The compressor motor is failing and drawing double the rated current.
Measuring Current in a DC Motor Circuit
You are building a small robot and want to check how much current the motor draws. You connect your multimeter in series with the motor circuit on the DC setting. The display reads 450mA. This is within the safe range for your chosen wiring gauge.
Common Mistakes When Measuring Amps
Plugging the Red Probe into the Wrong Port
The most common mistake is leaving the red probe in the VΩ port instead of moving it to the A port. This gives you no reading at all for current and can damage your multimeter.
Always move the red probe to the A port before measuring current. Move it back to the VΩ port when you are done.
Not Connecting in Series
Voltage is measured in parallel across two points in a circuit. Current must be measured in series; the multimeter must become part of the circuit, and current must flow through it.
Connecting in parallel when measuring current creates a direct short circuit. This blows your multimeter fuse instantly.
Exceeding the Multimeter Maximum Rated Current
Most multimeters handle up to 10A on the A setting. Going above this blows the internal fuse and sometimes permanently damages the meter.
Always check the expected current level before connecting. If you expect more than 10A, use a clamp meter instead.
Forgetting to Switch Back After Testing
After measuring current, always move the red probe back to the VΩ port. If you forget and then try to measure voltage with the probe still in the A port, you create a short circuit across the voltage source. This blows your fuse and can damage the circuit you are testing.
FAQ
What port do I use to measure amps on a multimeter?
Plug the black probe into the COM port. Plug the red probe into the port labeled A or 10A for large currents. For small currents like a parasitic draw test, use the mA port if your multimeter has one. Never use the VΩ port for current measurement — it is only for voltage and resistance.
What is a normal parasitic draw reading?
A normal parasitic draw on most modern vehicles is between 20mA and 80mA after the vehicle’s computers have entered sleep mode. This sleep period takes 10 to 30 minutes after the ignition is switched off. Any reading above 100mA after the sleep period indicates a problem that needs investigating.
What does OL mean when measuring current?
OL means overload. The current flowing through the circuit is higher than the range your multimeter is set to measure. Switch to a higher range setting immediately. If you leave the multimeter on an overloaded setting, it will blow the internal fuse.
Can I measure amps without breaking the circuit?
Yes. Use a clamp meter instead of a standard multimeter. A clamp meter measures current by clamping its jaws around a single wire. It detects the magnetic field created by current flow and calculates the amperage without any need to break the circuit or connect in series.
What is the difference between amps and milliamps?
Amps (A) and milliamps (mA) are both units of electrical current. One amp equals 1,000 milliamps. Milliamps are used for small currents like parasitic draw testing. Amps are used for larger currents like motor testing or alternator output.
Should I use a clamp meter or multimeter to measure amps?
Use a multimeter for small currents like a parasitic draw test — it is more accurate in the milliamp range. Use a clamp meter for large currents above 10A or for measuring current in live household circuits — it is safer because it does not require breaking the circuit.
Conclusion
Measuring amps with a multimeter is one of the most powerful diagnostic tests you can do.
For a parasitic draw test, connect your multimeter in series with the negative battery terminal, set it to DC milliamps, and wait for the reading to stabilize. A normal reading is under 80mA. Anything above 100mA needs investigation.
Remember to always plug the red probe into the A port — not the VΩ port. Always start on the highest range setting and work down. And always switch back to the VΩ port when you are done measuring current.
For large current measurements or live AC circuits, use a clamp meter. It is safer, easier, and does not require breaking the circuit.
Ready to go deeper? Check out our Testing Batteries Guide to learn how voltage and current testing work together for a complete battery diagnosis.